***
title: Microsoft AD FS
updated: 2024-07-24T00:00:00.000Z
max-toc-depth: 2
----------------
**[SSO with Microsoft AD FS is available with Postman Enterprise plans.](https://www.postman.com/pricing/)**
To configure SSO with [Microsoft Active Directory Federation Services](https://learn.microsoft.com/en-gb/windows-server/identity/ad-fs/ad-fs-overview) (AD FS), you can use your Microsoft AD FS server. You must be an administrator in both Microsoft AD FS and Postman to configure SSO for your team.
Before you configure SSO with Microsoft AD FS, you must create the following:
* An Active Directory instance where all users have an email address attribute.
* An SSL certificate from the Microsoft AD FS server.
* A server that runs Microsoft Server 2012 or 2008.
After you meet these minimum requirements, install Microsoft AD FS on your server. To configure and install Microsoft AD FS, see [Deploy and configure AD FS](https://learn.microsoft.com/en-us/previous-versions/dynamicscrm-2016/deployment-administrators-guide/gg188612\(v=crm.8\)) in the Microsoft Knowledge Base.
## Configuring SSO with Microsoft AD FS
Before configuring your server in Microsoft AD FS, you must [configure SSO in Postman](/docs/administration/sso/admin-sso/). When choosing the **Authentication Type**, select **AD FS**. Name your authentication and click **Continue**.
 To continue configuring your server, complete the following tasks in order:
* [Add a relying party trust](#add-a-relying-party-trust)
* [Create claim rules](#create-claim-rules)
* [Change the hash algorithm](#change-the-hash-algorithm)
* [Enable the RelayState parameter on your servers](#enable-the-relaystate-parameter-on-your-servers)
* [Submit identity provider details to Postman](#submit-identity-provider-details-to-postman)
### Add a relying party trust
A relying party trust defines the connection between Microsoft AD FS and Postman.
1. Open AD FS Management on your computer.
2. Select the **Relying Party Trusts** folder.
3. On the Actions sidebar, click **Add Relying Party Trust** to start the configuration wizard for a new trust.
4. In the Welcome screen, click **Start**.

5. In the **Select Data Source** screen, select **Enter data about the party manually** and then click **Next**.
6. In the **Specify Display Name** screen, enter a display name you'll recognize later and then click **Next**. You can optionally add notes.
7. In the **Choose Profile** screen, click **AD FS profile** and then click **Next**.
8. In the Configure Certificate screen, upload the **Encryption Certificate** downloaded from Postman or use the default certificate settings, and then click **Next**.

9. In the **Configure URL** screen, click **Enable support for the SAML 2.0 WebSSO protocol**. Take the **ACS URL** from Postman and add it as your **Relying party SAML 2.0 SSO service URL**, and then click **Next**.

10. In the **Configure Identifiers** screen, take the **Entity ID** from Postman and add it as your **Relying party trust identifier**. Click **Add**, and then click **Next**.

11. In the **Configure Multi-factor Authentication Now?** screen, select **I do not want to configure multi-factor authentication settings for this relying party trust at this time**.
12. In the **Choose Issuance Authorization Rules** screen, click **Permit all users to access this relying party** and then click **Next**.
13. In the **Ready to Add Trust** screen, review your settings and then click **Next**.
14. In the **Finish** screen, click **Close** to exit and open the [Claim Rules editor](#create-claim-rules).
### Create claim rules
After you create a relying party trust, you can create two claim rules.
1. Open AD FS Management on your computer.
2. Select the **Relying Party Trusts** folder, and then select the [relying party trust you created](#add-a-relying-party-trust).
3. On the **Actions** sidebar, click **Edit Claim Rules** to start the configuration wizard for a new rule.
4. Click **Add Rule** to create a new rule.

5. In the **Select Rule Template** screen, select **Send LDAP Attributes as Claims** as the claim rule template, and then click **Next**.
6. In the **Configure Rule** screen, enter a claim rule name you'll recognize later. Select **Active Directory** as the attribute store. In the **LDAP Attribute** column, select **E-Mail Addresses**. In the **Outgoing Claim Type** column, select **E-Mail Address**. Then click **Finish**.

7. Select **Add Rule** to create another new rule.
8. In the **Select Rule Template** screen, select **Transform an Incoming Claim** as the claim rule template, and then click **Next**.
9. In the **Configure Rule** screen, enter a claim rule name you'll recognize later. Select **E-mail Address** as the incoming claim type. Select **Name ID** as the outgoing claim type. Select **Email** as the outgoing name ID format. Select **Pass through all claim values**. Then click **Finish**.

10. Click **Apply**, and then click **OK** to save the new rules.

### Change the hash algorithm
To change the hash algorithm for the relying party trust, do the following:
1. Open AD FS Management on your computer.
2. Select the **Relying Party Trusts** folder, and then select the [relying party trust you created](#add-a-relying-party-trust).
3. In the **Actions** sidebar, click **Properties**.
4. Click the **Advanced** tab. Select **SHA-1** as the secure hash algorithm.
5. Click **Apply**, and then click **OK**.

### Enable the RelayState parameter on your servers
Enable the RelayState parameter on your Microsoft AD FS servers, and then restart your service.
1. Open the configuration file.
* For Microsoft AD FS 2.0, open the following file in a text editor:
```shell
%systemroot%\inetpub\adfs\ls\web.config
```
* For Microsoft AD FS 3.0, open the following file in a text editor:
```shell
%systemroot%\ADFS\Microsoft.IdentityServer.Servicehost.exe.config
```
2. In the `` section, add a line for `` as follows, and then save the change:
```shell
...
```
3. For Microsoft AD FS 2.0, run `IISReset` to restart IIS.
4. For both Microsoft AD FS 2.0 and 3.0, restart the Active Directory Federation Services (`adfssrv`) service.
If you're using Microsoft AD FS 3.0 you only need to restart the Active Directory Federation Services (`adfssrv`) service on your Microsoft AD FS 3.0 servers, not the WAP servers.
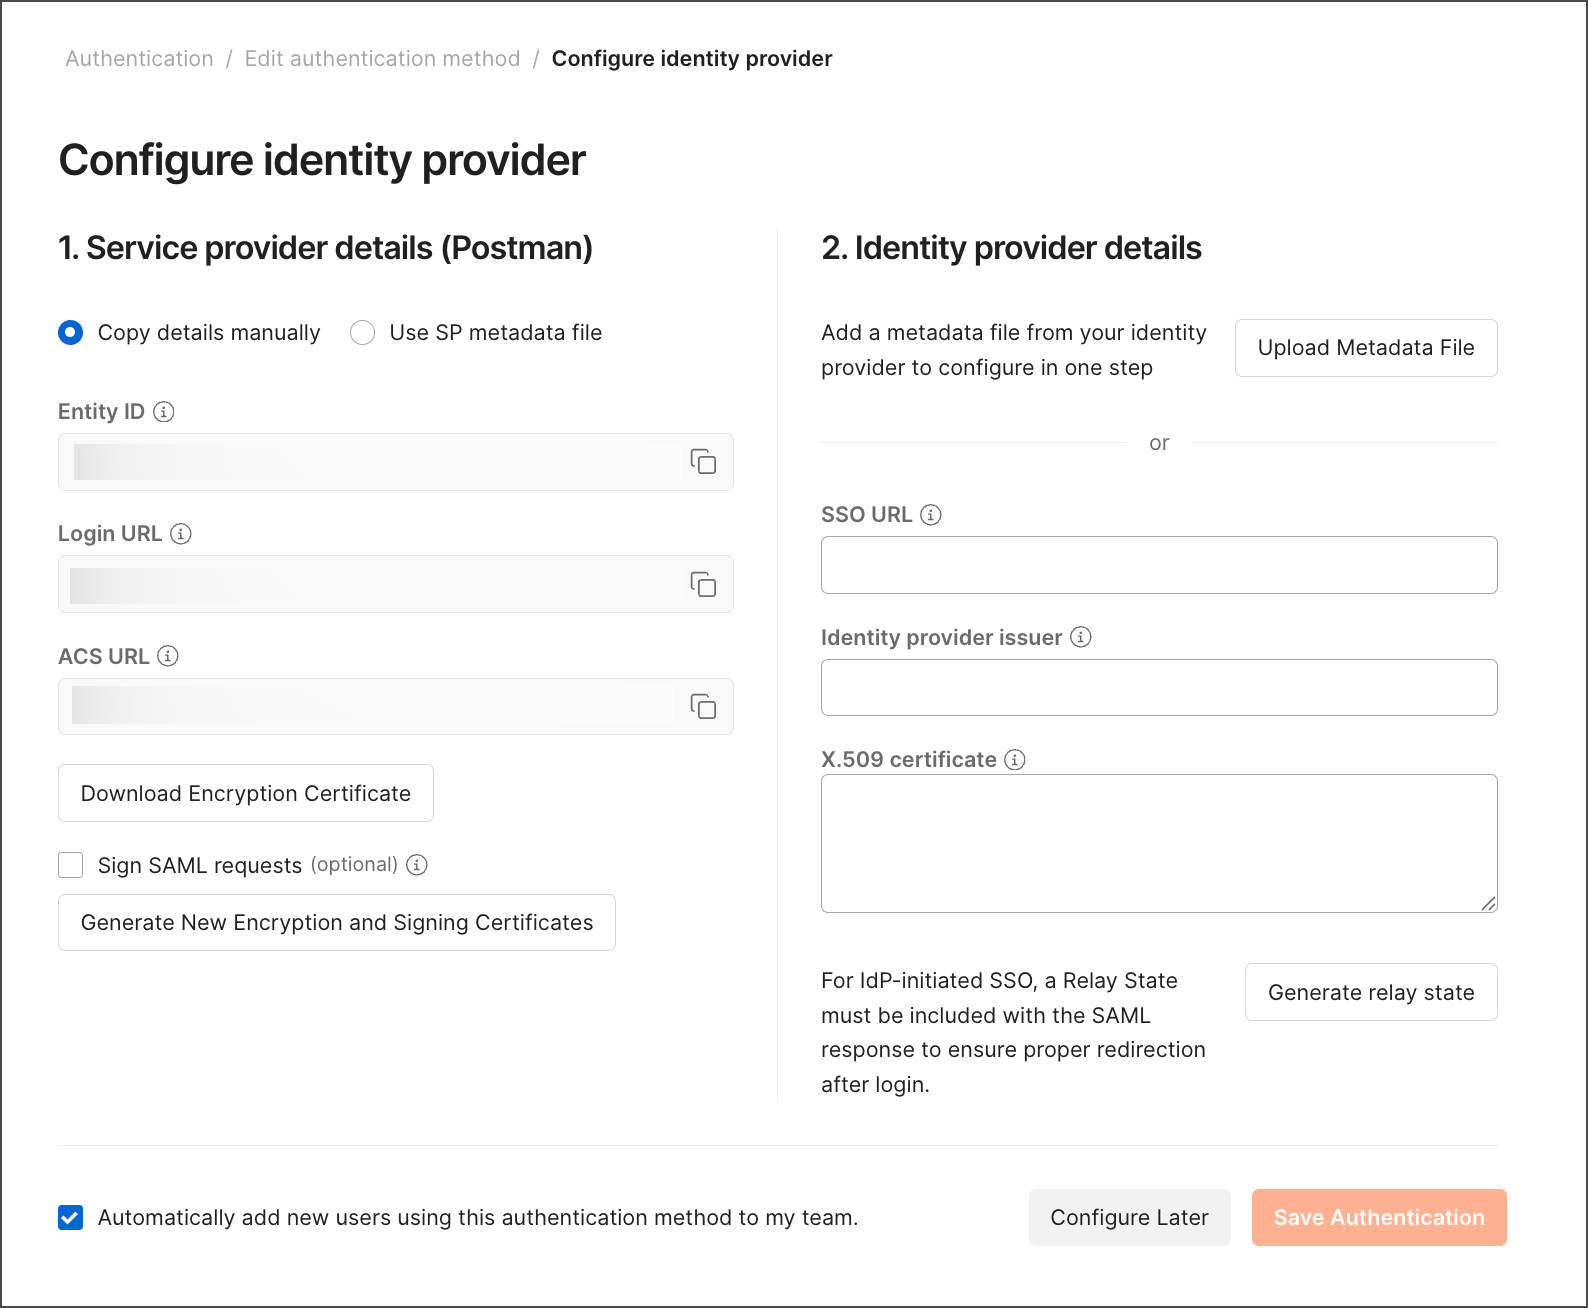
### Submit identity provider details to Postman
After you configure your server, submit your identity provider's (IdP) details to Postman.
1. Download the Federation Metadata XML file from [Microsoft AD FS](https://adfshelp.microsoft.com/MetadataExplorer/GetFederationMetadata). This file will be in the following format: `https:///federationmetadata/2007-06/federationMetadata.xml`.
2. In Postman, upload the Federation Metadata XML file under **Identity provider metadata** file. Or, you can enter the **SSO URL**, **Identity provider issuer**, and **X.509 Certificate** individually under **Identity provider details**.
3. Click **Save Authentication** in Postman.
To continue configuring your server, complete the following tasks in order:
* [Add a relying party trust](#add-a-relying-party-trust)
* [Create claim rules](#create-claim-rules)
* [Change the hash algorithm](#change-the-hash-algorithm)
* [Enable the RelayState parameter on your servers](#enable-the-relaystate-parameter-on-your-servers)
* [Submit identity provider details to Postman](#submit-identity-provider-details-to-postman)
### Add a relying party trust
A relying party trust defines the connection between Microsoft AD FS and Postman.
1. Open AD FS Management on your computer.
2. Select the **Relying Party Trusts** folder.
3. On the Actions sidebar, click **Add Relying Party Trust** to start the configuration wizard for a new trust.
4. In the Welcome screen, click **Start**.

5. In the **Select Data Source** screen, select **Enter data about the party manually** and then click **Next**.
6. In the **Specify Display Name** screen, enter a display name you'll recognize later and then click **Next**. You can optionally add notes.
7. In the **Choose Profile** screen, click **AD FS profile** and then click **Next**.
8. In the Configure Certificate screen, upload the **Encryption Certificate** downloaded from Postman or use the default certificate settings, and then click **Next**.

9. In the **Configure URL** screen, click **Enable support for the SAML 2.0 WebSSO protocol**. Take the **ACS URL** from Postman and add it as your **Relying party SAML 2.0 SSO service URL**, and then click **Next**.

10. In the **Configure Identifiers** screen, take the **Entity ID** from Postman and add it as your **Relying party trust identifier**. Click **Add**, and then click **Next**.

11. In the **Configure Multi-factor Authentication Now?** screen, select **I do not want to configure multi-factor authentication settings for this relying party trust at this time**.
12. In the **Choose Issuance Authorization Rules** screen, click **Permit all users to access this relying party** and then click **Next**.
13. In the **Ready to Add Trust** screen, review your settings and then click **Next**.
14. In the **Finish** screen, click **Close** to exit and open the [Claim Rules editor](#create-claim-rules).
### Create claim rules
After you create a relying party trust, you can create two claim rules.
1. Open AD FS Management on your computer.
2. Select the **Relying Party Trusts** folder, and then select the [relying party trust you created](#add-a-relying-party-trust).
3. On the **Actions** sidebar, click **Edit Claim Rules** to start the configuration wizard for a new rule.
4. Click **Add Rule** to create a new rule.

5. In the **Select Rule Template** screen, select **Send LDAP Attributes as Claims** as the claim rule template, and then click **Next**.
6. In the **Configure Rule** screen, enter a claim rule name you'll recognize later. Select **Active Directory** as the attribute store. In the **LDAP Attribute** column, select **E-Mail Addresses**. In the **Outgoing Claim Type** column, select **E-Mail Address**. Then click **Finish**.

7. Select **Add Rule** to create another new rule.
8. In the **Select Rule Template** screen, select **Transform an Incoming Claim** as the claim rule template, and then click **Next**.
9. In the **Configure Rule** screen, enter a claim rule name you'll recognize later. Select **E-mail Address** as the incoming claim type. Select **Name ID** as the outgoing claim type. Select **Email** as the outgoing name ID format. Select **Pass through all claim values**. Then click **Finish**.

10. Click **Apply**, and then click **OK** to save the new rules.

### Change the hash algorithm
To change the hash algorithm for the relying party trust, do the following:
1. Open AD FS Management on your computer.
2. Select the **Relying Party Trusts** folder, and then select the [relying party trust you created](#add-a-relying-party-trust).
3. In the **Actions** sidebar, click **Properties**.
4. Click the **Advanced** tab. Select **SHA-1** as the secure hash algorithm.
5. Click **Apply**, and then click **OK**.

### Enable the RelayState parameter on your servers
Enable the RelayState parameter on your Microsoft AD FS servers, and then restart your service.
1. Open the configuration file.
* For Microsoft AD FS 2.0, open the following file in a text editor:
```shell
%systemroot%\inetpub\adfs\ls\web.config
```
* For Microsoft AD FS 3.0, open the following file in a text editor:
```shell
%systemroot%\ADFS\Microsoft.IdentityServer.Servicehost.exe.config
```
2. In the `` section, add a line for `` as follows, and then save the change:
```shell
...
```
3. For Microsoft AD FS 2.0, run `IISReset` to restart IIS.
4. For both Microsoft AD FS 2.0 and 3.0, restart the Active Directory Federation Services (`adfssrv`) service.
If you're using Microsoft AD FS 3.0 you only need to restart the Active Directory Federation Services (`adfssrv`) service on your Microsoft AD FS 3.0 servers, not the WAP servers.
### Submit identity provider details to Postman
After you configure your server, submit your identity provider's (IdP) details to Postman.
1. Download the Federation Metadata XML file from [Microsoft AD FS](https://adfshelp.microsoft.com/MetadataExplorer/GetFederationMetadata). This file will be in the following format: `https:///federationmetadata/2007-06/federationMetadata.xml`.
2. In Postman, upload the Federation Metadata XML file under **Identity provider metadata** file. Or, you can enter the **SSO URL**, **Identity provider issuer**, and **X.509 Certificate** individually under **Identity provider details**.
3. Click **Save Authentication** in Postman.