***
title: Edit your API specification
approved: 2026-02-05T00:00:00.000Z
max-toc-depth: 2
ux: v12
-------
Edit your specification to update the structure and design of your API. [Navigate your specification](#navigate-your-specification) using the outline in the sidebar and [the command palette](#navigate-using-the-command-palette) to find and jump to specific sections. You can [add new sections using snippets](#add-new-sections-using-snippets) to add pre-formatted blocks that you can fill out. You can [generate a schema from a JSON request or response body](#generate-a-schema-from-a-json-body), and add the schema directly to your specification. You can also organize your OpenAPI or protobuf specifications into [multiple files and folders](#add-files-and-folders).
As you edit your specification, Postman offers [autocomplete suggestions](#edit-your-specification-using-autocomplete) for properties and valid values. You can also view others' contributions and updates to your specification with the [changelog](#view-specification-changes-with-the-changelog).
Postman identifies [syntax errors and API governance issues](/docs/design-apis/specifications/validate-a-specification/), and shows details so you can fix them. Postman also displays a [live preview of your API's documentation](/docs/design-apis/specifications/view-live-documentation/) in the right sidebar as you edit your specification.
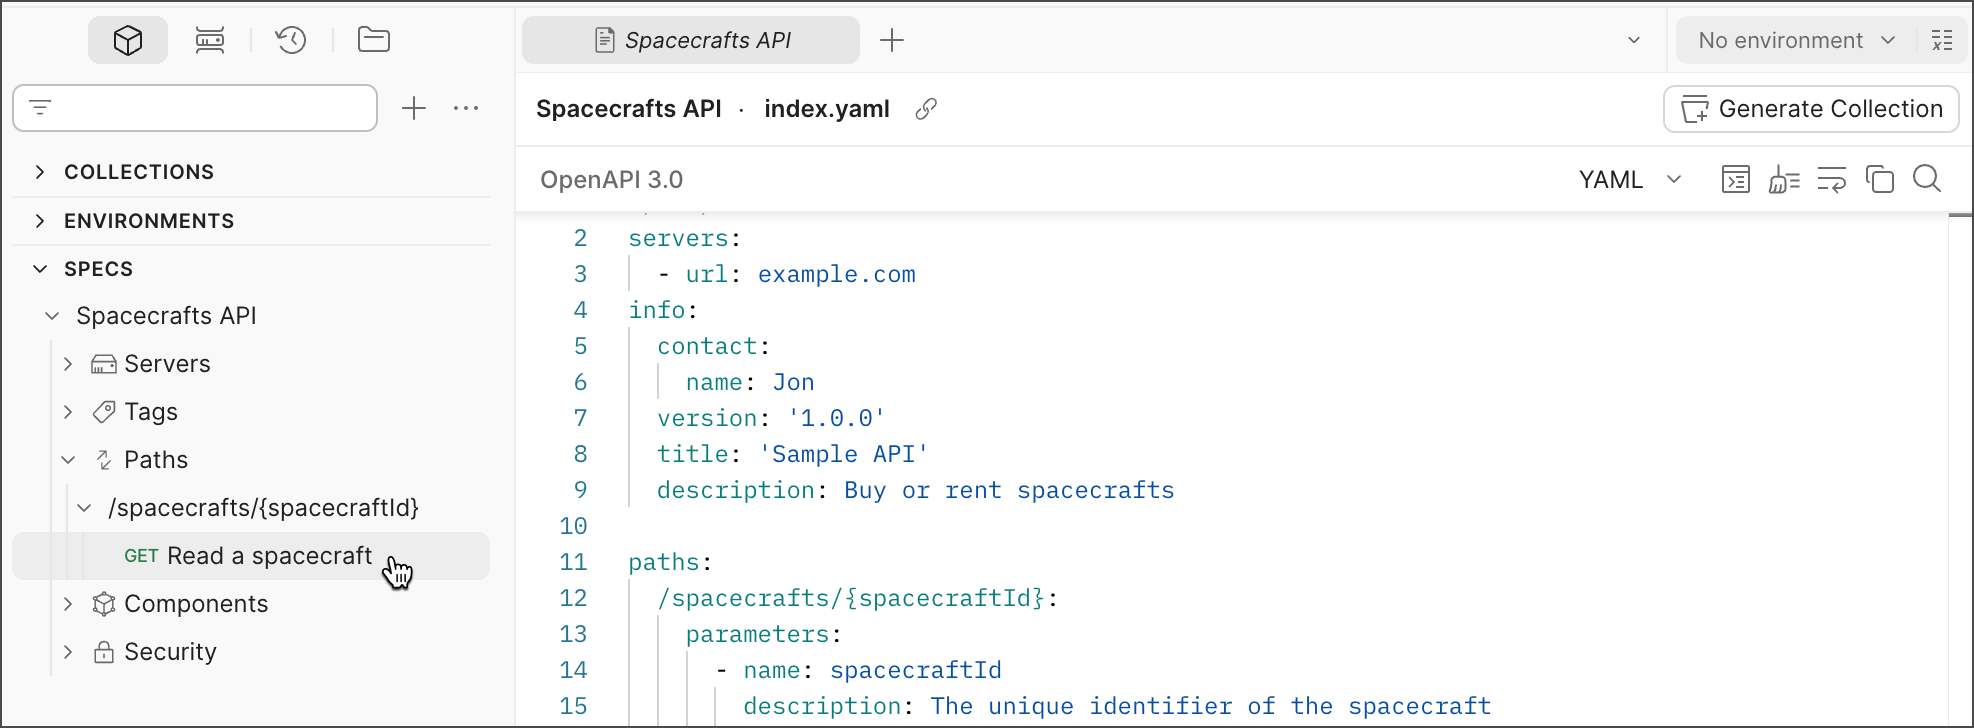
## Navigate your specification
Your specification defines the structure of your API. You can navigate your specification from the outline in the sidebar. If your specification is organized into multiple files and folders, you can use the outline to navigate to the file with that section. You can also navigate your specification using [the command palette](#navigate-using-the-command-palette) to jump to specific sections.
The sidebar displays an outline of your API specification. Use the arrows to expand or collapse sections. Select a section in the outline to jump to it in the specification. New sections appear in the outline as you add them to your specification.
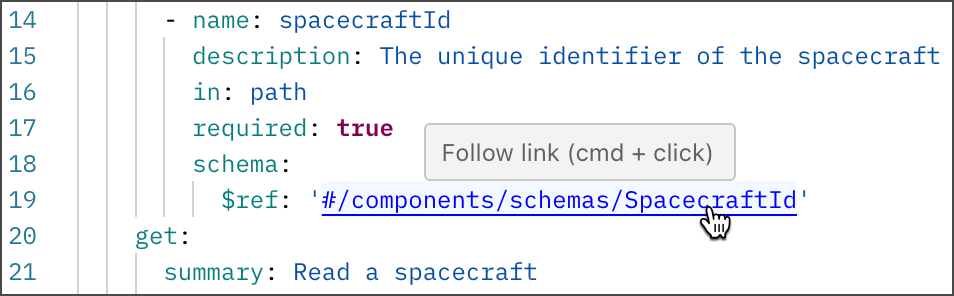
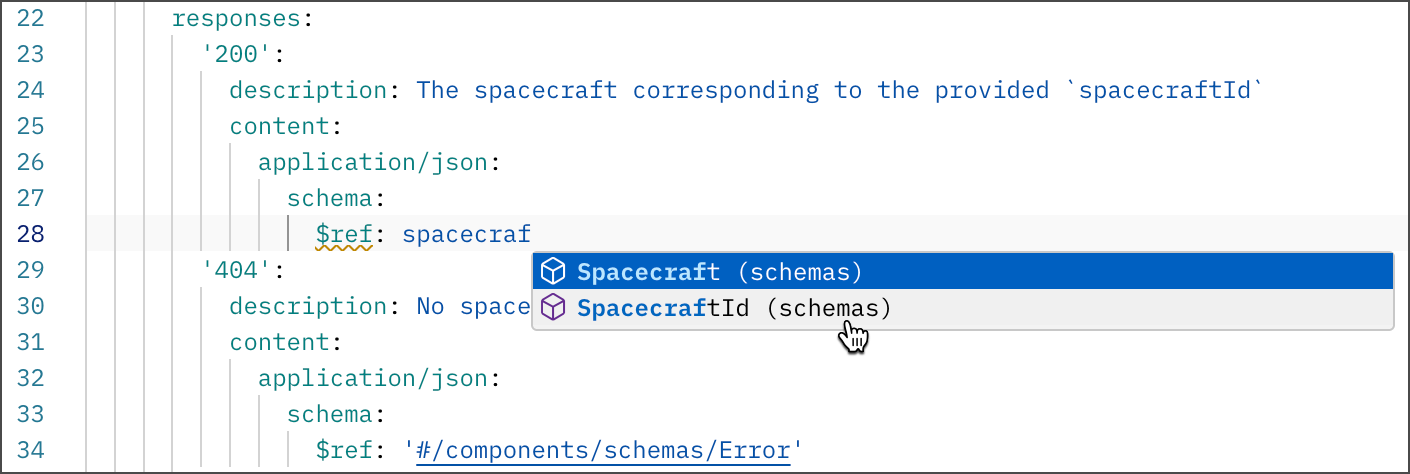
To jump to a referenced component, hover over a `#ref` component and click the component while selecting **⌘** or **Ctrl**.
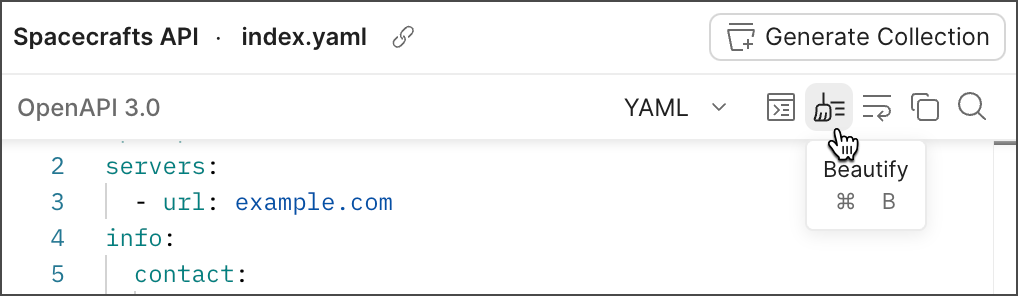
In the upper right are options to convert your specification's format (JSON or YAML), beautify the content, wrap text, copy the specification, and search. When you finish editing your specification, click **Save**.
If you [generated a collection](/docs/design-apis/specifications/generate-collections/#generate-collections-from-a-specification) from an OpenAPI 3.0 specification, make sure to [update the collection](/docs/design-apis/specifications/generate-collections/#keep-collections-in-sync-with-an-openapi-specification) once you're done making changes.
### Navigate using the command palette
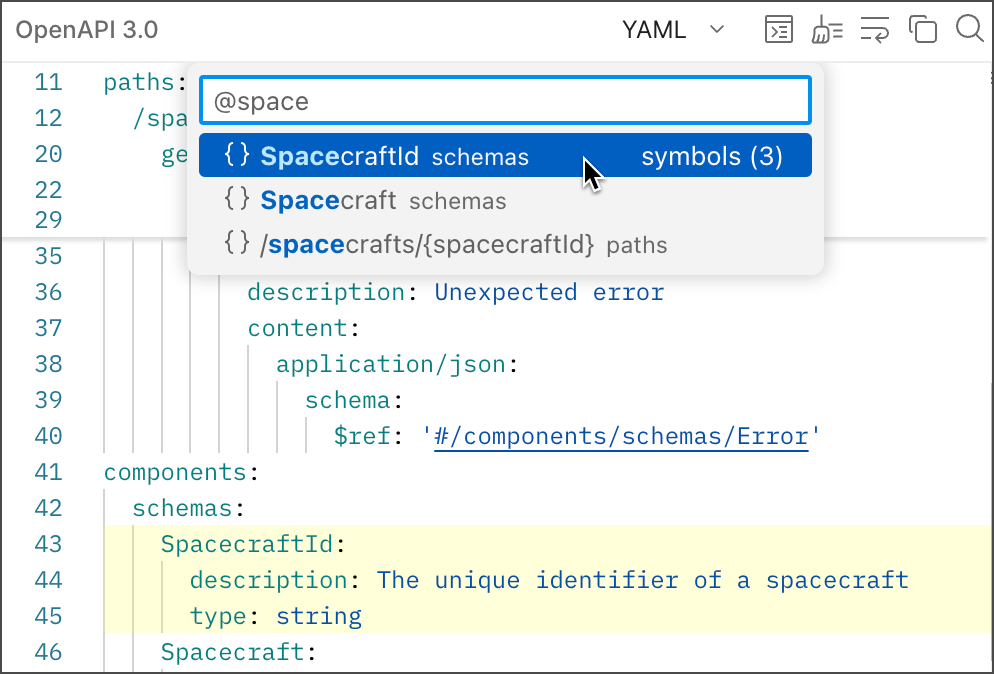
Find items in your specification and jump to them using the command palette. To show the command palette, click  **View Command Palette** in the upper right. You can also click **⌘+Shift+O** or **Ctrl+Shift+O**.
In the command palette, click an item in the list to jump to that item in the specification. To filter the list, enter "@" and begin typing the item you want to find.
You can use a colon to jump to a specific line and character number in the specification. To jump to a line, enter a colon followed by the line number, such as ":20". To jump to a character on the line, enter another colon followed by the character number, such as ":20:3". Then click **Go to line \** or **Go to line \ and character \**.
You can also use the command palette to perform editing commands. In the command palette, enter ">" and click the editing command you want to perform. For example, click **Fold All** to collapse all sections in the specification, or click **Unfold All** to expand all sections.
## Add new sections using snippets
Snippets aren't supported for protobuf or GraphQL specifications.
*Snippets* are pre-formatted blocks you can fill out to build your OpenAPI or AsyncAPI specification. To add a new section using a snippet, do the following:
1. In the specification outline, click
**View Command Palette** in the upper right. You can also click **⌘+Shift+O** or **Ctrl+Shift+O**.
In the command palette, click an item in the list to jump to that item in the specification. To filter the list, enter "@" and begin typing the item you want to find.
You can use a colon to jump to a specific line and character number in the specification. To jump to a line, enter a colon followed by the line number, such as ":20". To jump to a character on the line, enter another colon followed by the character number, such as ":20:3". Then click **Go to line \** or **Go to line \ and character \**.

You can also use the command palette to perform editing commands. In the command palette, enter ">" and click the editing command you want to perform. For example, click **Fold All** to collapse all sections in the specification, or click **Unfold All** to expand all sections.
## Add new sections using snippets
Snippets aren't supported for protobuf or GraphQL specifications.
*Snippets* are pre-formatted blocks you can fill out to build your OpenAPI or AsyncAPI specification. To add a new section using a snippet, do the following:
1. In the specification outline, click  next to a supported section type to add it to your specification using a snippet. Clicking displays a dropdown list if the section supports more than one section type.
If you're adding a snippet to an OpenAPI specification with [multiple files and folders](#add-files-and-folders), Postman identifies the correct file to add the snippet.
If the **Servers** or **Tags** sections are missing from your OpenAPI specification, you can expand these sections in the specification outline and click **Add**. This adds the respective section to your specification using snippets.
2. Make a selection from the dropdown list if the section supports more than one section type:
* When you click next to the **Schemas** (OpenAPI 3.0 or 3.1) and **Definitions** (OpenAPI 2.0) section, you can create a new schema from scratch or [generate a schema from a JSON body](#generate-a-schema-from-a-json-body).
* (*OpenAPI 3.0 and 3.1 only*) When you click next to the **Components** section, you can select a supported section type to add it using a snippet.
3. Add your content to section. You can use the **Tab** key to move between fields in the generated snippet.
If you're on a Postman Enterprise plan, you can [create reusable components](/docs/design-apis/specifications/component-library/) for OpenAPI specifications in your team's Component Library. This enables your team to maintain and standardize components in a single place.
Note the following when using snippets with OpenAPI specifications:
* You can't add sections using snippets if Postman identifies syntax errors in your specification. Learn how to [view and fix syntax errors in your specification](/docs/design-apis/specifications/validate-a-specification/#view-syntax-errors-in-your-specification).
* You can't use snippets to add more sections than are needed to complete the specification. For example, if an operation already has a request body, Postman prevents you from adding another request body using snippets.
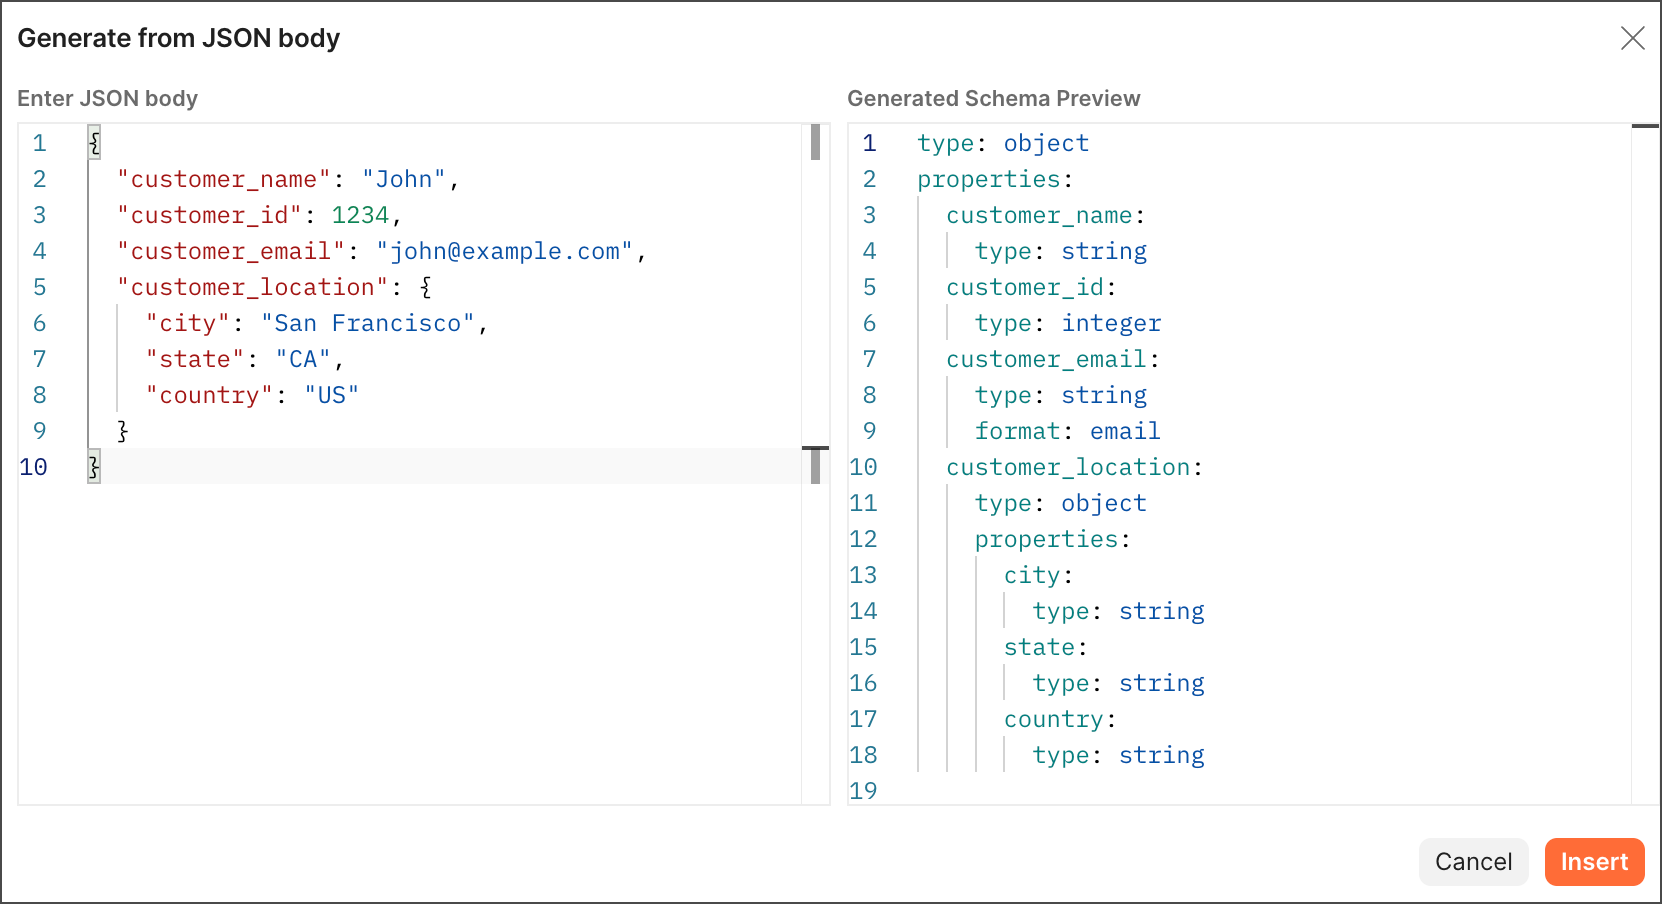
## Generate a schema from a JSON body
You can generate a new schema from a request or response body in JSON format, instead of adding a new schema using a snippet.
To generate a new schema using a JSON body, do the following:
1. Choose one of the following based on the type of specification:
* **OpenAPI 3.0 or 3.1** - Click **Components > Schemas**, click **Add Schema**, then select **Generate from JSON body**.
* **OpenAPI 2.0** - Click **Add Definition** then select **Generate from JSON body**.
* **AsyncAPI 2.0** - Click **Components > Schemas**, then click **Add schema**.
2. In the **Enter JSON body** pane, enter a request or response body in JSON format that represents the schema you'd like to add to your specification. The JSON body will be converted into the specification's language and format in the **Generated Schema Preview** pane.
3. Click **Insert** to add the generated schema to your specification.
If you're adding a generated schema to an OpenAPI specification with [multiple files and folders](#add-files-and-folders), Postman identifies the correct file to add the schema.
4. Add a name for your schema.
## Add files and folders
You can add files and folders to an OpenAPI or protobuf [format](/docs/design-apis/specifications/add-files-to-a-specification#supported-multi-file-specification-formats) file to turn it into a multi-file specification. This enables you to better organize and manage your specification. Learn how to [create and manage a multi-file specification](/docs/design-apis/specifications/add-files-to-a-specification/).
## Edit your specification using autocomplete
Postman offers autocomplete suggestions as you edit your specification. Postman suggests properties and valid values based on the specification type and existing content. Postman also identifies [syntax errors and API governance issues](/docs/design-apis/specifications/validate-a-specification/), and shows details so you can fix them.
## View specification changes with the changelog
The changelog provides a complete list of changes and revisions to a specification in chronological order. You can use it to view the time and date at which changes occurred, the users who made changes, and where the edits were made in the specification. To view the changelog, click
next to a supported section type to add it to your specification using a snippet. Clicking displays a dropdown list if the section supports more than one section type.
If you're adding a snippet to an OpenAPI specification with [multiple files and folders](#add-files-and-folders), Postman identifies the correct file to add the snippet.
If the **Servers** or **Tags** sections are missing from your OpenAPI specification, you can expand these sections in the specification outline and click **Add**. This adds the respective section to your specification using snippets.
2. Make a selection from the dropdown list if the section supports more than one section type:
* When you click next to the **Schemas** (OpenAPI 3.0 or 3.1) and **Definitions** (OpenAPI 2.0) section, you can create a new schema from scratch or [generate a schema from a JSON body](#generate-a-schema-from-a-json-body).
* (*OpenAPI 3.0 and 3.1 only*) When you click next to the **Components** section, you can select a supported section type to add it using a snippet.
3. Add your content to section. You can use the **Tab** key to move between fields in the generated snippet.
If you're on a Postman Enterprise plan, you can [create reusable components](/docs/design-apis/specifications/component-library/) for OpenAPI specifications in your team's Component Library. This enables your team to maintain and standardize components in a single place.
Note the following when using snippets with OpenAPI specifications:
* You can't add sections using snippets if Postman identifies syntax errors in your specification. Learn how to [view and fix syntax errors in your specification](/docs/design-apis/specifications/validate-a-specification/#view-syntax-errors-in-your-specification).
* You can't use snippets to add more sections than are needed to complete the specification. For example, if an operation already has a request body, Postman prevents you from adding another request body using snippets.
## Generate a schema from a JSON body
You can generate a new schema from a request or response body in JSON format, instead of adding a new schema using a snippet.
To generate a new schema using a JSON body, do the following:
1. Choose one of the following based on the type of specification:
* **OpenAPI 3.0 or 3.1** - Click **Components > Schemas**, click **Add Schema**, then select **Generate from JSON body**.
* **OpenAPI 2.0** - Click **Add Definition** then select **Generate from JSON body**.
* **AsyncAPI 2.0** - Click **Components > Schemas**, then click **Add schema**.
2. In the **Enter JSON body** pane, enter a request or response body in JSON format that represents the schema you'd like to add to your specification. The JSON body will be converted into the specification's language and format in the **Generated Schema Preview** pane.
3. Click **Insert** to add the generated schema to your specification.
If you're adding a generated schema to an OpenAPI specification with [multiple files and folders](#add-files-and-folders), Postman identifies the correct file to add the schema.
4. Add a name for your schema.

## Add files and folders
You can add files and folders to an OpenAPI or protobuf [format](/docs/design-apis/specifications/add-files-to-a-specification#supported-multi-file-specification-formats) file to turn it into a multi-file specification. This enables you to better organize and manage your specification. Learn how to [create and manage a multi-file specification](/docs/design-apis/specifications/add-files-to-a-specification/).
## Edit your specification using autocomplete
Postman offers autocomplete suggestions as you edit your specification. Postman suggests properties and valid values based on the specification type and existing content. Postman also identifies [syntax errors and API governance issues](/docs/design-apis/specifications/validate-a-specification/), and shows details so you can fix them.

## View specification changes with the changelog
The changelog provides a complete list of changes and revisions to a specification in chronological order. You can use it to view the time and date at which changes occurred, the users who made changes, and where the edits were made in the specification. To view the changelog, click  **Changelog** in the right sidebar.
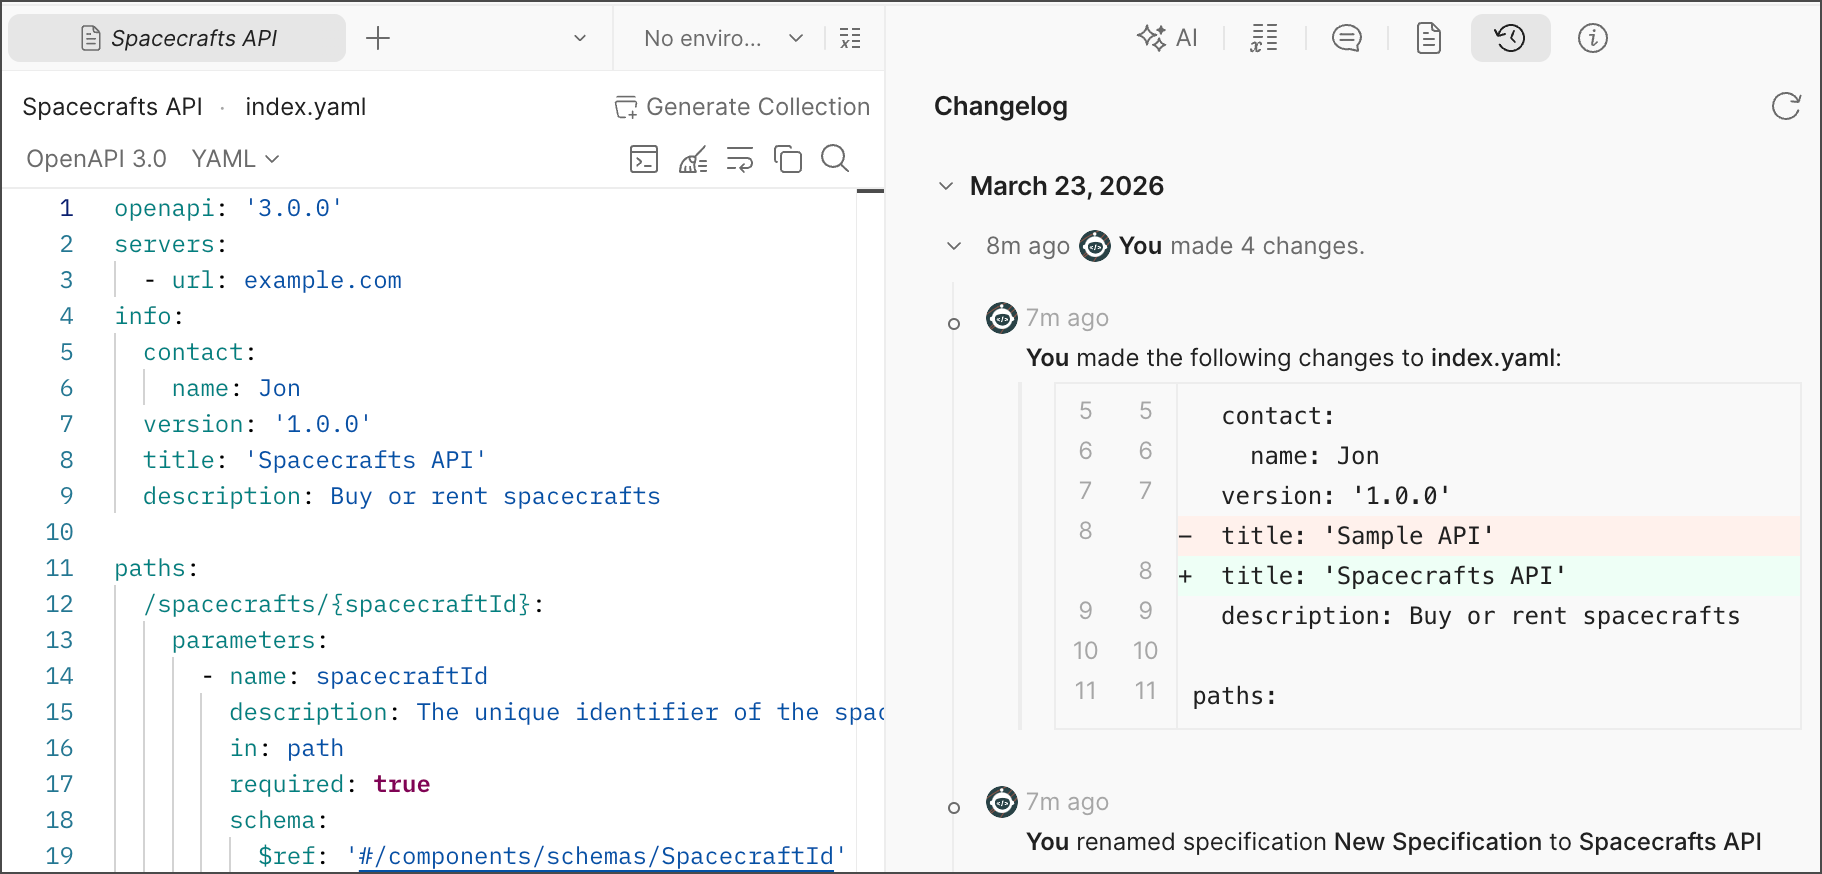
Postman groups changes made within several minutes of each other into sessions for readability. You can click a session in the changelog to review its changes. If a diff is too large to view in the changelog, you can hover over the diff and click it to open the complete diff in a new window.
To refresh the changelog, click
**Changelog** in the right sidebar.

Postman groups changes made within several minutes of each other into sessions for readability. You can click a session in the changelog to review its changes. If a diff is too large to view in the changelog, you can hover over the diff and click it to open the complete diff in a new window.
To refresh the changelog, click  **Refresh changelog**.