> For clean Markdown content of this page, append .md to this URL. For the complete documentation index, see https://learning.postman.com/llms.txt.
# Edit an OpenAPI specification with the Visual editor
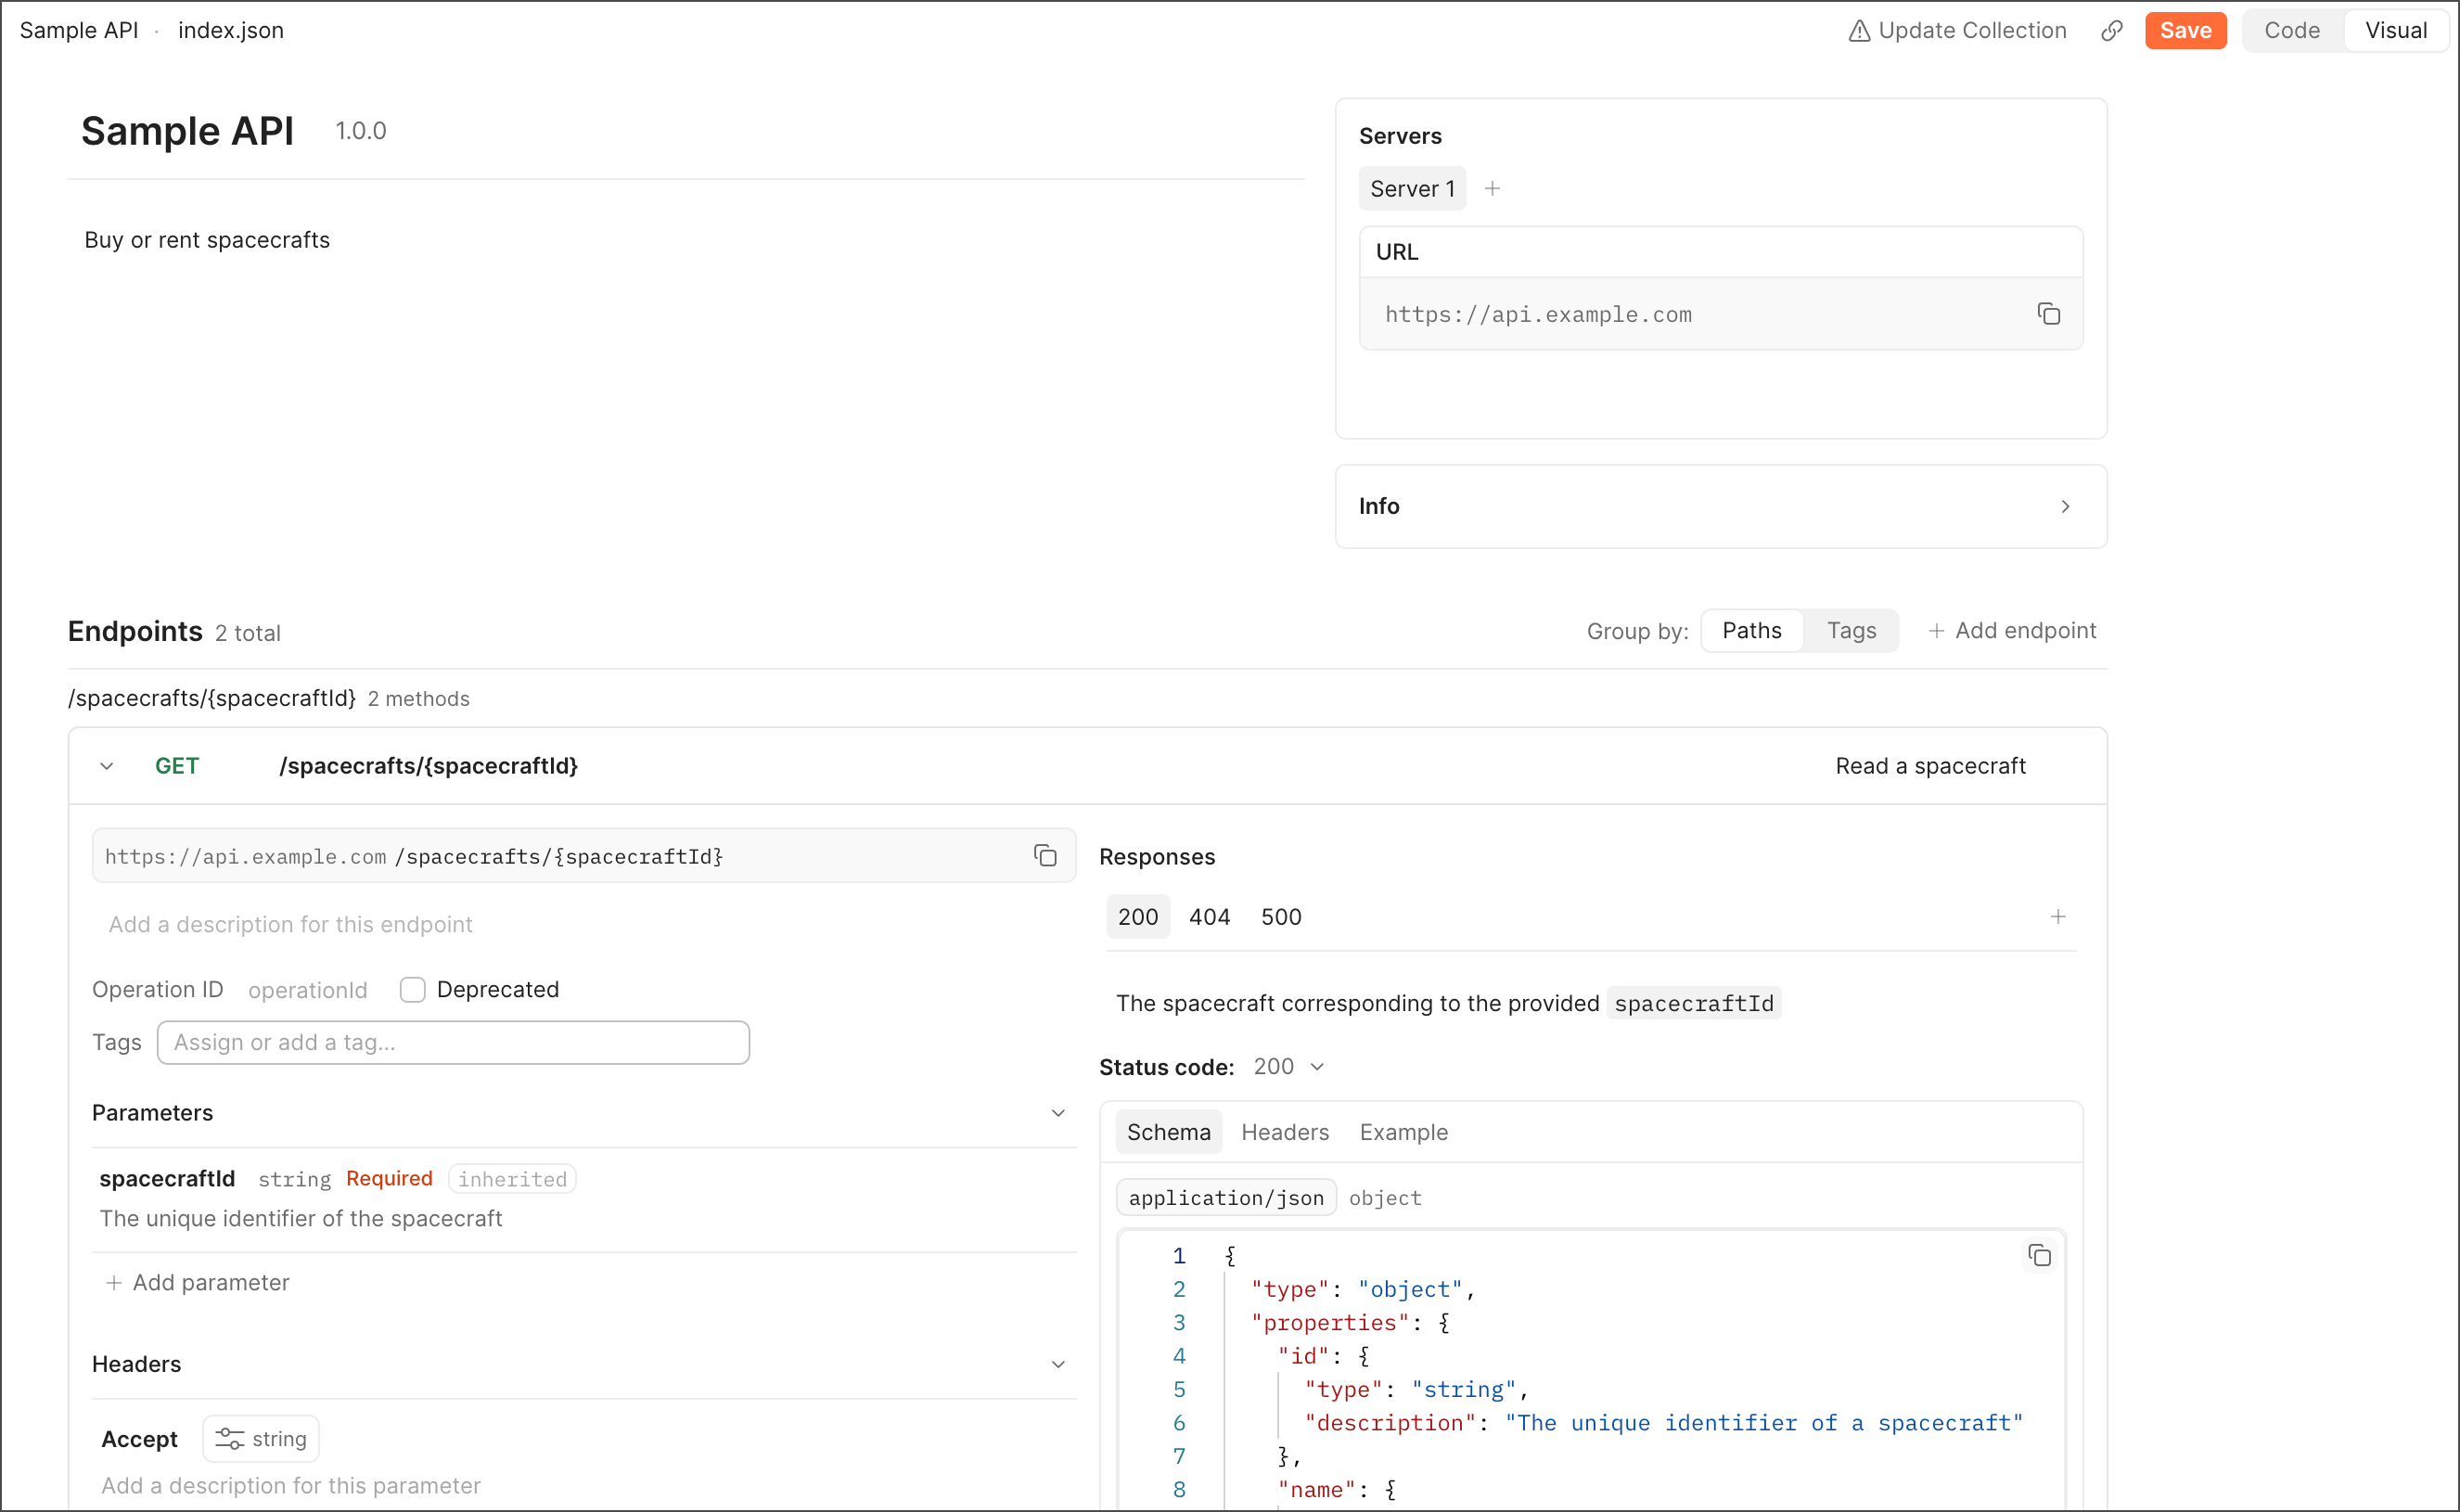
Design your OpenAPI specifications interactively using Postman's Visual editor. The Visual editor provides a form-based view of your API's structure, so you can create and edit endpoints, schemas, responses, and more without writing YAML or JSON directly.
The Visual editor is only available for OpenAPI specifications. To edit other supported specifications, or to edit an OpenAPI specification in YAML or JSON, switch to the default [Code editor](/docs/design-apis/specifications/edit-a-specification/).
 The Visual editor is ideal for users who want to:
* Design a new OpenAPI specification without writing YAML or JSON syntax.
* Add or update endpoints, schemas, and other components using guided forms.
* Visualize the structure of your OpenAPI specification in an intuitive way.
To enable the Visual editor for an OpenAPI specification, click **Visual** in the top-right corner of the editor. The Visual editor opens, displaying a form-based view of your specification. To save any changes you make to the specification, click **Save** in the top-right corner of the editor.
## Edit specification metadata
The top of the Visual editor displays your specification's metadata, which corresponds to the `info` and `servers` sections of an OpenAPI specification. Click any field to edit it, and click outside of the field to apply your changes. You can edit the following:
* The name of your API.
* The API's version, such as `1.0.0`.
* A description of your API and its purpose. This supports Markdown and plain text.
* **Servers** — A list of servers that host your API. To add a server, click **+ Add server**. This section includes the following fields:
* The base URL for your API, such as `https://example.com`. To copy it, click
The Visual editor is ideal for users who want to:
* Design a new OpenAPI specification without writing YAML or JSON syntax.
* Add or update endpoints, schemas, and other components using guided forms.
* Visualize the structure of your OpenAPI specification in an intuitive way.
To enable the Visual editor for an OpenAPI specification, click **Visual** in the top-right corner of the editor. The Visual editor opens, displaying a form-based view of your specification. To save any changes you make to the specification, click **Save** in the top-right corner of the editor.
## Edit specification metadata
The top of the Visual editor displays your specification's metadata, which corresponds to the `info` and `servers` sections of an OpenAPI specification. Click any field to edit it, and click outside of the field to apply your changes. You can edit the following:
* The name of your API.
* The API's version, such as `1.0.0`.
* A description of your API and its purpose. This supports Markdown and plain text.
* **Servers** — A list of servers that host your API. To add a server, click **+ Add server**. This section includes the following fields:
* The base URL for your API, such as `https://example.com`. To copy it, click  **Copy**. To delete a server, click
  **Delete server**.
* A description of the server, such as "Production" or "Beta". This supports Markdown and plain text.
* **Info** — The `info` section of your OpenAPI specification, which includes the following fields:
* **Contact name**, **Contact email**, and **Contact URL** — Contact information for the person or team responsible for the API.
* **License** and **License URL** — The name of the license and a URL that links to the full license text.
* **Terms of service** — A URL that links to your API's terms of service.
## Endpoints
A specification's endpoints are in the **Endpoints** section of the Visual editor. You can use **Group by** to organize endpoints by **Path** or **Tag**.
To add a new endpoint, do the following:
1. In the **Endpoints** section, click **+ Add endpoint**.
2. Select an HTTP method for the endpoint.
3. Enter the endpoint's path.
4. Click the **New endpoint** text box in the top-right and enter a brief summary that describes what the endpoint does.
5. (Optional) Assign the endpoint to one or more tags to group it with related endpoints. To add a new tag, enter the new tag's name.
6. (Optional) Enter a description with information about the endpoint.
7. Enter an **Operation ID** to uniquely identify the endpoint.
8. Add [headers](#add-headers), [parameters](#add-parameters), a [request body](#add-a-request-body), and [responses](#add-responses) as needed for the endpoint.
### Edit or remove an endpoint
To edit an existing endpoint, click it in the **Endpoints** section and make your changes. If the endpoint is no longer in use, select **Deprecated**.
To delete an endpoint, click next to the endpoint.
### Add headers
In the endpoint's **Headers** section, click **+ Add header**, then define the following:
* Change the header's name.
* Add a description of the header.
* Click the header's type to configure the following properties:
* **Type** — The header's data type.
* **Required** — Turn on to mark the header as required.
* **Deprecated** — Turn on to mark the header as deprecated.
* **Format** — The data format.
* **Default value** — The default value if none is provided.
* **Possible enum values** — A comma-separated list of allowed values.
* **Pattern** — A regular expression the value must match.
* **Min length** and **Max length** — The minimum and maximum length of the value.
To delete a header, click next to it.
### Add parameters
In the endpoint's **Parameters** section, you can define your endpoint's query, path, and cookie parameters.
If you want to reuse an [existing parameter](#parameters) in your specification, click **+ Use existing** and select the parameter from the list. To create a new parameter, click **+ Add parameter** and define the following:
* Change the parameter's name.
* Add a description of the parameter.
* Click the parameter's type to configure the following properties:
* **Type** — The parameter's data type.
* **Required** — Turn on to mark the parameter as required.
* **Deprecated** — Turn on to mark the parameter as deprecated.
* **Format** — The data format.
* **Default value** — The default value if none is provided.
* **Possible enum values** — A comma-separated list of allowed values.
* **Pattern** — A regular expression the value must match.
* **Min length** and **Max length** — The minimum and maximum length of the value.
* Select the parameter's location. The location determines where the parameter is sent in the request.
### Add a request body
In the endpoint's **Request body** section, click **+ Add request body**. Postman adds a request body with an `application/json` media type by default. Define the following:
* Add a description of the request body.
* Select **required** to mark the request body as required.
* Click **Schema** and enter the request body's schema in the code editor. To copy the schema, click **Copy**.
* Click **Example** to view or edit a request body's examples:
* Click **+ Add** to add a new example. Enter the example in the code editor.
* To copy an example, select it and click **Copy**.
* To delete an example, select it and click next to it.
* Add a schema to the request body:
* Click **Use existing** to select from existing [schema components](#schemas).
* Click **Extract to component** to turn the inline schema into a reusable [schema component](#schemas).
To delete the request body, click next to it.
### Add responses
In the endpoint's **Responses** section, click **+ Add response** to add a new response. By default, Postman includes a `200` response. Each response is listed by its status code at the top of the section.
Select a response, then define the following:
* Add a description of the response.
* Select a **Status code** from the dropdown list, or select **Custom** to enter a custom status code.
* Click **Schema** to define the response body's schema:
* Enter the schema in the code editor. To copy the schema, click **Copy**.
* Click **Extract to component** to turn the inline schema into a reusable [schema component](#schemas).
* Click **Use existing** to reference an existing [schema component](#schemas).
* Define the response headers. Click **+ Add header**, then define the [header's properties](#add-headers).
* Click **Example** to view or edit the response's examples:
* Click **+ Add** to add a new example. Enter the example in the code editor.
* To copy an example, select it and click **Copy**.
* To delete an example, select it and click next to it.
To delete a response, click next to the **Status code** dropdown list.
## Add and edit components
Components are reusable pieces of your OpenAPI specification that you can reference from any endpoint. In the Visual editor, add and edit schemas, responses, parameters, and headers from the **Components** section. Click a component to expand it and edit its details.
When you reference components in your specification, the editor displays the component's reference. You can click the reference to view the component's details in the **Components** section of the Visual editor.
To reference a schema component from an endpoint's request or response body, click **Use existing** in the schema definition and select a schema. To turn an inline schema into a reusable schema component, click **Extract to component**.
### Schemas
The **Schemas** section displays the number of schemas defined in your specification. To add a schema, click **+ Add schema**, then enter a name for the schema. Click the schema to expand it, then update the following:
* Click the name of the schema to rename it.
* Enter a description in the **Describe this component** text box.
* Enter the JSON schema in the code editor. Click **Copy** to copy the schema.
To delete a schema, click next to the schema.
### Responses
The **Responses** section displays the number of reusable responses defined in your specification. To add a response, click **+ Add response**, then enter a name for the response. Click the response to expand it, then click **+ Add body** to define the response body. You can then define the following in the response:
* Click the name of the response to rename it.
* Enter a description in the **Response** text box. For example, "Successful response" or "404 Error".
* Enter the response body's JSON schema in the code editor. To copy it, click **Copy**. You can also choose one of the following options:
* Click **Use existing** to select from existing [schema components](#schemas).
* Click **Extract to component** to turn the inline schema into a reusable [schema component](#schemas).
* Click **Example** to view or edit the response's examples:
* Click **+ Add** to add a new example. Enter a JSON example in the code editor.
* Click **Copy** to copy the example.
* To delete an example, click next to it.
* Add a schema to the response body:
* Click **Use existing** to select from existing [schema components](#schemas).
* Click **Extract to component** to turn the inline schema into a reusable [schema component](#schemas).
To delete a response, click **Delete component**.
### Parameters
To add a reusable parameter, enter a name in the **New parameter name** field and click **+ Add parameter**. Click the parameter to expand it, then define the following:
* Click the parameter's name to rename it.
* **In** — Select the parameter's location, such as "Query" or "Path".
* **Type** — Click to configure the following parameter properties:
* **Type** — The parameter's data type.
* **Required** — Turn on to mark the parameter as required.
* **Deprecated** — Turn on to mark the parameter as deprecated.
* **Format** — The data format.
* **Default value** — The default value if none is provided.
* **Possible enum values** — A comma-separated list of allowed values.
* **Pattern** — A regular expression the value must match.
* **Min length** and **Max length** — The minimum and maximum length of the value.
* **Description** — A description of the parameter.
To delete a parameter, click **Delete component**.
### Headers
The **Headers** section displays the number of reusable headers defined in your specification. To add a header, click **+ Add header**, then enter a name for the header. Click the header to expand it, then define the following:
* Click the header's name to rename it.
* **Type** — Click to configure the following header properties:
* **Type** — The header's data type.
* **Required** — Turn on to mark the header as required.
* **Deprecated** — Turn on to mark the header as deprecated.
* **Format** — The data format.
* **Default value** — The default value if none is provided.
* **Possible enum values** — A comma-separated list of allowed values.
* **Pattern** — A regular expression the value must match.
* **Min length** and **Max length** — The minimum and maximum length of the value.
* Enter a description in the **Describe this component** text box.
To delete a header, click **Delete component**.
## Manage specification tags
Use tags to group related endpoints in your specification. Each tag displays the number of endpoints that reference it.
To add a tag, enter a name in the **New tag name** text box, then click **+ Add tag**. Click the tag to add a description and a **Docs URL** that links to external documentation for the tag.
To delete a tag, click next to the tag.
**Delete server**.
* A description of the server, such as "Production" or "Beta". This supports Markdown and plain text.
* **Info** — The `info` section of your OpenAPI specification, which includes the following fields:
* **Contact name**, **Contact email**, and **Contact URL** — Contact information for the person or team responsible for the API.
* **License** and **License URL** — The name of the license and a URL that links to the full license text.
* **Terms of service** — A URL that links to your API's terms of service.
## Endpoints
A specification's endpoints are in the **Endpoints** section of the Visual editor. You can use **Group by** to organize endpoints by **Path** or **Tag**.
To add a new endpoint, do the following:
1. In the **Endpoints** section, click **+ Add endpoint**.
2. Select an HTTP method for the endpoint.
3. Enter the endpoint's path.
4. Click the **New endpoint** text box in the top-right and enter a brief summary that describes what the endpoint does.
5. (Optional) Assign the endpoint to one or more tags to group it with related endpoints. To add a new tag, enter the new tag's name.
6. (Optional) Enter a description with information about the endpoint.
7. Enter an **Operation ID** to uniquely identify the endpoint.
8. Add [headers](#add-headers), [parameters](#add-parameters), a [request body](#add-a-request-body), and [responses](#add-responses) as needed for the endpoint.
### Edit or remove an endpoint
To edit an existing endpoint, click it in the **Endpoints** section and make your changes. If the endpoint is no longer in use, select **Deprecated**.
To delete an endpoint, click next to the endpoint.
### Add headers
In the endpoint's **Headers** section, click **+ Add header**, then define the following:
* Change the header's name.
* Add a description of the header.
* Click the header's type to configure the following properties:
* **Type** — The header's data type.
* **Required** — Turn on to mark the header as required.
* **Deprecated** — Turn on to mark the header as deprecated.
* **Format** — The data format.
* **Default value** — The default value if none is provided.
* **Possible enum values** — A comma-separated list of allowed values.
* **Pattern** — A regular expression the value must match.
* **Min length** and **Max length** — The minimum and maximum length of the value.
To delete a header, click next to it.
### Add parameters
In the endpoint's **Parameters** section, you can define your endpoint's query, path, and cookie parameters.
If you want to reuse an [existing parameter](#parameters) in your specification, click **+ Use existing** and select the parameter from the list. To create a new parameter, click **+ Add parameter** and define the following:
* Change the parameter's name.
* Add a description of the parameter.
* Click the parameter's type to configure the following properties:
* **Type** — The parameter's data type.
* **Required** — Turn on to mark the parameter as required.
* **Deprecated** — Turn on to mark the parameter as deprecated.
* **Format** — The data format.
* **Default value** — The default value if none is provided.
* **Possible enum values** — A comma-separated list of allowed values.
* **Pattern** — A regular expression the value must match.
* **Min length** and **Max length** — The minimum and maximum length of the value.
* Select the parameter's location. The location determines where the parameter is sent in the request.
### Add a request body
In the endpoint's **Request body** section, click **+ Add request body**. Postman adds a request body with an `application/json` media type by default. Define the following:
* Add a description of the request body.
* Select **required** to mark the request body as required.
* Click **Schema** and enter the request body's schema in the code editor. To copy the schema, click **Copy**.
* Click **Example** to view or edit a request body's examples:
* Click **+ Add** to add a new example. Enter the example in the code editor.
* To copy an example, select it and click **Copy**.
* To delete an example, select it and click next to it.
* Add a schema to the request body:
* Click **Use existing** to select from existing [schema components](#schemas).
* Click **Extract to component** to turn the inline schema into a reusable [schema component](#schemas).
To delete the request body, click next to it.
### Add responses
In the endpoint's **Responses** section, click **+ Add response** to add a new response. By default, Postman includes a `200` response. Each response is listed by its status code at the top of the section.
Select a response, then define the following:
* Add a description of the response.
* Select a **Status code** from the dropdown list, or select **Custom** to enter a custom status code.
* Click **Schema** to define the response body's schema:
* Enter the schema in the code editor. To copy the schema, click **Copy**.
* Click **Extract to component** to turn the inline schema into a reusable [schema component](#schemas).
* Click **Use existing** to reference an existing [schema component](#schemas).
* Define the response headers. Click **+ Add header**, then define the [header's properties](#add-headers).
* Click **Example** to view or edit the response's examples:
* Click **+ Add** to add a new example. Enter the example in the code editor.
* To copy an example, select it and click **Copy**.
* To delete an example, select it and click next to it.
To delete a response, click next to the **Status code** dropdown list.
## Add and edit components
Components are reusable pieces of your OpenAPI specification that you can reference from any endpoint. In the Visual editor, add and edit schemas, responses, parameters, and headers from the **Components** section. Click a component to expand it and edit its details.
When you reference components in your specification, the editor displays the component's reference. You can click the reference to view the component's details in the **Components** section of the Visual editor.
To reference a schema component from an endpoint's request or response body, click **Use existing** in the schema definition and select a schema. To turn an inline schema into a reusable schema component, click **Extract to component**.
### Schemas
The **Schemas** section displays the number of schemas defined in your specification. To add a schema, click **+ Add schema**, then enter a name for the schema. Click the schema to expand it, then update the following:
* Click the name of the schema to rename it.
* Enter a description in the **Describe this component** text box.
* Enter the JSON schema in the code editor. Click **Copy** to copy the schema.
To delete a schema, click next to the schema.
### Responses
The **Responses** section displays the number of reusable responses defined in your specification. To add a response, click **+ Add response**, then enter a name for the response. Click the response to expand it, then click **+ Add body** to define the response body. You can then define the following in the response:
* Click the name of the response to rename it.
* Enter a description in the **Response** text box. For example, "Successful response" or "404 Error".
* Enter the response body's JSON schema in the code editor. To copy it, click **Copy**. You can also choose one of the following options:
* Click **Use existing** to select from existing [schema components](#schemas).
* Click **Extract to component** to turn the inline schema into a reusable [schema component](#schemas).
* Click **Example** to view or edit the response's examples:
* Click **+ Add** to add a new example. Enter a JSON example in the code editor.
* Click **Copy** to copy the example.
* To delete an example, click next to it.
* Add a schema to the response body:
* Click **Use existing** to select from existing [schema components](#schemas).
* Click **Extract to component** to turn the inline schema into a reusable [schema component](#schemas).
To delete a response, click **Delete component**.
### Parameters
To add a reusable parameter, enter a name in the **New parameter name** field and click **+ Add parameter**. Click the parameter to expand it, then define the following:
* Click the parameter's name to rename it.
* **In** — Select the parameter's location, such as "Query" or "Path".
* **Type** — Click to configure the following parameter properties:
* **Type** — The parameter's data type.
* **Required** — Turn on to mark the parameter as required.
* **Deprecated** — Turn on to mark the parameter as deprecated.
* **Format** — The data format.
* **Default value** — The default value if none is provided.
* **Possible enum values** — A comma-separated list of allowed values.
* **Pattern** — A regular expression the value must match.
* **Min length** and **Max length** — The minimum and maximum length of the value.
* **Description** — A description of the parameter.
To delete a parameter, click **Delete component**.
### Headers
The **Headers** section displays the number of reusable headers defined in your specification. To add a header, click **+ Add header**, then enter a name for the header. Click the header to expand it, then define the following:
* Click the header's name to rename it.
* **Type** — Click to configure the following header properties:
* **Type** — The header's data type.
* **Required** — Turn on to mark the header as required.
* **Deprecated** — Turn on to mark the header as deprecated.
* **Format** — The data format.
* **Default value** — The default value if none is provided.
* **Possible enum values** — A comma-separated list of allowed values.
* **Pattern** — A regular expression the value must match.
* **Min length** and **Max length** — The minimum and maximum length of the value.
* Enter a description in the **Describe this component** text box.
To delete a header, click **Delete component**.
## Manage specification tags
Use tags to group related endpoints in your specification. Each tag displays the number of endpoints that reference it.
To add a tag, enter a name in the **New tag name** text box, then click **+ Add tag**. Click the tag to add a description and a **Docs URL** that links to external documentation for the tag.
To delete a tag, click next to the tag.