***
title: Webhook migration guide
updated: 2026-01-14T00:00:00.000Z
topictype: troubleshooting
slug: docs/postman-flows/build-flows/troubleshoot/webhook-migration-guide
max-toc-depth: 2
----------------
Webhooks will be sunset on February 11, 2026. Any existing flows that use webhooks will stop running after this date. You can preserve these flows' functionality by migrating them to [flows running in the cloud](/docs/postman-flows/reference/flows-actions-overview/), a more powerful, cloud-based alternative to webhooks. This guide shows how to migrate your workflows to flows running in the cloud.
## Benefits of migrating webhooks to flows running in the cloud
Flows running in the cloud provide everything webhooks offered, plus the following:
* **Cloud deployment** - Your flows run reliably in the cloud in addition to running locally in the Postman cloud runtime environment.
* **Built-in scheduling** - Run flows in the cloud automatically at custom intervals with [scheduled flows](/docs/postman-flows/build-flows/structure/actions/#schedule-a-flow-to-run-automatically).
* **Better observability** - Track run history, logs, and performance metrics in [analytics](/docs/postman-flows/build-flows/analyze/analytics/).
* **Version control** - [Snapshot](/docs/postman-flows/build-flows/configure/snapshots/) and manage different versions of your workflows.
## Differences between webhooks and flows running in the cloud
| **Feature** | **Webhooks** | **Flows running in the cloud** |
| ----------------- | -------------------------- | ------------------------------- |
| **Execution** | Local | Cloud-based |
| **Scheduling** | Required external monitors | Built-in scheduled flows |
| **Observability** | Limited | Full run logs |
| **Versioning** | None | Snapshots & deployment tracking |
| **Reliability** | Depends on local setup | Production infrastructure |
## Migration process
To migrate your webhook-based flow to a flow running in the cloud, do the following:
### Step 1 - Copy your webhook test data
1. Open your webhook-based flow.
2. Click **Preview**.
3. Copy the JSON body from the preview and close the preview pane.
### Step 2 - Create a deployable flow
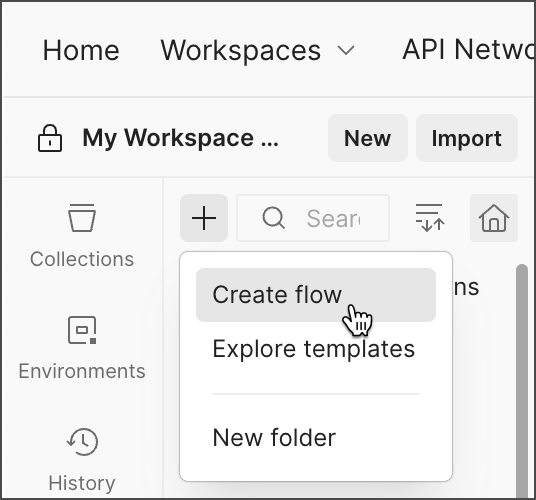
1. Click  **Create a new folder or flow** and select **Create flow**.
 2. In the **Start** block, click **Change trigger** and select **Request**.
### Step 3 - Set up your request trigger
1. Click
2. In the **Start** block, click **Change trigger** and select **Request**.
### Step 3 - Set up your request trigger
1. Click  **Scenarios**.
2. Hover over the **Request Trigger** default scenario and click **Edit**.
3. Paste the JSON body from your webhook into the scenario.
4. Save and close the scenario pane.
### Step 4 - Copy your flow logic
1. In your webhook-based flow, press **⌘ + A** or **Ctrl + A** to select all the blocks.
2. Copy the blocks.
3. In your new flow, paste the blocks onto the canvas.
### Step 5 - Connect the blocks
1. Connect the **Request** block's **Body** port to your first flow block.
2. Connect your final block to the **Body** port of the **Response** block.
3. Make sure all blocks are correctly connected.
### Step 6 - Test your flow
1. Click **Run** to run the scenario manually.
2. Verify everything works as expected.
3. Check the [run logs](/docs/postman-flows/build-flows/troubleshoot/troubleshoot/#run-logs) for any errors.
### Step 7 - Deploy to the cloud
1. In your new flow, click **Deploy** in the upper right corner.
2. Enter a **URL**.
3. Click **Deploy**. Your new flow is live and running in the Postman cloud. It's available at the URL you specified. Click the **Current** tab in the **Deploy** pane.
**Scenarios**.
2. Hover over the **Request Trigger** default scenario and click **Edit**.
3. Paste the JSON body from your webhook into the scenario.
4. Save and close the scenario pane.
### Step 4 - Copy your flow logic
1. In your webhook-based flow, press **⌘ + A** or **Ctrl + A** to select all the blocks.
2. Copy the blocks.
3. In your new flow, paste the blocks onto the canvas.
### Step 5 - Connect the blocks
1. Connect the **Request** block's **Body** port to your first flow block.
2. Connect your final block to the **Body** port of the **Response** block.
3. Make sure all blocks are correctly connected.
### Step 6 - Test your flow
1. Click **Run** to run the scenario manually.
2. Verify everything works as expected.
3. Check the [run logs](/docs/postman-flows/build-flows/troubleshoot/troubleshoot/#run-logs) for any errors.
### Step 7 - Deploy to the cloud
1. In your new flow, click **Deploy** in the upper right corner.
2. Enter a **URL**.
3. Click **Deploy**. Your new flow is live and running in the Postman cloud. It's available at the URL you specified. Click the **Current** tab in the **Deploy** pane.