# Write documentation in Postman
Postman [automatically generates documentation](/docs/publishing-your-api/document-a-collection/) for every collection you create, including [collections linked to an API](/docs/publishing-your-api/documenting-your-api/). All descriptions you write are included in your collection's complete documentation, including all requests in your collection, along with examples, authorization details, and example code.
To help your teammates ([or the world](/docs/publishing-your-api/publishing-your-docs/)) better understand what you're building, add detailed descriptions to your collection and its [requests](/docs/sending-requests/create-requests/create-requests/). Use the Postman editor to view how your content will look as you write it. Or use the Markdown editor to structure and format your descriptions using Markdown syntax. Both are compatible, so you can switch between both editors as you work.
## Add descriptions to your documentation
Use descriptions to inform your collection's users about what it does and the purpose of each request. Structure your descriptions with headings and add content such as text, tables, images, and links.
To add a description to a collection or folder, do the following:
1. Click **Collections** in the sidebar and select a collection.
2. Enter a description in the **Overview** tab using the visual [Postman editor](#write-descriptions-in-the-postman-editor) or the [Markdown editor](#write-descriptions-in-markdown).
3. Click outside of the editor to save your new content.
To add a description to a request, do the following:
1. Click **Collections** in the sidebar, select a collection, then select a request.
2. For public workspaces, click  **Documentation** in the right sidebar. For all other workspace types, click
  **Docs** in the workbench.
3. Enter a description using the visual [Postman editor](#write-descriptions-in-the-postman-editor) or the [Markdown editor](#write-descriptions-in-markdown).
4. Click outside of the editor to save your new content.
To give users more details about requests in your collection, add descriptions to the request [parameters and headers](#add-descriptions-to-parameters-and-headers).
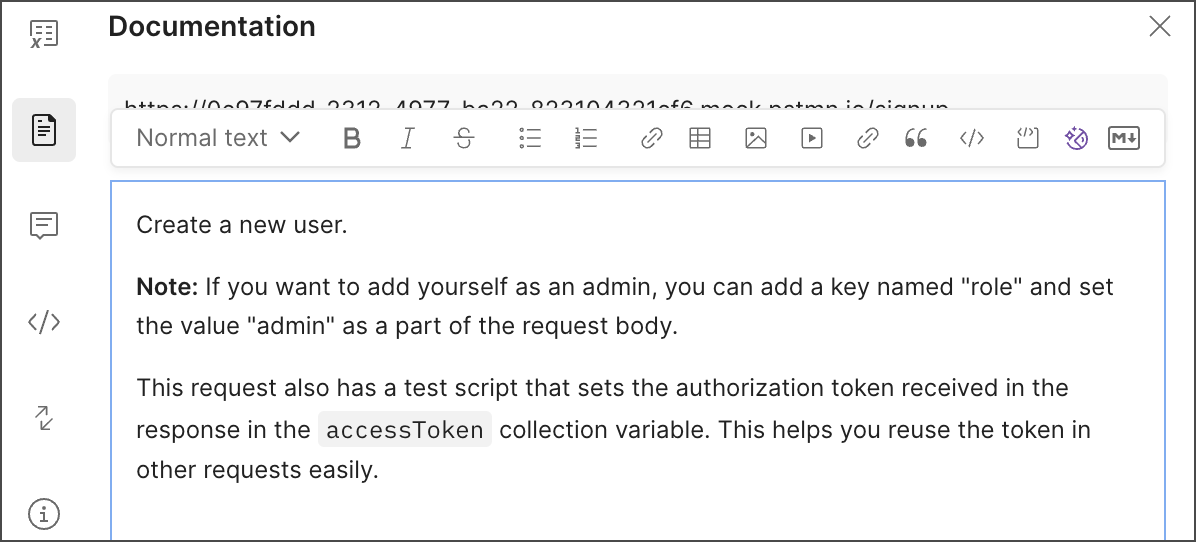
### Write descriptions in the Postman editor
To write a description using rich text editing tools, select the **Postman editor**. You can use the Postman editor to write a description without having to write any Markdown code. Use the tools on the toolbar to work with text and other content, as you would in a typical word processor. Or, use common keyboard shortcuts to format text, like **⌘+B** or **Ctrl+B** to make text bold.
**View the tooltips to get help as you work.** Hold your cursor over an item on the toolbar to see a description of the tool and the associated keyboard shortcut.
**Create tables without Markdown.** No need to fuss with Markdown code to get your tables to work. To add a table, click
**Docs** in the workbench.
3. Enter a description using the visual [Postman editor](#write-descriptions-in-the-postman-editor) or the [Markdown editor](#write-descriptions-in-markdown).
4. Click outside of the editor to save your new content.
To give users more details about requests in your collection, add descriptions to the request [parameters and headers](#add-descriptions-to-parameters-and-headers).
### Write descriptions in the Postman editor
To write a description using rich text editing tools, select the **Postman editor**. You can use the Postman editor to write a description without having to write any Markdown code. Use the tools on the toolbar to work with text and other content, as you would in a typical word processor. Or, use common keyboard shortcuts to format text, like **⌘+B** or **Ctrl+B** to make text bold.

**View the tooltips to get help as you work.** Hold your cursor over an item on the toolbar to see a description of the tool and the associated keyboard shortcut.
**Create tables without Markdown.** No need to fuss with Markdown code to get your tables to work. To add a table, click  **Table**. To add or remove columns or rows, or to delete the table, select a cell and then click the shortcut menu.
**The Postman editor understands Markdown syntax.** If you're comfortable using Markdown, enter any standard Markdown code to format text. For example, enter `#` followed by a space to start a new heading, or enter `---` to add a horizontal line. To reuse documentation that's already written in Markdown, copy the existing Markdown code and paste it into the editor to instantly format it.
If you copy content from the Postman editor, the content retains its formatting when you paste it into another application, such as a word processor or an email.
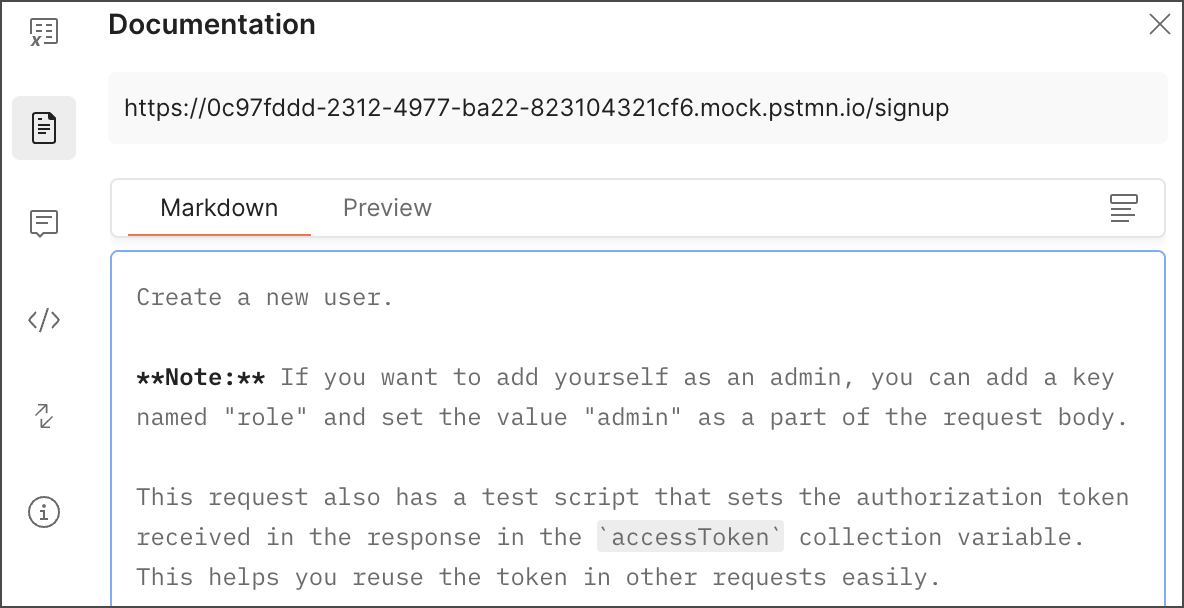
### Write descriptions in Markdown
To write a description using Markdown, select the **Markdown editor** option. Use standard Markdown syntax to create your content:
* Structure content with headings, lists, and tables.
* Format text with bold, emphasis, and block quotes.
* Add images, links, and code blocks.
As you work, click the **Preview** tab to review how your documentation will appear and to ensure the formatting is correct. To continue editing, click the **Markdown** tab.
Leave a blank line before and after block elements (like headings, paragraphs, and lists) to avoid formatting issues.
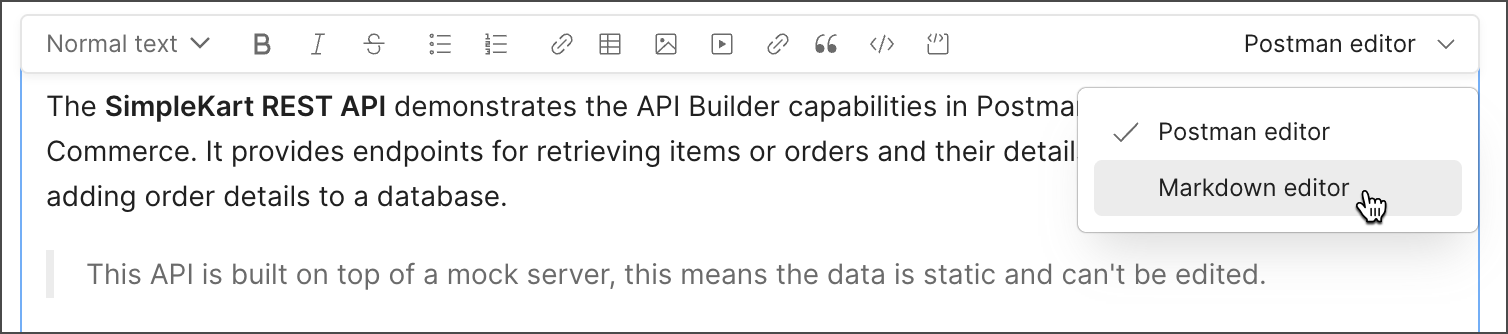
### Select a default documentation editor
You can choose the default editor you want to use for editing documentation descriptions in Postman. When you edit a description, Postman switches to your preferred editor. You can still switch between the Postman and Markdown editors while editing a description.
To switch your default editor, do the following:
1. Click
**Table**. To add or remove columns or rows, or to delete the table, select a cell and then click the shortcut menu.
**The Postman editor understands Markdown syntax.** If you're comfortable using Markdown, enter any standard Markdown code to format text. For example, enter `#` followed by a space to start a new heading, or enter `---` to add a horizontal line. To reuse documentation that's already written in Markdown, copy the existing Markdown code and paste it into the editor to instantly format it.
If you copy content from the Postman editor, the content retains its formatting when you paste it into another application, such as a word processor or an email.
### Write descriptions in Markdown
To write a description using Markdown, select the **Markdown editor** option. Use standard Markdown syntax to create your content:
* Structure content with headings, lists, and tables.
* Format text with bold, emphasis, and block quotes.
* Add images, links, and code blocks.
As you work, click the **Preview** tab to review how your documentation will appear and to ensure the formatting is correct. To continue editing, click the **Markdown** tab.
Leave a blank line before and after block elements (like headings, paragraphs, and lists) to avoid formatting issues.

### Select a default documentation editor
You can choose the default editor you want to use for editing documentation descriptions in Postman. When you edit a description, Postman switches to your preferred editor. You can still switch between the Postman and Markdown editors while editing a description.
To switch your default editor, do the following:
1. Click  **Settings** in the Postman header, then click **Settings**.
2. In the
**Settings** in the Postman header, then click **Settings**.
2. In the  **General** tab, scroll down to **User Interface**.
3. Select **Postman editor** or **Markdown editor** for the **Default documentation editor** setting.
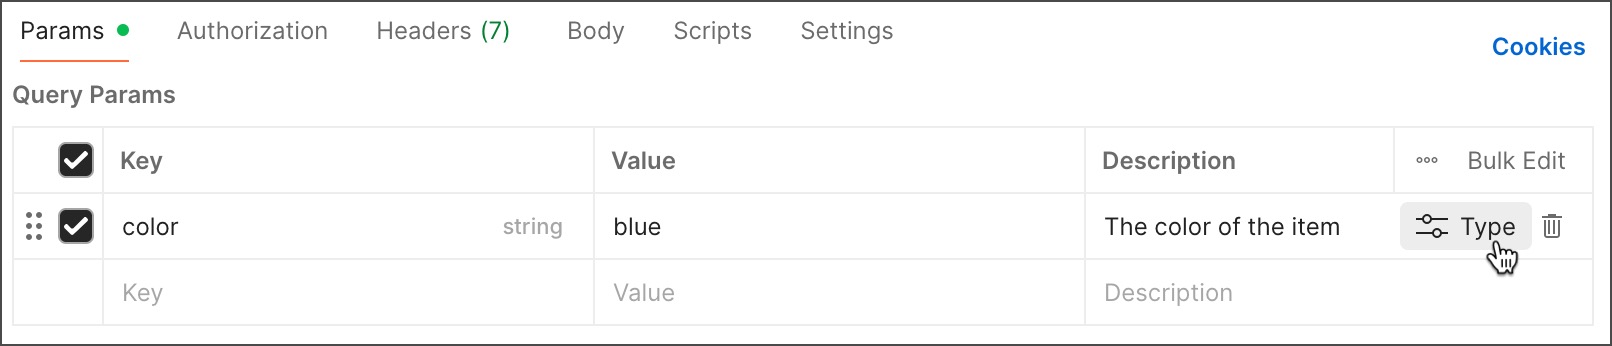
### Add descriptions to parameters and headers
Add descriptions to parameters and headers to help others understand and use your collection's requests. Open a request and enter the description in the box next to the key-value pair. Add [types](/docs/design-apis/collections/add-properties-to-parameters-and-headers/) to your request's [parameters](/docs/sending-requests/create-requests/parameters/) and [headers](/docs/sending-requests/create-requests/headers/#configure-request-headers), such as data type, format, and default values, to further define them.
The parameter and header descriptions are visible to people with access to your collection or anyone viewing your [published documentation](/docs/publishing-your-api/publishing-your-docs/). The descriptions appear in the documentation along with the request, next to the parameter or header name.
All key-value pairs are included in your documentation. Use [types](/docs/design-apis/collections/add-properties-to-parameters-and-headers/) to define required parameters and headers. Anyone using your collection can choose which key-value pairs to include when sending requests or [generating code snippets](/docs/sending-requests/create-requests/generate-code-snippets/).
## Include authorization details
Your documentation automatically includes the type of authorization required to access your endpoints. Authorization details appear below the collection description and also below each request in your documentation.
If you [specify authorization details](/docs/sending-requests/authorization/specifying-authorization-details/) for the collection, those authorization requirements are inherited by every request in the collection. If one of your endpoints requires a different authorization type, open the request and [change the authorization details](/docs/sending-requests/authorization/specifying-authorization-details/#inherit-authorization). The changes are reflected in your documentation.
## Including examples
Examples are paired requests and responses that your endpoints in action. Any [examples you add to a collection](/docs/sending-requests/response-data/examples/#add-an-example) are included in the documentation. For each request, your documentation shows the example code snippets, as well the example response body and headers.
Examples display when you [view the complete documentation](/docs/publishing-your-api/viewing-documentation/#viewing-documentation-for-a-collection) for a collection, or when you [view published documentation](/docs/publishing-your-api/viewing-documentation/#viewing-public-documentation).
## Add links
Use links to direct users to your repository, website, or other online resources.
To add a link using the Postman editor, click
**General** tab, scroll down to **User Interface**.
3. Select **Postman editor** or **Markdown editor** for the **Default documentation editor** setting.
### Add descriptions to parameters and headers
Add descriptions to parameters and headers to help others understand and use your collection's requests. Open a request and enter the description in the box next to the key-value pair. Add [types](/docs/design-apis/collections/add-properties-to-parameters-and-headers/) to your request's [parameters](/docs/sending-requests/create-requests/parameters/) and [headers](/docs/sending-requests/create-requests/headers/#configure-request-headers), such as data type, format, and default values, to further define them.

The parameter and header descriptions are visible to people with access to your collection or anyone viewing your [published documentation](/docs/publishing-your-api/publishing-your-docs/). The descriptions appear in the documentation along with the request, next to the parameter or header name.
All key-value pairs are included in your documentation. Use [types](/docs/design-apis/collections/add-properties-to-parameters-and-headers/) to define required parameters and headers. Anyone using your collection can choose which key-value pairs to include when sending requests or [generating code snippets](/docs/sending-requests/create-requests/generate-code-snippets/).
## Include authorization details
Your documentation automatically includes the type of authorization required to access your endpoints. Authorization details appear below the collection description and also below each request in your documentation.
If you [specify authorization details](/docs/sending-requests/authorization/specifying-authorization-details/) for the collection, those authorization requirements are inherited by every request in the collection. If one of your endpoints requires a different authorization type, open the request and [change the authorization details](/docs/sending-requests/authorization/specifying-authorization-details/#inherit-authorization). The changes are reflected in your documentation.
## Including examples
Examples are paired requests and responses that your endpoints in action. Any [examples you add to a collection](/docs/sending-requests/response-data/examples/#add-an-example) are included in the documentation. For each request, your documentation shows the example code snippets, as well the example response body and headers.
Examples display when you [view the complete documentation](/docs/publishing-your-api/viewing-documentation/#viewing-documentation-for-a-collection) for a collection, or when you [view published documentation](/docs/publishing-your-api/viewing-documentation/#viewing-public-documentation).
## Add links
Use links to direct users to your repository, website, or other online resources.
To add a link using the Postman editor, click  **Link**. Paste or enter the URL and the link text, then click **Add**. If you need to change the link later, select it, then click
  **Edit link**.
To add a link using the Markdown editor, use the following syntax:
```md
[link text to display](https://your-link-url.com)
```
## Add images
Images liven up your documentation and help your ideas come across with more clarity. You can upload an image file from your computer or embed an image that's hosted online.
### Upload an image
To upload an image using the Postman editor, click
**Edit link**.
To add a link using the Markdown editor, use the following syntax:
```md
[link text to display](https://your-link-url.com)
```
## Add images
Images liven up your documentation and help your ideas come across with more clarity. You can upload an image file from your computer or embed an image that's hosted online.
### Upload an image
To upload an image using the Postman editor, click  **Image** and select **Browse**. Select the image you want to upload and click **Open**. You can also upload an image by copying and pasting an image into the Postman editor, or by dragging an image file into the Postman editor.
The Postman editor supports PNG, JPG, SVG, and GIF formats. The maximum supported image size is 5 MB.
### Embed an image
Your image must be hosted online (for example, on a website) before you can embed it in your documentation.
To embed an image using the Postman editor, click **Image** and select **Embed URL**. Paste or enter the URL of the image, then click **Embed**.
To embed an image using the Markdown editor, use the following syntax:
```md

```
### Edit images
You can change an image after uploading or embedding it:
* To change an image in the Postman editor, first select it and click
**Image** and select **Browse**. Select the image you want to upload and click **Open**. You can also upload an image by copying and pasting an image into the Postman editor, or by dragging an image file into the Postman editor.
The Postman editor supports PNG, JPG, SVG, and GIF formats. The maximum supported image size is 5 MB.
### Embed an image
Your image must be hosted online (for example, on a website) before you can embed it in your documentation.
To embed an image using the Postman editor, click **Image** and select **Embed URL**. Paste or enter the URL of the image, then click **Embed**.
To embed an image using the Markdown editor, use the following syntax:
```md

```
### Edit images
You can change an image after uploading or embedding it:
* To change an image in the Postman editor, first select it and click  **Delete image**. Then upload or embed a new image.
* To change an image in the Markdown editor, edit the Markdown code.
* To resize an image, select the image in the Postman editor and drag the resize handles. You can specify a new value for `width` in the Markdown editor.
* To add or edit a caption, click the image in the Postman editor and enter a caption below the image. In the Markdown editor, enter alt text in the brackets (`![]`).
### Image storage limits
If you're on a [Postman Free plan](https://www.postman.com/pricing/) and aren't part of a team, the total size of your uploaded images is limited to 20 MB. If you're part of a team ([free or paid plans](https://www.postman.com/pricing/)), the total size of your team's uploaded images is limited to 100 MB.
To check how much storage you're using, go to your [billing dashboard](http://go.postman.co/billing) and click **Resource Usage**. The amount of space used by uploaded images and files appears in the **Storage Usage** section. To upgrade your available storage, contact [Postman support](https://www.postman.com/support/).
When you reach 90% of your storage limit, you'll receive a warning each time you try to add an image. To learn more about the resources included with your Postman plan and what happens when you reach your usage limits, see [About resource usage](/docs/billing/resource-usage/).
## Embed videos
You can embed videos hosted on YouTube or Vimeo in your documentation. Your documentation displays a preview of the video, and users can click the preview to start playback without leaving Postman.
You can't embed a video hosted on a service other than YouTube and Vimeo, but you can [add a link](#add-links) to the video.
To embed a video using the Postman editor, click
**Delete image**. Then upload or embed a new image.
* To change an image in the Markdown editor, edit the Markdown code.
* To resize an image, select the image in the Postman editor and drag the resize handles. You can specify a new value for `width` in the Markdown editor.
* To add or edit a caption, click the image in the Postman editor and enter a caption below the image. In the Markdown editor, enter alt text in the brackets (`![]`).
### Image storage limits
If you're on a [Postman Free plan](https://www.postman.com/pricing/) and aren't part of a team, the total size of your uploaded images is limited to 20 MB. If you're part of a team ([free or paid plans](https://www.postman.com/pricing/)), the total size of your team's uploaded images is limited to 100 MB.
To check how much storage you're using, go to your [billing dashboard](http://go.postman.co/billing) and click **Resource Usage**. The amount of space used by uploaded images and files appears in the **Storage Usage** section. To upgrade your available storage, contact [Postman support](https://www.postman.com/support/).
When you reach 90% of your storage limit, you'll receive a warning each time you try to add an image. To learn more about the resources included with your Postman plan and what happens when you reach your usage limits, see [About resource usage](/docs/billing/resource-usage/).
## Embed videos
You can embed videos hosted on YouTube or Vimeo in your documentation. Your documentation displays a preview of the video, and users can click the preview to start playback without leaving Postman.
You can't embed a video hosted on a service other than YouTube and Vimeo, but you can [add a link](#add-links) to the video.
To embed a video using the Postman editor, click  **Video**. Paste or enter the URL of the video, and then click **Embed**.
To embed a video using the Markdown editor, use the following syntax:
```md
```
You can't play videos when editing documentation. Click **Save**, and then click the video to start playback.
You can change a video after uploading or embedding it:
* To change a video in the Postman editor, first select it and click . Then embed a new video.
* To change a video in the Markdown editor, edit the Markdown code as needed.
* To resize a video preview, select the video in the Postman editor and drag the resize handles. You can also specify a new value for `width` in the Markdown editor.
* To add or edit a caption, select the video in the Postman editor and enter a caption below the video.
## Write documentation with Postbot
[Postbot](/docs/getting-started/basics/about-postbot/) can write documentation for your collection's requests. Use it to automatically add descriptions, including request parameters and response examples. You can also use Postbot to edit and improve existing request documentation.
To write request documentation with Postbot, do the following:
1. Click **Collections** in the sidebar, select a collection, then select a request.
2. (Optional) Send the request so there is a response for Postbot to analyze.
3. In public workspaces, click in the right sidebar, then click **Generate with Postbot**. In team or private workspaces, click **Docs**, then click **Write with AI** in the Postman editor.
You can also click
**Video**. Paste or enter the URL of the video, and then click **Embed**.
To embed a video using the Markdown editor, use the following syntax:
```md
```
You can't play videos when editing documentation. Click **Save**, and then click the video to start playback.
You can change a video after uploading or embedding it:
* To change a video in the Postman editor, first select it and click . Then embed a new video.
* To change a video in the Markdown editor, edit the Markdown code as needed.
* To resize a video preview, select the video in the Postman editor and drag the resize handles. You can also specify a new value for `width` in the Markdown editor.
* To add or edit a caption, select the video in the Postman editor and enter a caption below the video.
## Write documentation with Postbot
[Postbot](/docs/getting-started/basics/about-postbot/) can write documentation for your collection's requests. Use it to automatically add descriptions, including request parameters and response examples. You can also use Postbot to edit and improve existing request documentation.
To write request documentation with Postbot, do the following:
1. Click **Collections** in the sidebar, select a collection, then select a request.
2. (Optional) Send the request so there is a response for Postbot to analyze.
3. In public workspaces, click in the right sidebar, then click **Generate with Postbot**. In team or private workspaces, click **Docs**, then click **Write with AI** in the Postman editor.
You can also click  **Postbot** in the Postman footer, then click **Add documentation**. Or, enter a prompt with specific details, like “add docs and describe the 401 status code”.
You can also use Postman's Agent Mode to help you write descriptions for your collections. To learn more, see [Postman Agent Mode](/docs/agent-mode/overview/).
## Next steps
Looking for some documentation inspiration? Browse through the [Postman API Network](https://www.postman.com/explore/) to find examples of great documentation created in Postman.
**Postbot** in the Postman footer, then click **Add documentation**. Or, enter a prompt with specific details, like “add docs and describe the 401 status code”.
You can also use Postman's Agent Mode to help you write descriptions for your collections. To learn more, see [Postman Agent Mode](/docs/agent-mode/overview/).
## Next steps
Looking for some documentation inspiration? Browse through the [Postman API Network](https://www.postman.com/explore/) to find examples of great documentation created in Postman.