***
title: Generate SDKs in Postman
updated: 2026-02-19T00:00:00.000Z
max-toc-depth: 2
----------------
You can generate SDKs using the Postman CLI or the Postman app. The generated SDKs are available for download and come with autogenerated documentation. You can connect your GitHub repo to sync your SDK and create a pull request with the generated code.
The Postman SDK Generator also enables you to generate SDKs locally without affecting your public collections in the cloud. This way, you can experiment with SDK generation and test different configurations in a safe, isolated environment.
## Permissions required to generate SDKs
You must have Editor or higher access to the collection or specification to generate an SDK. Viewers can view and download existing SDKs, but they can't generate new ones. Learn more about [Postman roles and permissions](/docs/administration/roles-and-permissions).
## Generate SDKs from collections and API specifications
You can use the Postman CLI or the Postman app to generate your SDK.
### Generate SDKs from the CLI
1. Get the collection or specification ID. In Postman, open your collection or specification, then click  **Show right sidebar** on the bottom right to open the right sidebar. Click
  **Info** in the right sidebar and copy the ID to use with the `postman sdk generate` command in the next step.
2. Run the [`postman sdk generate`](/docs/sdk-generator/sdk-cli/#postman-sdk-generate) command with the pasted ID. For example, to generate an SDK in Typescript, use the following command with your ID and output directory:
```bash
postman sdk generate --language typescript
```
Your SDK downloads into the `sdks` directory in your current working directory.
You can use the [`postman sdk list`](/docs/sdk-generator/sdk-cli/#postman-sdk-list) command and navigate to the files from your terminal.
### Generate SDKs from the Postman App
1. Click **Collections** or **Specs** in the sidebar to select the collection or specification for which you want to generate an SDK.
2. In the right sidebar, click
**Info** in the right sidebar and copy the ID to use with the `postman sdk generate` command in the next step.
2. Run the [`postman sdk generate`](/docs/sdk-generator/sdk-cli/#postman-sdk-generate) command with the pasted ID. For example, to generate an SDK in Typescript, use the following command with your ID and output directory:
```bash
postman sdk generate --language typescript
```
Your SDK downloads into the `sdks` directory in your current working directory.
You can use the [`postman sdk list`](/docs/sdk-generator/sdk-cli/#postman-sdk-list) command and navigate to the files from your terminal.
### Generate SDKs from the Postman App
1. Click **Collections** or **Specs** in the sidebar to select the collection or specification for which you want to generate an SDK.
2. In the right sidebar, click  **SDKs**.
To open the right sidebar, click **Show right sidebar** on the bottom right.
3. Name your SDK build. The name helps you identify the build in the list of generated SDKs and in the SDK documentation. You can use the default name or enter a custom one.
**SDKs**.
To open the right sidebar, click **Show right sidebar** on the bottom right.
3. Name your SDK build. The name helps you identify the build in the list of generated SDKs and in the SDK documentation. You can use the default name or enter a custom one.
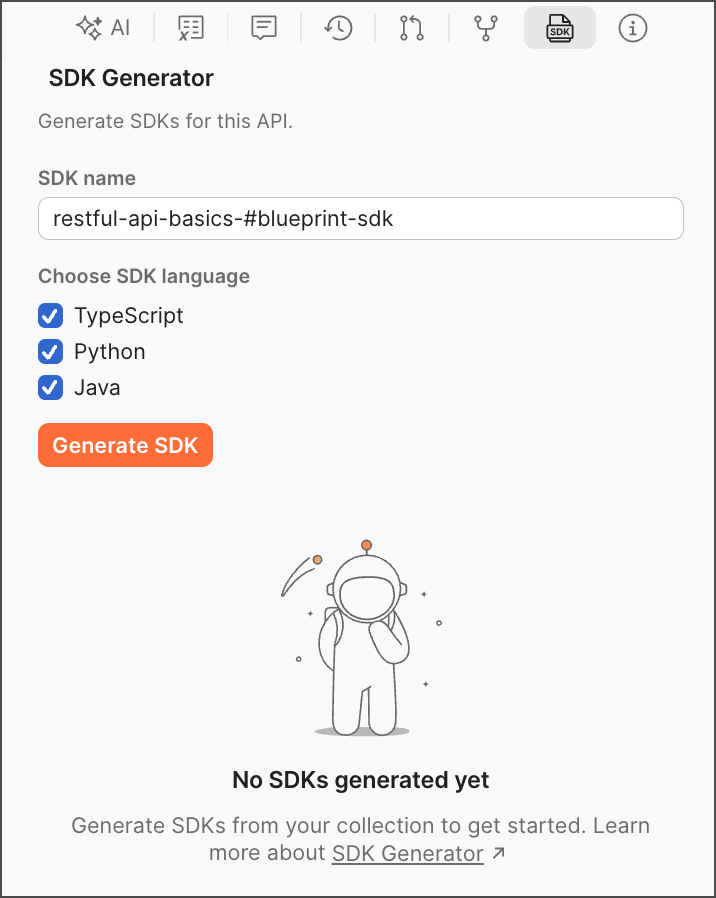 4. Select your languages. You can select one or more languages for SDK generation: `typescript`, `python`, or `java`. You can also select all to generate SDKs in all supported languages.
Generate SDKs using Agent Mode. Click
4. Select your languages. You can select one or more languages for SDK generation: `typescript`, `python`, or `java`. You can also select all to generate SDKs in all supported languages.
Generate SDKs using Agent Mode. Click  **AI** and ask the agent to generate SDKs for you. For example, you can say "Generate SDKs in Python and Java for this collection."
5. Click **Generate SDKs**.
6. Click
**AI** and ask the agent to generate SDKs for you. For example, you can say "Generate SDKs in Python and Java for this collection."
5. Click **Generate SDKs**.
6. Click  to download your SDK.
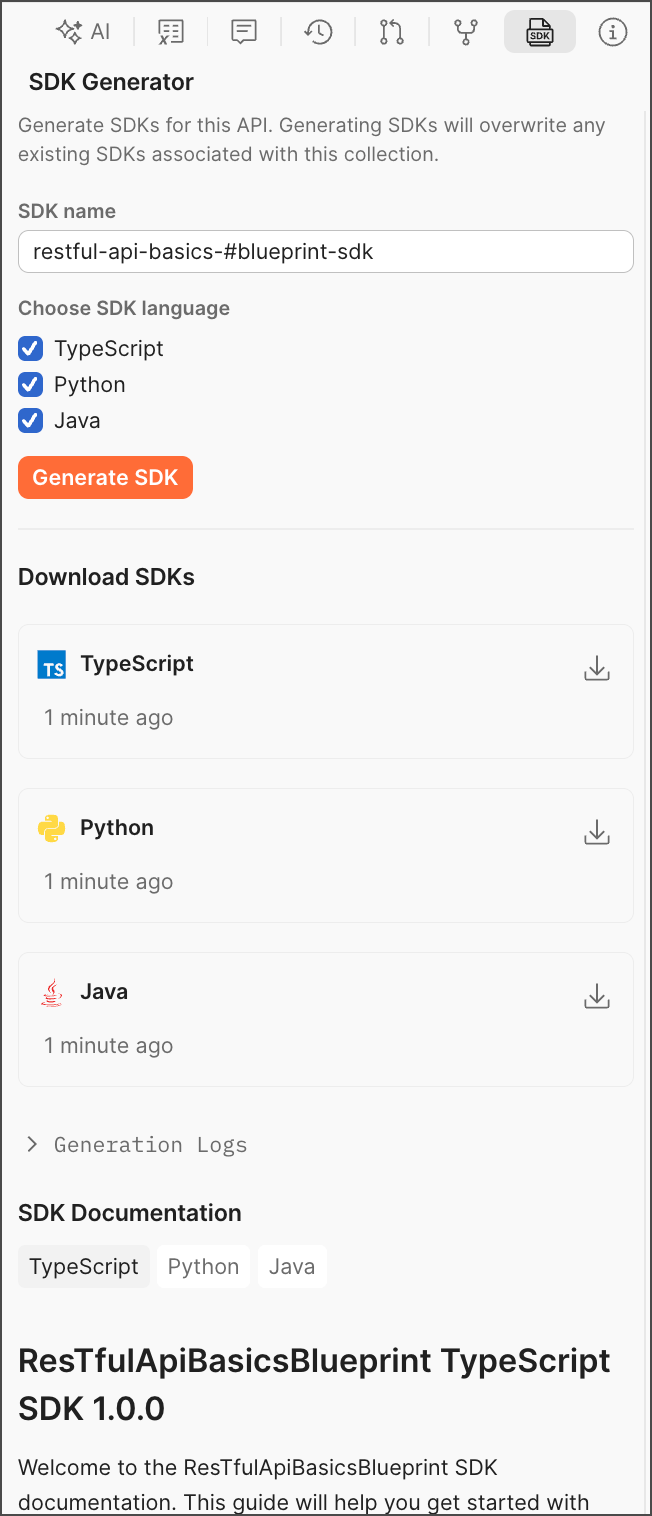 You can also check **Generation Logs** as well as the generated documentation, which appears below your package download.
To regenerate your SDKs or generate new ones in other languages, select the languages and click
**Generate SDKs**
again.
## Copy SDK code snippets
Sometimes you'll need to copy a request snippet from your SDK and paste it in your IDE. As a developer, you might update a request, test it in Postman, generate an SDK, and want to copy the new snippet.
To copy the snippet, do the following:
1. Open the request from a collection with a generated SDK, then select
You can also check **Generation Logs** as well as the generated documentation, which appears below your package download.
To regenerate your SDKs or generate new ones in other languages, select the languages and click
**Generate SDKs**
again.
## Copy SDK code snippets
Sometimes you'll need to copy a request snippet from your SDK and paste it in your IDE. As a developer, you might update a request, test it in Postman, generate an SDK, and want to copy the new snippet.
To copy the snippet, do the following:
1. Open the request from a collection with a generated SDK, then select  **Code** in the right sidebar.
2. From the dropdown list, select an SDK option (for example, `Typescript - SDK`).
**Code** in the right sidebar.
2. From the dropdown list, select an SDK option (for example, `Typescript - SDK`).
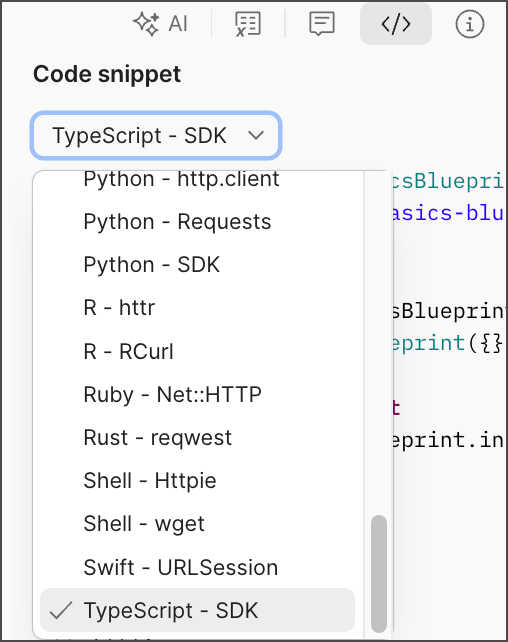 3. Click
  **Copy snippet** to copy the code snippet to your clipboard.
## View the SDK docs
SDK documentation is autogenerated and refreshed when you click the **Generate SDK** button, as described in [Generate SDKs from collections and API specifications](#generate-sdks-from-collections-and-api-specifications).
To access the docs, in the right sidebar, click **SDKs**. The docs appear below the SDKs you generated for each language.
To open the right sidebar, click **Show right sidebar** on the bottom right.
The SDK docs provide important information, such as installation and usage instructions, service and model details, and more.
## Connect to your GitHub and make a pull request
To generate an SDK from a collection in a specific language and sync it with GitHub repo, do the following:
1. Get your collection ID. Click **Info** in the right sidebar and copy the ID.
2. Run the following command in the Postman CLI to connect your collection to your repo for the language of your SDK, in this case TypeScript:
```bash
postman sdk connect github --language typescript
```
This action redirects you to the GitHub OAuth login screen and asks for the owner, repo, branch, and folder details. If successfully connected, you get the following message:
`Success: Successfully created integration for with Github repo `
3. Run the following command to manually generate and push a given SDK build ID to the configured repo.
```bash
postman sdk generate -l typescript --pr
```
The CLI output will look like this:
```bash
Creating 1 pull request(s)...
Cloning repository repo/a-test-git-repo...
Creating branch sdk-update-v1.0.0-1768491618110...
✓ Copied 123 file(s) to repository
Staging changes...
Committing changes...
Pushing branch...
Creating pull request...
✓ Pull request created: https://github.com/repo/a-test-git-repo/pull/16
```
After you merge your PR, the SDK will become available in GitHub.
## Generate SDKs locally
Generating SDKs in local mode enables you to generate SDKs locally without affecting your public Postman Collections in the cloud. SDKs are saved directly to your local file system for immediate use, and they automatically appear as code snippet options in your requests. You can also pull SDKs from your cloud collections to your local workspace. This way, you can experiment with SDK generation and test different configurations in a safe, isolated environment.
You can generate local SDKs on the desktop app only. To learn more about Postman's file system support and how to set up your local workspace and sync it with CI/CD and Postman Cloud, see [About Native Git](/docs/agent-mode/native-git/).
To generate an SDK in local mode:
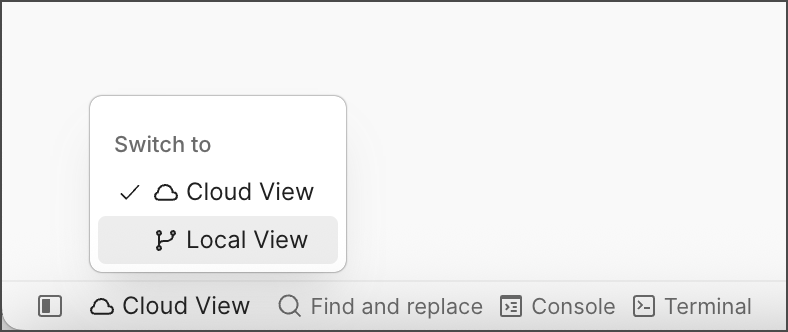
1. Open your collection in Postman and ensure you're in **Local View** (not **Cloud View**). You can check this in the bottom left of the Postman app. If you're in **Cloud View**, click it to switch to **Local View**.
**Copy snippet** to copy the code snippet to your clipboard.
## View the SDK docs
SDK documentation is autogenerated and refreshed when you click the **Generate SDK** button, as described in [Generate SDKs from collections and API specifications](#generate-sdks-from-collections-and-api-specifications).
To access the docs, in the right sidebar, click **SDKs**. The docs appear below the SDKs you generated for each language.
To open the right sidebar, click **Show right sidebar** on the bottom right.
The SDK docs provide important information, such as installation and usage instructions, service and model details, and more.
## Connect to your GitHub and make a pull request
To generate an SDK from a collection in a specific language and sync it with GitHub repo, do the following:
1. Get your collection ID. Click **Info** in the right sidebar and copy the ID.
2. Run the following command in the Postman CLI to connect your collection to your repo for the language of your SDK, in this case TypeScript:
```bash
postman sdk connect github --language typescript
```
This action redirects you to the GitHub OAuth login screen and asks for the owner, repo, branch, and folder details. If successfully connected, you get the following message:
`Success: Successfully created integration for with Github repo `
3. Run the following command to manually generate and push a given SDK build ID to the configured repo.
```bash
postman sdk generate -l typescript --pr
```
The CLI output will look like this:
```bash
Creating 1 pull request(s)...
Cloning repository repo/a-test-git-repo...
Creating branch sdk-update-v1.0.0-1768491618110...
✓ Copied 123 file(s) to repository
Staging changes...
Committing changes...
Pushing branch...
Creating pull request...
✓ Pull request created: https://github.com/repo/a-test-git-repo/pull/16
```
After you merge your PR, the SDK will become available in GitHub.
## Generate SDKs locally
Generating SDKs in local mode enables you to generate SDKs locally without affecting your public Postman Collections in the cloud. SDKs are saved directly to your local file system for immediate use, and they automatically appear as code snippet options in your requests. You can also pull SDKs from your cloud collections to your local workspace. This way, you can experiment with SDK generation and test different configurations in a safe, isolated environment.
You can generate local SDKs on the desktop app only. To learn more about Postman's file system support and how to set up your local workspace and sync it with CI/CD and Postman Cloud, see [About Native Git](/docs/agent-mode/native-git/).
To generate an SDK in local mode:
1. Open your collection in Postman and ensure you're in **Local View** (not **Cloud View**). You can check this in the bottom left of the Postman app. If you're in **Cloud View**, click it to switch to **Local View**.
 2. In the right sidebar, click **SDK Generator**.
To open the right sidebar, click **Show right sidebar** on the bottom right.
3. Select your preferred language (Python, TypeScript, Java, or all).
4. Click **Generate**.
Generation time may vary depending on the complexity of your API and the selected programming language.
### Local file system structure
When you generate SDKs locally, they're organized in your file system as follows:
Each SDK folder contains the complete generated SDK code, ready for integration into projects.
### Pull SDKs from cloud
You can also pull existing SDKs from cloud collections:
1. From the Git menu, click **Pull from Postman cloud**.
2. Select the SDKs you want to pull into your local workspace.
3. Select **Pull from Cloud**.
The SDKs will be downloaded and integrated into your local file system.
2. In the right sidebar, click **SDK Generator**.
To open the right sidebar, click **Show right sidebar** on the bottom right.
3. Select your preferred language (Python, TypeScript, Java, or all).
4. Click **Generate**.
Generation time may vary depending on the complexity of your API and the selected programming language.
### Local file system structure
When you generate SDKs locally, they're organized in your file system as follows:
Each SDK folder contains the complete generated SDK code, ready for integration into projects.
### Pull SDKs from cloud
You can also pull existing SDKs from cloud collections:
1. From the Git menu, click **Pull from Postman cloud**.
2. Select the SDKs you want to pull into your local workspace.
3. Select **Pull from Cloud**.
The SDKs will be downloaded and integrated into your local file system.