***
title: Okta
updated: 2025-11-25T00:00:00.000Z
max-toc-depth: 2
----------------
This feature is available on Postman Enterprise plans and Team plans with the Simple Security add-on. For more information, see the [pricing page](https://www.postman.com/pricing/).
To configure SSO with Okta, you can use the available Postman app in Okta or create a custom SAML application. You must be an administrator in both Okta and Postman to configure SSO for your team.
## Configuring SSO with Okta
Before configuring SSO in Okta, you must [configure SSO in Postman](/docs/administration/sso/admin-sso/). When choosing the **Authentication Type**, select **Okta**. Name your authentication and click **Continue**.
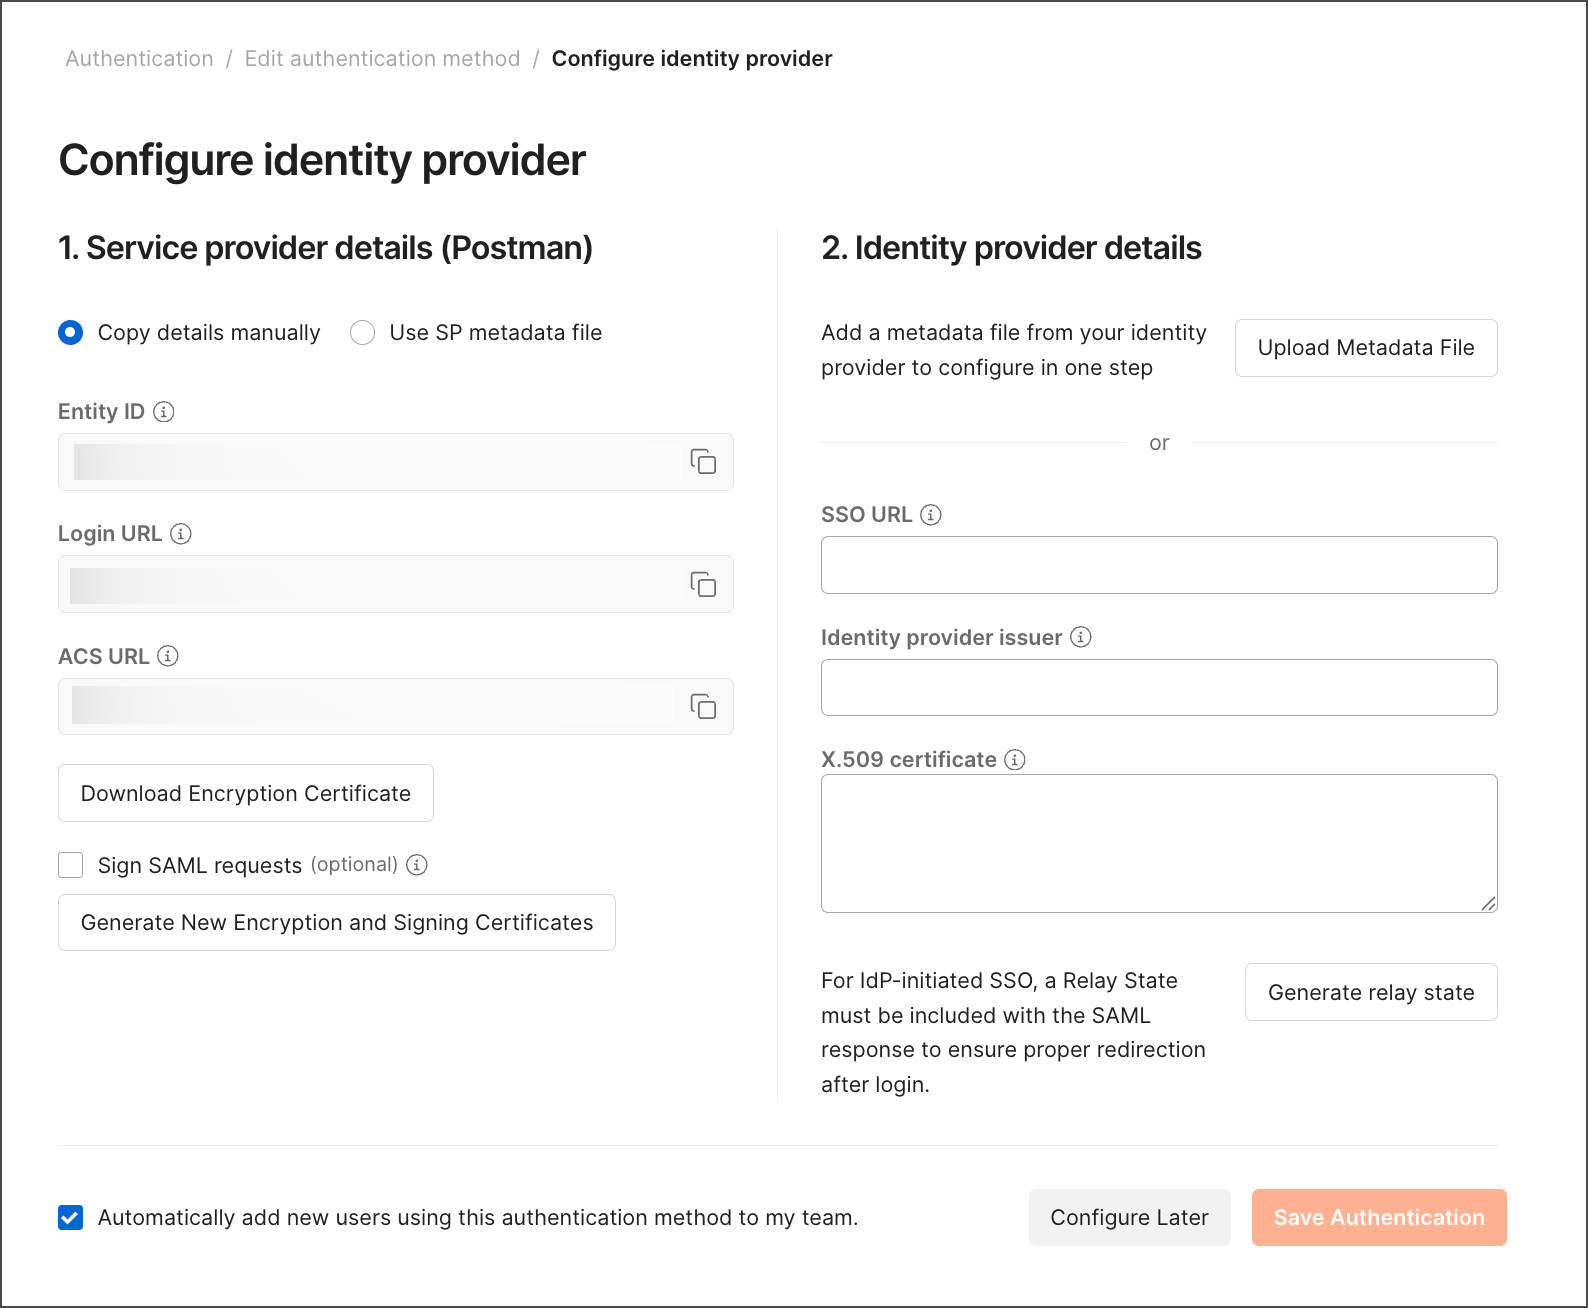 To continue configuring SSO with Okta, choose one of the following:
* [Configuring SSO using the Postman Okta app](#configuring-sso-using-the-postman-okta-app) (recommended)
* [Configuring SSO using a custom SAML app](#configuring-sso-using-a-custom-saml-app)
## Configuring SSO using the Postman Okta app
It's recommended that you configure SSO with Okta using the Postman Okta app.
To continue configuring the [Postman app in Okta](https://www.okta.com/integrations/postman/), do the following:
1. Open your Okta admin console in a new tab.
2. Go to **Applications**, and then click **Applications**.
3. Click **Browse App Catalog**.

4. Search for "Postman". Select the Postman app from the results, and then click **Add Integration**.

5. In the General Settings screen, enter an application label you'll recognize later, and then click **Done**.
6. Click the **Sign On** tab, and then click **Edit**.

7. Take the **Relay state** generated from Postman and add it as your **Default Relay State**. Upload the **Encryption Certificate** downloaded from Postman. Take the **ACS URL** from Postman and add it to your configuration in Okta, and then click **Save**.

8. Click **View SAML setup instructions** to display SAML configuration instructions, including the identity provider (IdP) details.
9. In Postman, enter the **SSO URL**, **Identity provider issuer**, and **X.509 Certificate** individually under **Identity provider details**.
10. Click **Save Authentication** in Postman.
## Configuring SSO using a custom SAML app
To continue configuring your custom SAML application, do the following:
You can't use a custom SAML app to [configure SCIM (System for Cross-domain Identity Management) provisioning through Okta](/docs/administration/scim-provisioning/configuring-scim-with-okta/).
1. Open your Okta admin console in a new tab.
2. Go to **Applications**, and then click **Applications**.
3. Click **Create App Integration**.

4. In the Create a new app integration screen, select **SAML 2.0** and then click **Next**.

5. In the **General Settings** tab, enter an app name you'll recognize later, and then click **Next**.
6. In the **Configure SAML** tab, take the **ACS URL** from Postman and add it as your **Single sign-on URL**. Take the **Entity ID** from Postman and add it as your **Audience URI (SP Entity ID)**. Take the **Relay state** generated from Postman and add it as your **Default RelayState**. Select **EmailAddress** as the name ID format.

7. Click **Show Advanced Settings**. Click **Encrypted** as the assertion encryption, **AES128-CBC** as the encryption algorithm, and **RSA-1.5** as the key transport algorithm. Upload the **Encryption Certificate** downloaded from Postman, and then click **Next**.

8. In the **Feedback** tab, click **I'm an Okta customer adding an internal app**. Select **This is an internal app that we have created** as the app type, and then click **Finish**.
9. Click the **Sign On** tab, and then click **View SAML setup instructions** to display the IdP details.

10. In Postman, enter the **SSO URL**, **Identity provider issuer**, and **X.509 Certificate** individually under **Identity provider details**.
11. Click **Save Authentication** in Postman.
## Next steps
Now that you've set up SSO with Okta using the Postman app, you can learn about setting up SCIM provisioning:
* To learn more, visit [Configuring SCIM with Okta](/docs/administration/scim-provisioning/configuring-scim-with-okta/). (*[Enterprise teams](https://www.postman.com/pricing/) only.*)
To continue configuring SSO with Okta, choose one of the following:
* [Configuring SSO using the Postman Okta app](#configuring-sso-using-the-postman-okta-app) (recommended)
* [Configuring SSO using a custom SAML app](#configuring-sso-using-a-custom-saml-app)
## Configuring SSO using the Postman Okta app
It's recommended that you configure SSO with Okta using the Postman Okta app.
To continue configuring the [Postman app in Okta](https://www.okta.com/integrations/postman/), do the following:
1. Open your Okta admin console in a new tab.
2. Go to **Applications**, and then click **Applications**.
3. Click **Browse App Catalog**.

4. Search for "Postman". Select the Postman app from the results, and then click **Add Integration**.

5. In the General Settings screen, enter an application label you'll recognize later, and then click **Done**.
6. Click the **Sign On** tab, and then click **Edit**.

7. Take the **Relay state** generated from Postman and add it as your **Default Relay State**. Upload the **Encryption Certificate** downloaded from Postman. Take the **ACS URL** from Postman and add it to your configuration in Okta, and then click **Save**.

8. Click **View SAML setup instructions** to display SAML configuration instructions, including the identity provider (IdP) details.
9. In Postman, enter the **SSO URL**, **Identity provider issuer**, and **X.509 Certificate** individually under **Identity provider details**.
10. Click **Save Authentication** in Postman.
## Configuring SSO using a custom SAML app
To continue configuring your custom SAML application, do the following:
You can't use a custom SAML app to [configure SCIM (System for Cross-domain Identity Management) provisioning through Okta](/docs/administration/scim-provisioning/configuring-scim-with-okta/).
1. Open your Okta admin console in a new tab.
2. Go to **Applications**, and then click **Applications**.
3. Click **Create App Integration**.

4. In the Create a new app integration screen, select **SAML 2.0** and then click **Next**.

5. In the **General Settings** tab, enter an app name you'll recognize later, and then click **Next**.
6. In the **Configure SAML** tab, take the **ACS URL** from Postman and add it as your **Single sign-on URL**. Take the **Entity ID** from Postman and add it as your **Audience URI (SP Entity ID)**. Take the **Relay state** generated from Postman and add it as your **Default RelayState**. Select **EmailAddress** as the name ID format.

7. Click **Show Advanced Settings**. Click **Encrypted** as the assertion encryption, **AES128-CBC** as the encryption algorithm, and **RSA-1.5** as the key transport algorithm. Upload the **Encryption Certificate** downloaded from Postman, and then click **Next**.

8. In the **Feedback** tab, click **I'm an Okta customer adding an internal app**. Select **This is an internal app that we have created** as the app type, and then click **Finish**.
9. Click the **Sign On** tab, and then click **View SAML setup instructions** to display the IdP details.

10. In Postman, enter the **SSO URL**, **Identity provider issuer**, and **X.509 Certificate** individually under **Identity provider details**.
11. Click **Save Authentication** in Postman.
## Next steps
Now that you've set up SSO with Okta using the Postman app, you can learn about setting up SCIM provisioning:
* To learn more, visit [Configuring SCIM with Okta](/docs/administration/scim-provisioning/configuring-scim-with-okta/). (*[Enterprise teams](https://www.postman.com/pricing/) only.*)