
Deploy flows to the Postman Cloud
You can deploy any flow to the Postman Cloud, where it can receive and respond to requests from collaborators and other users. Flows running in the cloud can be scheduled, or triggered by external systems like third-party services, other APIs, or webhooks. Flows in the cloud are useful for running automations and exposing functionality as an API or as an AI tool for MCP servers.
For more information about running flows in the cloud, see Deployed flows overview.
When deploying flows, note the following:
- Flows running in the Postman Cloud don’t support private APIs.
- You can’t deploy flows in Local View. To learn more, see Manage flows locally or in the Postman Cloud.
- Environment variables used by flows running in the Postman Cloud must be synced to the cloud. To learn more, see Sync environment variables for cloud runs.
Create a deployable flow
To create a flow you can run in the cloud, do the following:
-
On the Start block, click Change trigger and select
 Request,
  Schedule, or
  MCP. The Start block becomes the block type you selected.
 -
Add and connect blocks to create a flow that processes data from one or more of the Request, Schedule, or MCP block’s output ports.
-
Add a Response block. Connect other blocks’ outputs to the Response block’s Headers and Body inputs as necessary. This returns status codes and includes routed data in the response’s headers and body according to your requirements.
-
Click Run to test your flow locally with scenario data.
You can design your flows to be synchronous (sync) or asynchronous (async). In a sync flow, all the blocks complete their functions before the flow sends a response. An async flow running in the cloud sends a response before its blocks finish running. For more information, see Synchronous and Asynchronous flows.
Validate with a cloud run
Before deploying, you can run your flow in the Postman Cloud directly from the canvas to confirm it behaves as expected in the cloud environment. A cloud run uses the same environment as a deployed flow, making it a reliable way to catch issues before deploying. To learn more, see Build a “Hello, world” flow.
To run your flow in the cloud from the canvas, do the following:
-
In your flow, click
 Manage and run scenarios next to
  Run.
Run. -
Turn on the Cloud Run toggle. The
 Run button changes color.
 -
Click
Run. The flow runs in the Postman Cloud.
Sync environment variables for cloud runs
A flow running in the Postman cloud, either as a cloud run or as a deployed flow, can’t access the local values of your environment variables. If an HTTP Request block uses an environment variable that only has a local value, the flow can fail in the cloud even though it works when you run it locally.
To make an environment variable available to your flow in the cloud, share its value. Sharing a value syncs it to the Postman Cloud. To learn more, see Share variables in Postman.
Scripts in an HTTP Request block can’t update environment variables in the cloud. If a later block needs a value that a pre-request or post-response script sets, the flow can fail. To learn more, see Update environment variables with scripts.
Deploy a flow
After you create a flow with a Request, Schedule, or MCP block and a Response block, you can deploy it to make it publicly available. For more information about deploying flows, see Deploy flows with snapshots.
To deploy a new flow to the cloud, do the following:
-
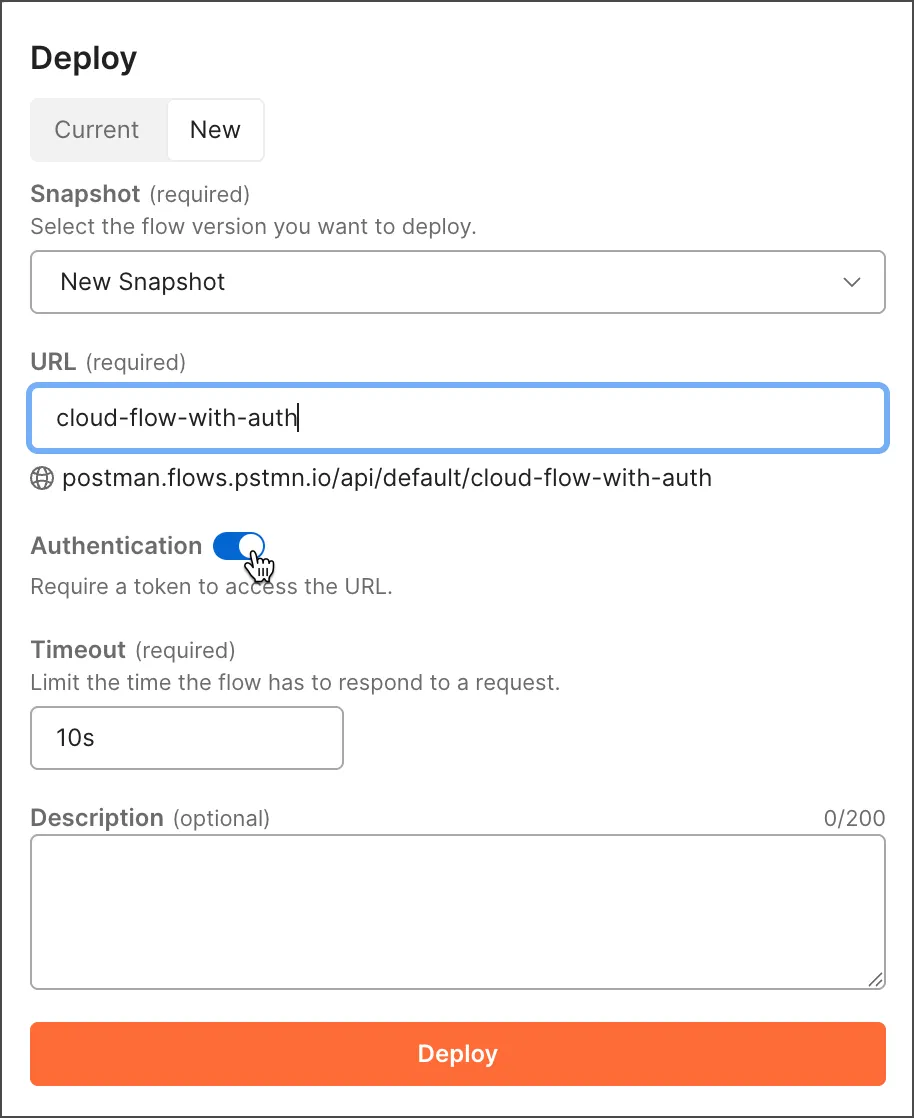
In your flow, click Deploy and enter the following:
-
URL — This path is added to the domain where the flow is deployed. You can use the resulting URL to call the flow.
-
Authentication — (Optional) Enable this setting to require a token to access the URL.
-
Timeout — Sets the amount of time that the flow waits before sending an HTTP 408 Request Timeout error if it hasn’t finished running. Enter a value between 5 and 30 seconds (inclusive). For more information, see Manage long-running deployed flows.
-
Description — (Optional) Describe the flow’s purpose and any important details.
-
-
Click Deploy. The flow runs in the Postman Cloud at the specified URL, and a green
 icon appears next to the flow’s name in the sidebar to show that it’s deployed. In the Deploy window, click Current to see a summary of the flow. The summary includes the flow’s status (online or offline), last deployed date and snapshot version, and authentication setting.
Deploy a new snapshot of a flow
If you make changes to your flow, you can deploy the new version and create a new snapshot of it.
To deploy a new version of an existing flow, do the following:
-
In your flow, click Deploy.
-
(Optional) Enter a description of the changes.
-
Click Deploy. The new version of the flow is deployed to the original URL and a new snapshot is created.
Deploy a previous snapshot of a flow
To revert a flow to a previous snapshot, do the following:
-
In your flow, click
 Past deployments.
 -
Select a previous deployment and click
 Snapshot to deploy it.
 -
Select the snapshot you want to deploy.
-
Click Deploy.
The local version of your flow doesn’t automatically restore the snapshot when you deploy it. To learn about restoring snapshots and more, see Version flows with snapshots.
Schedule a flow to run automatically
You can trigger flows in the cloud to run at regular intervals or at specific times.
To trigger a flow with a schedule, do the following:
-
In the Request block in your flow, click Change trigger and select
Schedule. The Request block changes to a Schedule block. -
In the text box, enter when you want the flow to run in plain language. For example, you could enter “Run once per minute for five minutes.” The shortest time increment you can schedule is one minute. The longest is one year.
-
Click Apply.
-
Click Deploy > New > Deploy. You can see the flow’s results on the Analytics page after it runs.
Enforce bearer token authorization
You can configure new and existing flows to authorize requests with a bearer token. To require a bearer token for a new flow, do the following:
-
Click Deploy.
-
Enter a URL.
-
Turn on Authentication.
-
Click Deploy.
-
In the Deploy window, click Current. The obfuscated token appears at the bottom of the Deploy window.
-
Hover over the token and click
 Copy to copy the token. You can then share the token with authorized users so they can include it in requests to the flow’s URL.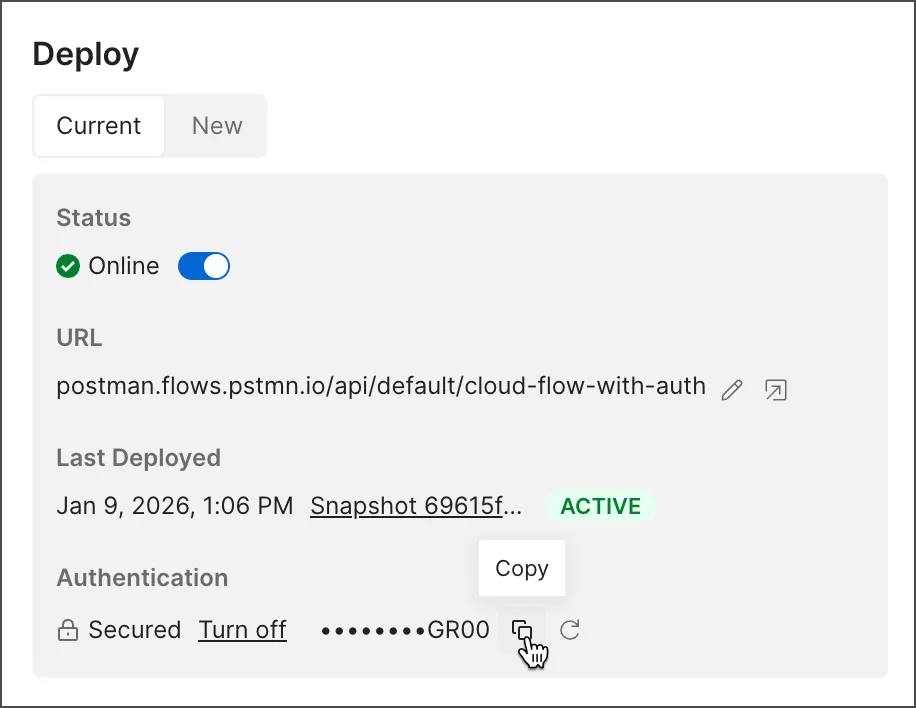
-
(Optional) Hover over the token and click
 Regenerate token to create a new token.