
Okta
This feature is available on Postman Enterprise plans and Team plans with the Simple Security add-on. For more information, see the pricing page.
To configure SSO with Okta, you can use the available Postman app in Okta or create a custom SAML application. You must be an administrator in both Okta and Postman to configure SSO for your team.
Configuring SSO with Okta
Before configuring SSO in Okta, you must configure SSO in Postman. When choosing the Authentication Type, select Okta. Name your authentication and click Continue.
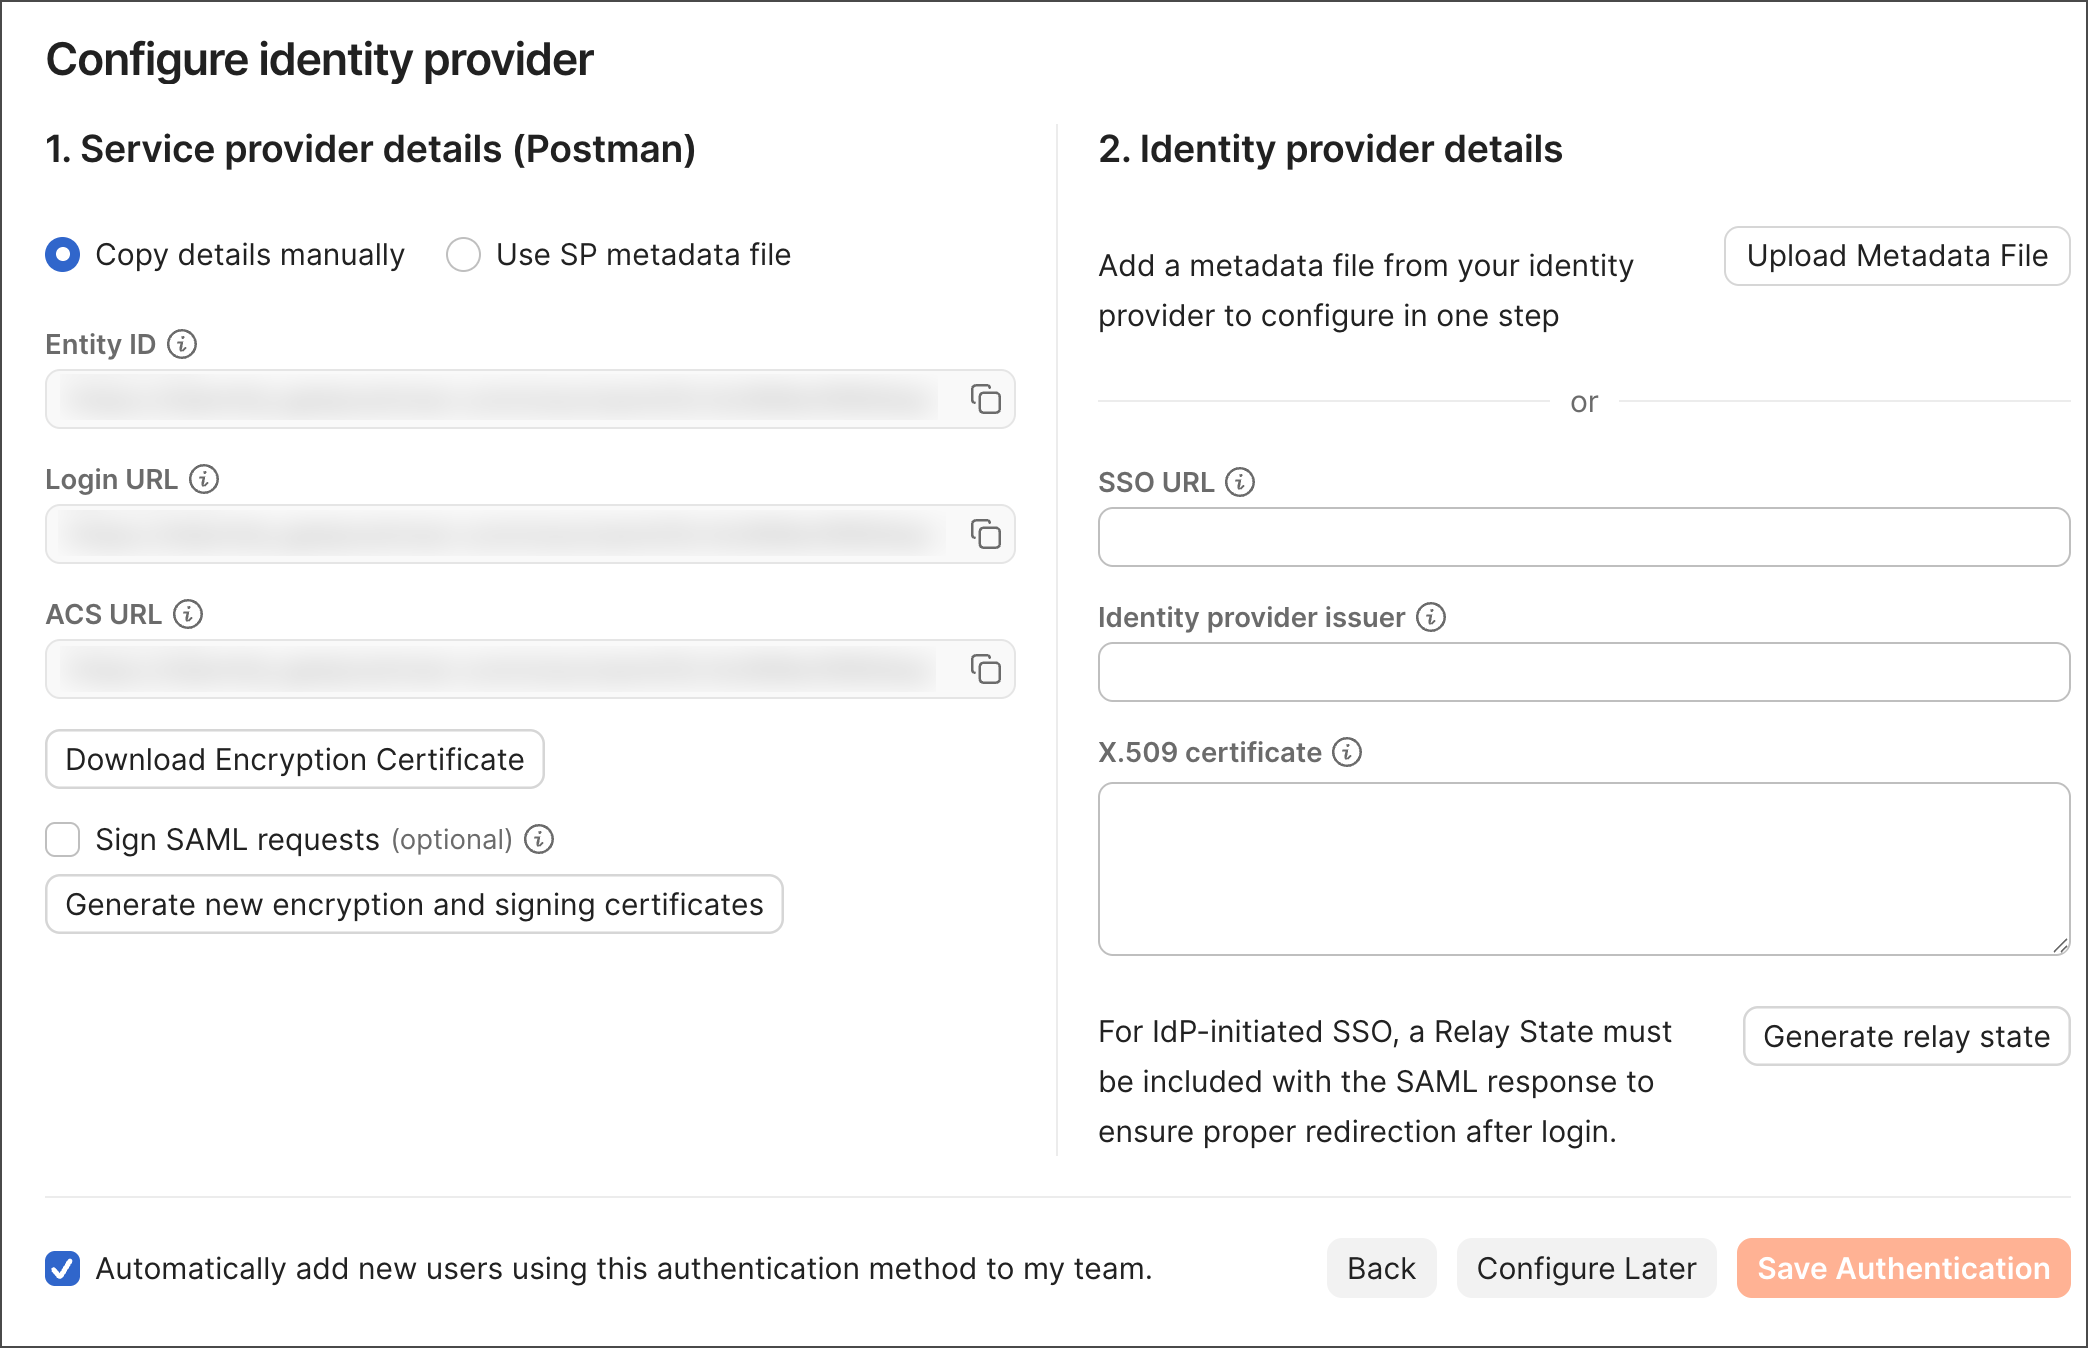
To continue configuring SSO with Okta, choose one of the following:
Configuring SSO using the Postman Okta app
It’s recommended that you configure SSO with Okta using the Postman Okta app.
To continue configuring the Postman app in Okta, do the following:
-
Open your Okta admin console in a new tab.
-
Go to Applications, and then click Applications.
-
Click Browse App Catalog.

-
Search for “Postman”. Select the Postman app from the results, and then click Add Integration.

-
In the General Settings screen, enter an application label you’ll recognize later, and then click Done.
-
Click the Sign On tab, and then click Edit.

-
Take the Relay state generated from Postman and add it as your Default Relay State. Upload the Encryption Certificate downloaded from Postman. Take the ACS URL from Postman and add it to your configuration in Okta, and then click Save.

-
Click View SAML setup instructions to display SAML configuration instructions, including the identity provider (IdP) details.
-
In Postman, enter the SSO URL, Identity provider issuer, and X.509 Certificate individually under Identity provider details.
-
Click Save Authentication in Postman.
Configuring SSO using a custom SAML app
To continue configuring your custom SAML application, do the following:
You can’t use a custom SAML app to configure SCIM (System for Cross-domain Identity Management) provisioning through Okta.
-
Open your Okta admin console in a new tab.
-
Go to Applications, and then click Applications.
-
Click Create App Integration.
-
In the Create a new app integration screen, select SAML 2.0 and then click Next.

-
In the General Settings tab, enter an app name you’ll recognize later, and then click Next.
-
In the Configure SAML tab, take the ACS URL from Postman and add it as your Single sign-on URL. Take the Entity ID from Postman and add it as your Audience URI (SP Entity ID). Take the Relay state generated from Postman and add it as your Default RelayState. Select EmailAddress as the name ID format.

-
Click Show Advanced Settings. Click Encrypted as the assertion encryption, AES128-CBC as the encryption algorithm, and RSA-1.5 as the key transport algorithm. Upload the Encryption Certificate downloaded from Postman, and then click Next.

-
In the Feedback tab, click I’m an Okta customer adding an internal app. Select This is an internal app that we have created as the app type, and then click Finish.
-
Click the Sign On tab, and then click View SAML setup instructions to display the IdP details.

-
In Postman, enter the SSO URL, Identity provider issuer, and X.509 Certificate individually under Identity provider details.
-
Click Save Authentication in Postman.
Set up enterprise-managed authorization for the Postman MCP server
Enterprise-managed authorization is in beta. You can’t turn it on yourself. To enable it for your team, contact Postman support.
Enterprise-managed authorization (EMA) lets your identity provider (IdP) sign team members in to the Postman MCP server from an AI agent, without a separate Postman sign-in. Your IdP gives the AI agent a short-lived pass, and the agent trades it with Postman for access. Your IdP manages access using Cross-App Access (XAA), so team members can connect only if you’ve given them access in your IdP.
If you remove a user’s access in your IdP, their access to the Postman MCP server ends within one hour, when the current token expires.
Claude and Okta support this setup, so the steps below use them.
Before you begin
Make sure you have the following:
- SSO set up and enabled for your team using a custom SAML app in Okta, on a plan that includes SSO. For more information, see Configuring SSO using a custom SAML app.
- Admin access to the Okta admin console.
- An AI agent to connect to the Postman MCP server, such as Claude.
Each user needs an existing Postman account with the same verified email address as in Okta, and must be an active member of your team. EMA doesn’t create accounts or send invites.
Request EMA from Postman Support
-
Contact Postman Support to request EMA for your team. Include your IdP issuer URL, such as
https://acme.okta.com.Use your Okta org URL exactly as it appears. Don’t add a trailing
/, and don’t use/oauth2/defaultor any other custom authorization server path. -
Postman Support turns on EMA for your team and sends you your Team ID and Audience URL. You’ll enter these in Okta in the next section.
Enable cross-app access in Okta
Learn how to configure Cross-App Access for an AI agent in Okta.
-
In the Okta admin console, open your existing Postman app, then click the Machine Assignments tab.
-
Next to Cross-app access (XAA), click Edit.
-
Set the status to Enabled, and then enter the following:
- Issuer URL — The Audience URL from Postman Support.
- Audience/tenant ID — The Team ID from Postman Support.
- Scopes (optional) — The scopes to include.
-
Click Save.
Register the AI agent in Okta
-
In the Okta admin console, go to Directory, and then click AI Agents.
-
Click Register AI agent.
-
Enter a name for the agent, such as “Claude”, and then click Next.
-
Under User access and authentication, select Allow users to access this agent. Then select one of the following:
- Create a new OIDC app linked to this AI agent
- Select an existing app — Choose the client app your organization already uses.
This action permanently binds the OIDC app to the agent. To change it later, you must delete the agent.
-
Click Next, add at least one owner, and then finish registering the agent.
-
On the agent’s page, go to Client registration. Choose the client registration method that your AI agent supports.
-
On the agent’s User access tab, assign the users who can use the agent.
Add a resource connection
-
On the agent’s page, go to Resource connections and add a connection.
-
Select the Application instance, which is the Postman app.
-
Enter the following:
- Client ID registered in the Postman app — Enter your AI agent’s CIMD URL, if the agent supports Cross-App Access for EMA. For Claude, enter
https://claude.ai/oauth/mcp-oauth-client-metadata. - Resource identifier (optional) — Leave blank unless your AI agent’s instructions say otherwise.
- Scopes — Select Allow any scope, or enter custom scopes.
- Client ID registered in the Postman app — Enter your AI agent’s CIMD URL, if the agent supports Cross-App Access for EMA. For Claude, enter
-
Click Add.
If you see “A connection to this app with this resource identifier already exists,” edit the existing connection instead of adding a new one.
Connect the Postman connector
A Claude organization admin does this step. Claude already includes a Postman connector with its MCP URL set, so you don’t need to add a custom connector or enter a URL.
Learn how to authorize MCP connectors for your entire organization in Claude.
-
In Claude, open the Postman connector.
-
Go to the connector’s settings, and then under connection methods, select Managed.
-
Test the connection.
-
Save and connect.
In Claude Code, this works only when users sign in with their claude.ai account. It doesn’t work with an API key or with a server the user added themselves.
Next steps
Now that you’ve set up SSO with Okta using the Postman app, you can learn about setting up SCIM provisioning:
-
To learn more, visit Configuring SCIM with Okta. (Enterprise teams only.)
-
To help users sign in with SSO, see Provide sign-in support.