Configure SCIM with Okta
Postman supports SCIM (System for Cross-domain Identity Management) provisioning through Okta with the Postman Okta app or the SCIM 2.0 test app (Header Auth). These apps enable you to automate user provisioning and de-provisioning.
You must be a Postman Admin or Super Admin to enable SCIM. It’s recommended that you enable SCIM with a service account assigned the Super Admin role.
With SCIM enabled, users won’t have the option to leave your organization or team on their own, and won’t be able to change their account email or password. Only Admins and Super Admins have permission to remove members. Only administrators in Okta have permission to use SCIM to change user account emails if they’re associated with your verified domain.
Set up SCIM in Okta with Postman Okta app
Postman is available as an app in the Okta Integration Network, allowing you to enable user provisioning directly through Okta.
It’s recommended that you enable SCIM in Okta with the Postman Okta app.
Enable SCIM in Okta with Postman Okta app
Prior to enabling SCIM in Okta, you must add the Postman app in Okta and configure Okta’s SSO for your Postman team.
To set up provisioning with Okta, do the following:
-
In Okta, go to the Postman app, click Provisioning, then click Configure API Integration.

-
Click Enable API integration, and enter the following:
- Base URL - Enter
https://api.getpostman.com/scim/v2.
Important
If you’re using the EU Data Residency plan, enter
https://api.eu.postman.com/scim/v2.- API Token - Enter your SCIM API key.

- Base URL - Enter
-
Click Test API Credentials. If successful, a verification message appears.
If verification is unsuccessful, confirm that you have SCIM enabled for your team in Postman, are using the correct SCIM API key, and that your API key’s status is ACTIVE in your team authentication settings. If you continue to face issues, contact Postman support for assistance.
-
Click Save. You can now configure the Postman Okta app.
Configure the Postman Okta app
The Postman Okta app supports the provisioning features listed in the SCIM provisioning overview.
To turn these features on or off, do the following:
-
Go to the Postman app in Okta, click To App on the left, then click Edit.

-
Select features to enable them, or clear to turn them off.

-
Click Save to save your changes.
-
Click Assignments, then assign relevant people and groups to the app. Learn how to assign people and groups to an app in Okta.
Set up SCIM in Okta with SCIM test app
The SCIM 2.0 test app (Header Auth) is available in the Okta Integration Network, allowing you to enable user provisioning directly through Okta.
It’s recommended that you enable SCIM in Okta with the Postman Okta app.
Enable SCIM in Okta with SCIM test app
Prior to enabling SCIM in Okta, you must configure Okta’s SSO for your Postman team.
To set up provisioning with Okta, do the following:
-
Open your Okta admin console in a new tab.
-
Go to Applications, and then click Applications.
-
Click Browse App Catalog.

-
Search for “SCIM 2.0 Test App (Header Auth)”. Select the app from the results, and then click Add Integration.

-
In the General Settings tab, enter an app name you’ll recognize later, and then click Next.
-
In the Sign-On Options tab, click Done.
-
In Okta, go to the SCIM 2.0 test app (Header Auth), click Provisioning, then click Configure API Integration.

-
Click Enable API integration, and enter the following:
- Base URL - Enter
https://api.getpostman.com/scim/v2. - API Token - Enter your SCIM API key.

- Base URL - Enter
-
Click Test API Credentials. If successful, a verification message appears.
If verification is unsuccessful, confirm that you have SCIM enabled for your team in Postman, are using the correct SCIM API key, and that your API key’s status is ACTIVE in your team authentication settings. If you continue to face issues, contact Postman support for assistance.
-
Click Save. Then you can configure the SCIM 2.0 test app (Header Auth).
Configure the SCIM test app
After you enable SCIM in Okta with the SCIM 2.0 test app (Header Auth), you can configure the app. The SCIM 2.0 test app (Header Auth) supports the provisioning features listed in the SCIM provisioning overview. The app also supports updating group information from Postman to your identity provider (IdP).
To turn these features on or off, do the following:
-
Go to the SCIM 2.0 test app (Header Auth) in Okta, click Provisioning, click To App on the left, then click Edit.

-
Select features to enable them, or clear to turn them off. Postman supports the Create users, Update User Attributes, and Deactivate Users features. Postman doesn’t support the Sync Password feature.

-
Click Save to save your changes.
-
Make sure only the Username, Given name, and Family name attributes are mapped. Delete other attributes if they’re mapped.

-
Click Assignments, then assign relevant people and groups to the app. Learn how to assign people and groups to an app in Okta.
Assign people to Postman in Okta
Postman recommends creating and pushing groups from Okta to ensure they’re synced and set with the right permissions. To learn more, see Push groups in Okta.
You can assign people and groups to the Postman app in Okta.
To assign people to Postman in Okta, do the following:
-
Sign in to the Okta Admin Console.
-
Go to Applications and select your app.
-
Click Assignments.
-
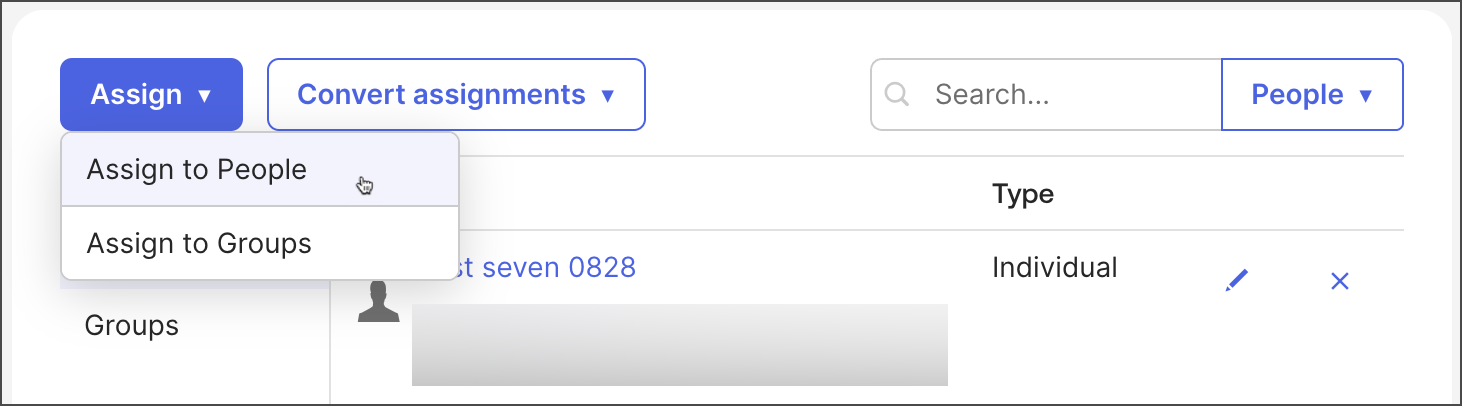
Select Assign > Assign to People or Assign to Groups to assign people to the app.
-
Search for the person or group and click Assign.
Learn how to assign people and groups to an app in Okta.
Push groups in Okta
Postman recommends creating and pushing groups from Okta to ensure they’re synced with the Active Directory (AD) group. You can find and link an existing group or create a new group using your AD group.
Find and link a group in Okta
Group linking allows you to link an AD group to an existing Postman group. When you search for a Postman group to link to, only groups without members are displayed. When you select a group to link to, the Postman group is renamed. This option is recommended when you want to assign a permission to a group in Postman, then link it to your AD group in Okta.
To link an AD group to a Postman group from Okta, do the following:
-
Sign in to the Okta Admin Console.
-
Go to Applications and select your app.
-
Click Push Groups.
-
Select By name and enter the name of the group you want to push.
-
Click Link Group, then select an existing Postman group.
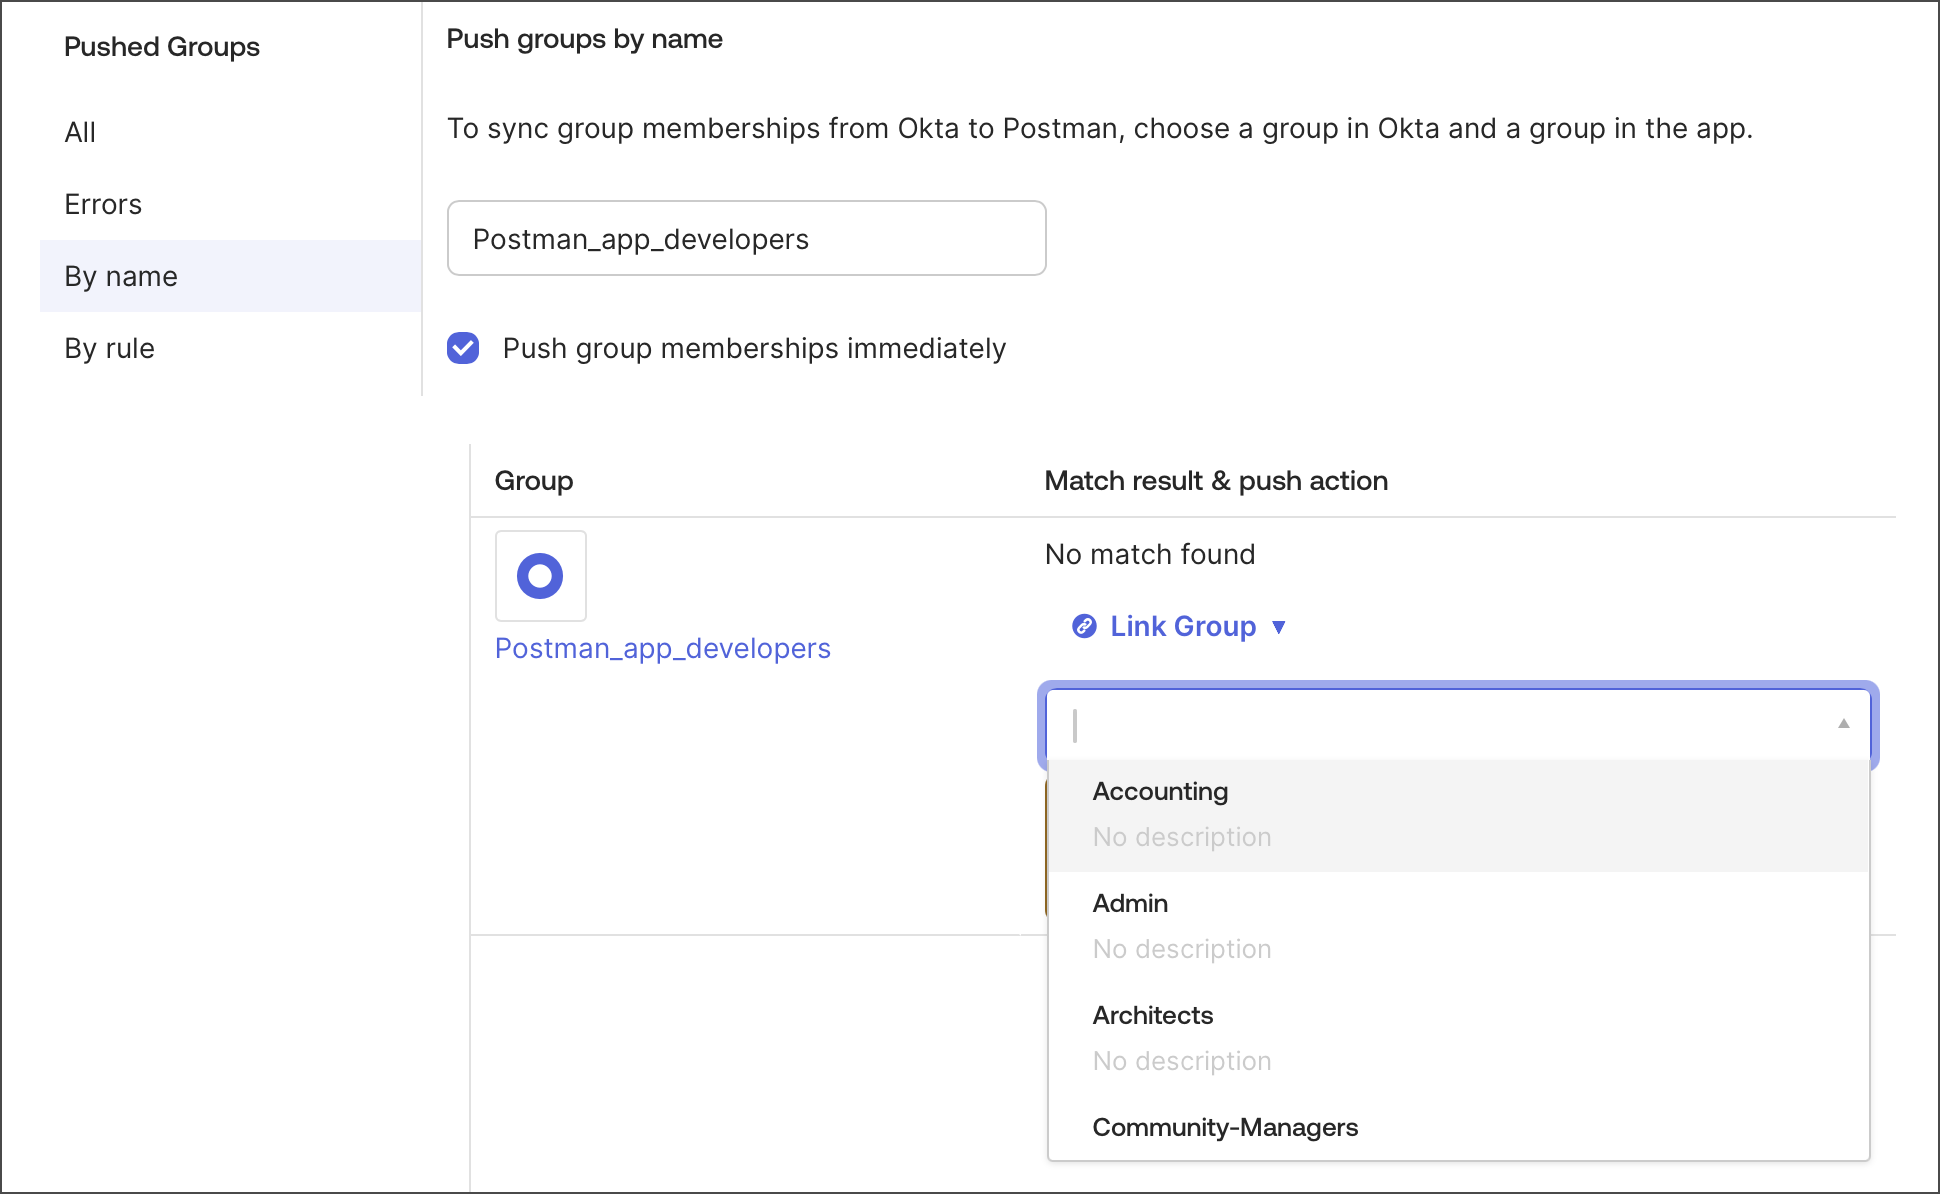
Ensure that the Push group membership immediately option is selected.
-
Click Save.
-
Refresh your browser and click All to check that your group is Active.

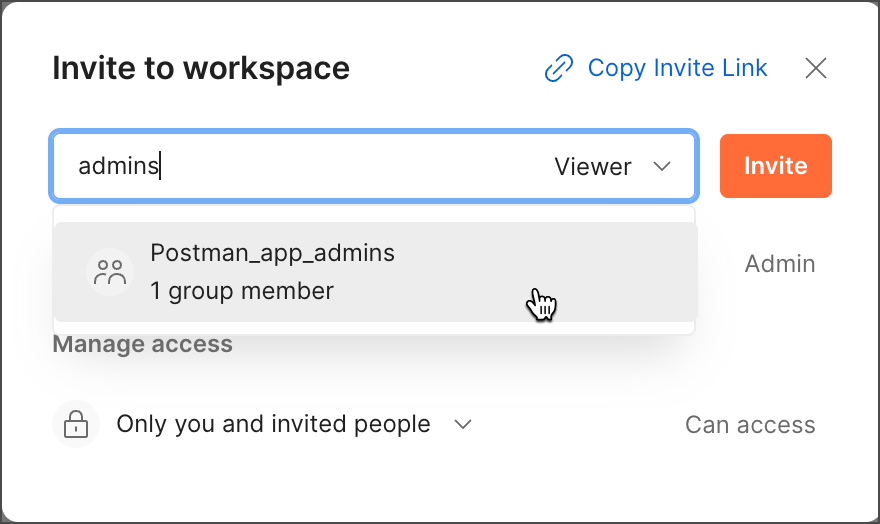
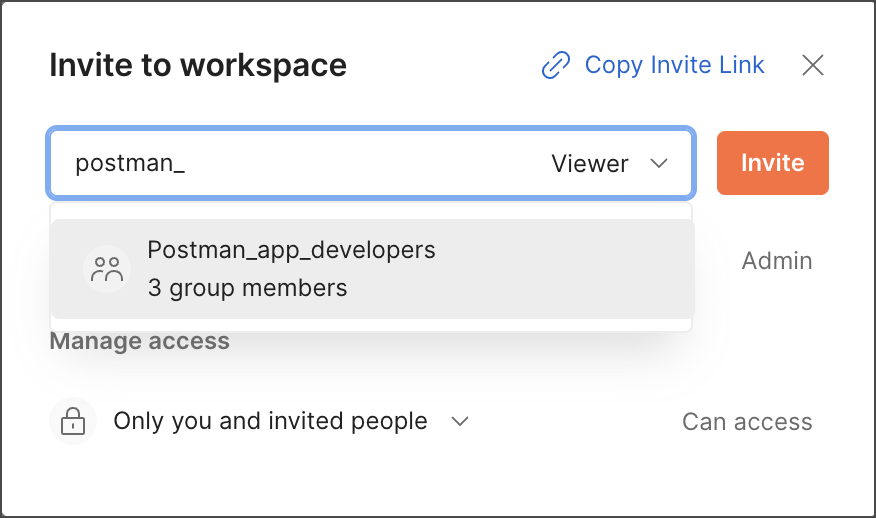
Now, Postman users can invite the group to their workspaces.
Create a new group in Okta
To create a new group in Postman using your AD Group, do the following:
-
Sign in to the Okta Admin Console.
-
Go to Applications and select your app.
-
Click Push Groups.
-
Select By name and enter the name of the group you want to push.
-
Click Create Group.
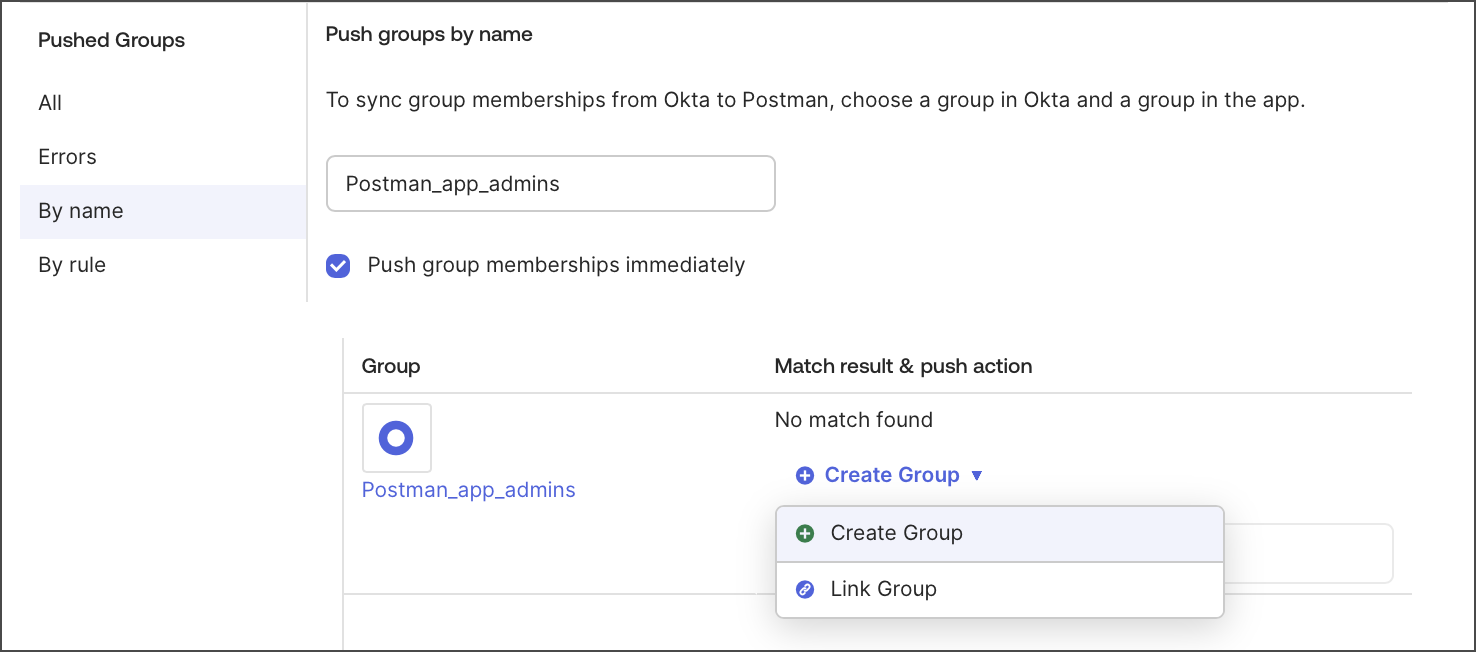
Ensure that the Push group membership immediately option is selected.
-
Click Save.
-
Refresh your browser and click All to check that your group is Active.
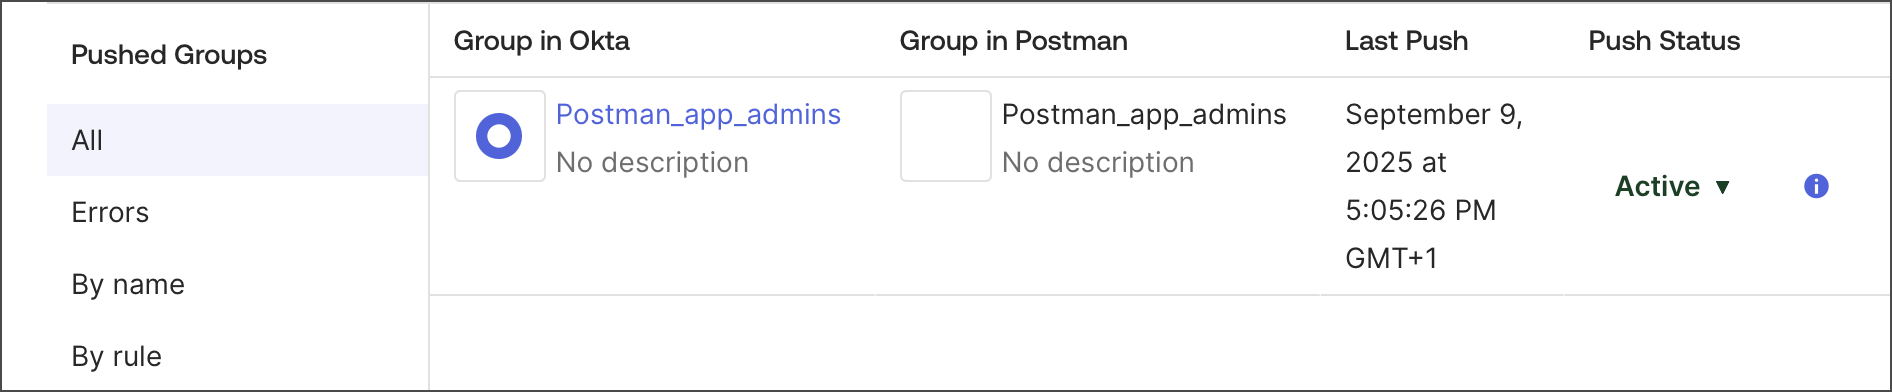
Now, Postman users can invite the group to their workspaces.