The gRPC client interface
Postman’s gRPC client interface provides a variety of specialized tools, views, and controls for invoking and testing gRPC requests. For example, it includes a dropdown list that shows the methods available on the server. This topic highlights the various parts of the gRPC client interface and how to use them.
Create a new request
Click New in the sidebar to create a new gRPC request. Select gRPC from the list to open a blank gRPC request in a new tab.
The request section
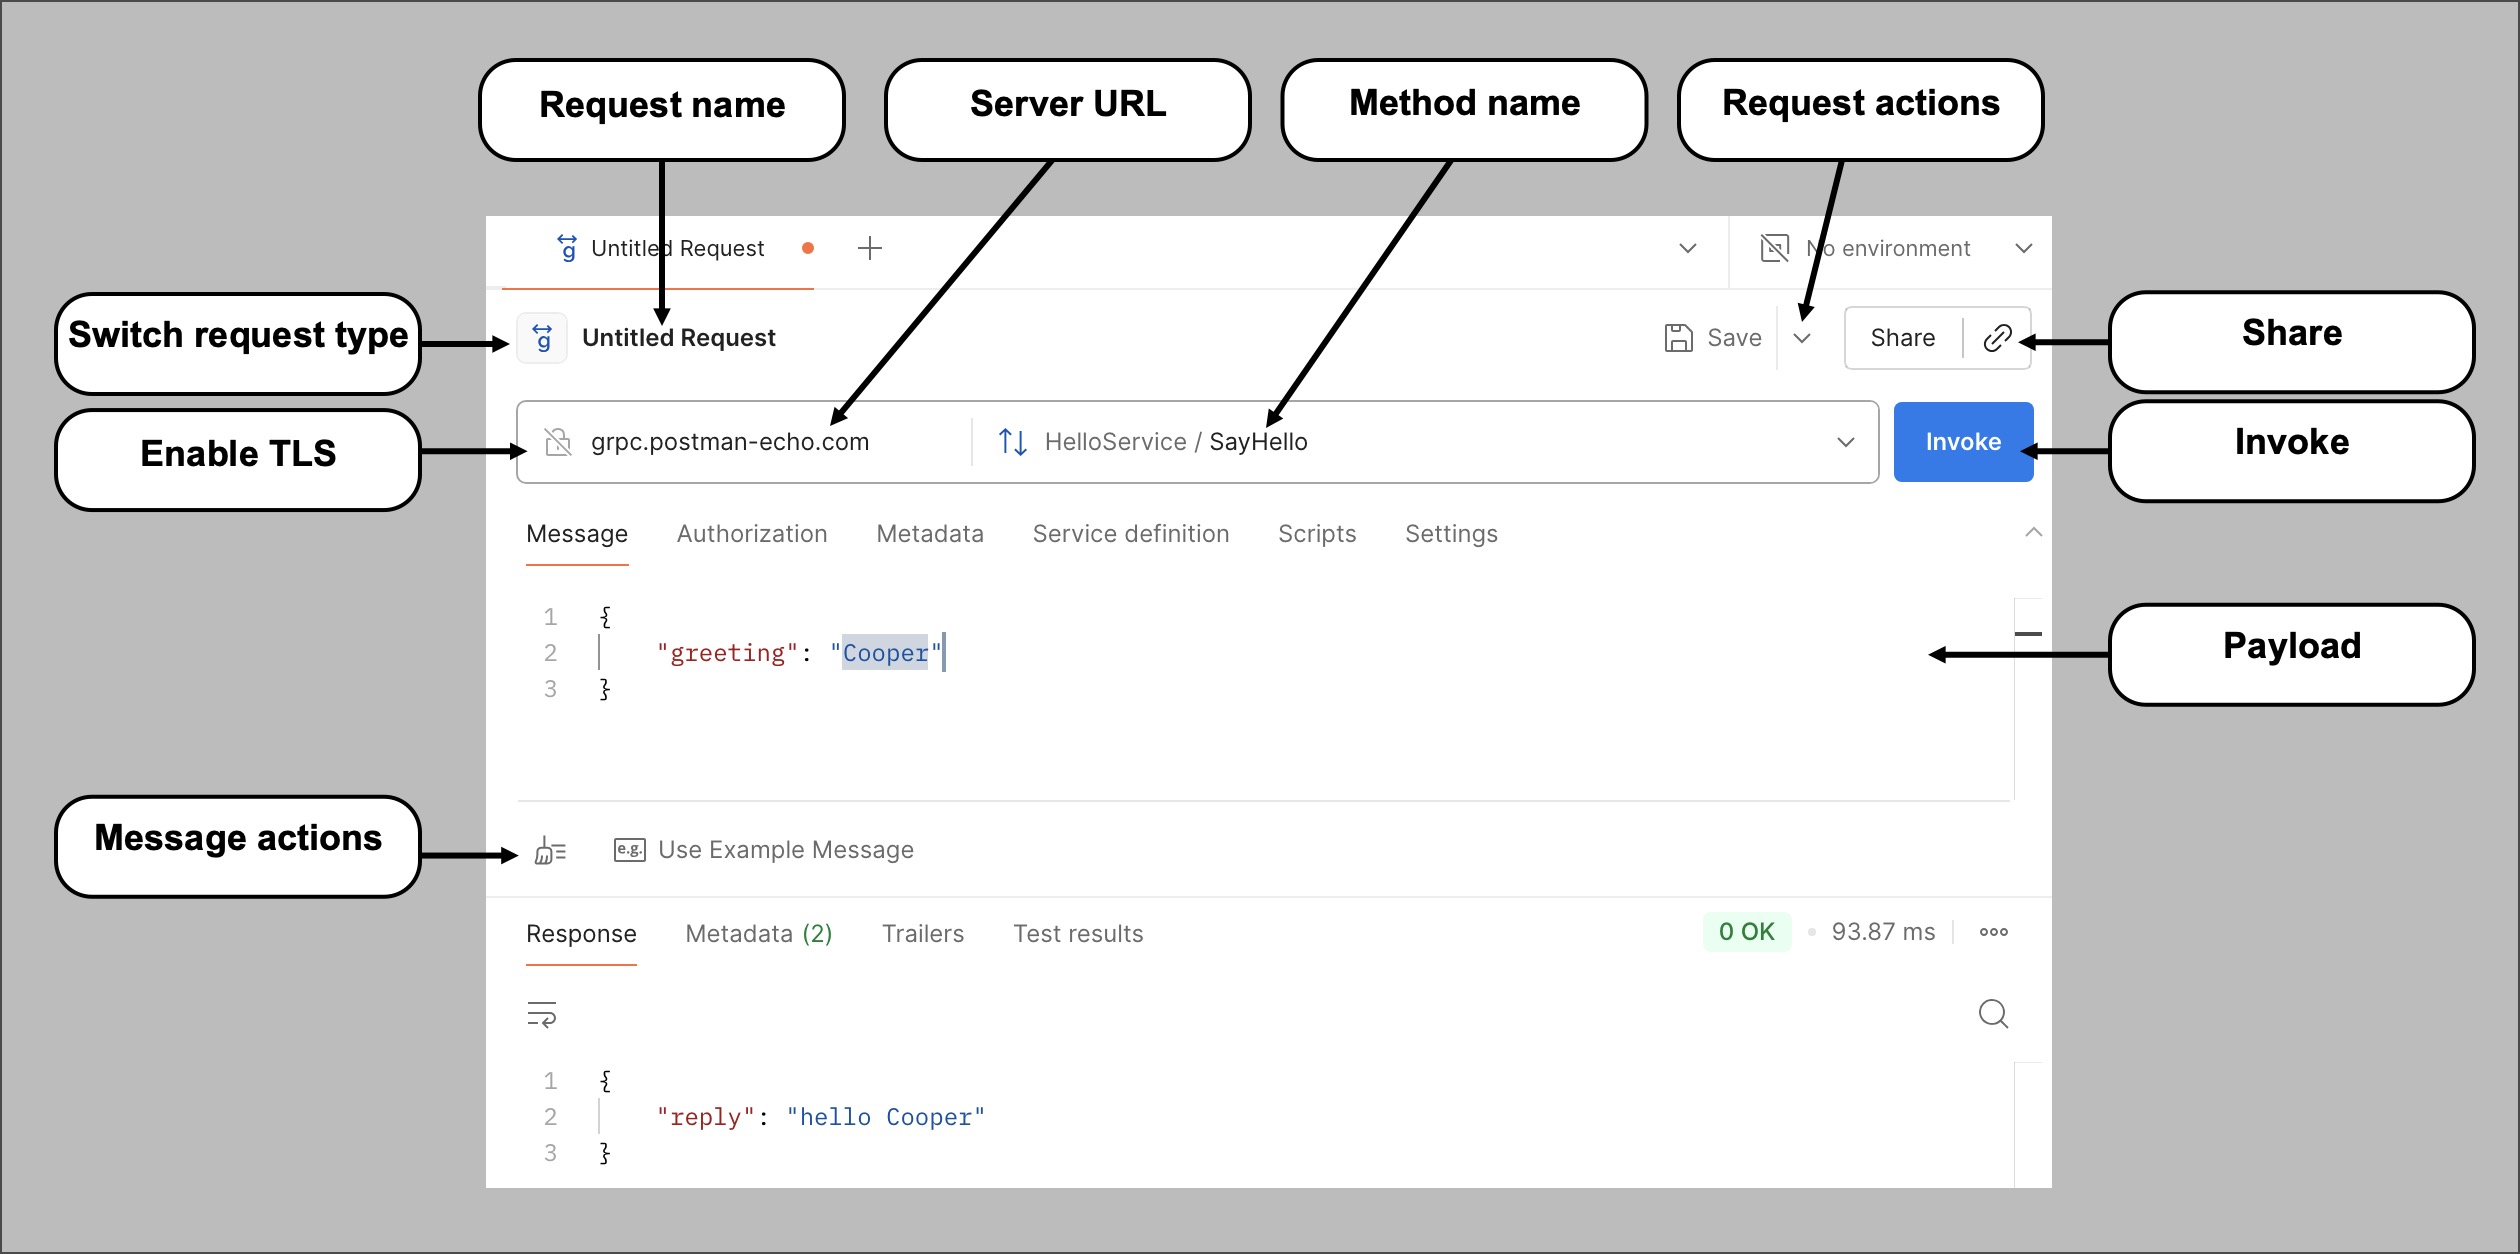
The request section includes the required configurations to connect to the server and run the selected method. Requests need a server URL, a service definition, and a selected method to be invoked. Based on the API requirements, you may have to include message payloads, metadata, and authorization details with the request. You may also have to configure TLS and other certificates based on the requirements.
-
Request name — To test multiple requests with different configurations, you can name each of them individually and save them into a collection. Saving into a collection enables you to reuse the requests later and share them with others.
-
Server URL — Defines the server’s hosted endpoint. A gRPC URL often begins with
grpc://instead ofhttp://orhttps://. While creating a new request, you can also browse through URLs you’ve used by selecting the URL box. This helps you create the request faster if you’re testing multiple methods on the same endpoint. Or, paste a gRPCurl command. -
Switch request type — Select the method you wish to invoke using the Switch request type dropdown list. The service’s definition populates the list of methods. For more details about the method types, see About gRPC API requests.
-
Request actions — Click
 to view a list of request actions:
- Save As — Saves the request into a collection so that you can reuse it later or share it with others. gRPC requests can only be saved to multi-protocol collections.
-
Share — Collaborate with team members, groups, and external users by sharing your requests with them. Learn more at Share your work in Postman.
-
Share — Select how you want to share the gRPC request with your team. To include an environment with the request, click Include environment and select an environment.
-
Copy link — Click
 Copy link to copy the link to the request to share with your team.
-
-
Invoke — Once you have entered the server URL, selected a method, and defined the payload, click Invoke to invoke the request and get a response from the server.
-
Payload — Contains the data to send in the request to the server. A gRPC payload has the following tabs to aid the server in running the request:
-
Message — Compose a message in JSON to send with the request. The server uses this message to perform appropriate actions and gives you a response in return.
-
Authorization — Pass credentials that the server uses to authorize the connection. Choose from a list of auth types, including API Key, Basic Auth, Bearer Token, and OAuth 2.0. Learn more about authorizing requests.
-
Metadata — Pass metadata with the request in the form of key-value pairs. The client uses the metadata to provide information about the call to the server.
-
Service definition — A service definition informs the client of all server-supported services, methods, message payload structures, and fields and data types. A service definition is loaded automatically after you enter the URL if the server supports server reflection. Otherwise, you must load a service definition manually by selecting or importing a
.protofile. Learn more about working with service definitions. -
Scripts — Postman has a powerful scripting environment that enables you to add JavaScript code (scripts) to your gRPC requests. Use scripts to perform API tests, debug your requests with the Postman Console, or dynamically read or update the values of variables. You can import packages with scripts and tests from your team’s Postman Package Library. You can also import packages from external package registries, such as npm and JSR. Learn more about scripting in gRPC requests.
-
Settings — Customize the gRPC request’s behavior with various options to meet your security and performance requirements. These options include:
- Enable server certificate verification — Verify the server certificate when invoking a method over a secure connection.
- Overwrite server name for certificate verification — Configure the value used to validate the common name in the server certificate.
- Include fields with default values in the response — View response fields with default values. Turning this off will omit such fields from the response.
- Maximum response message size — The maximum allowed message size, in megabytes. To receive messages of any size, set this value to 0.
- Connection Timeout — Configure the deadline to invoke and receive the response, in milliseconds. To keep the connection open indefinitely, set this value to 0.
-
-
Switch request type — You can change the protocol for a new request. Click New in the sidebar, then select a request protocol, or click
 Add to open a new tab. Click Switch request type next to the request’s name, then select a different request protocol.
You can’t change the request protocol after you click Save.
-
Enable TLS — Click
 Enable TLS to turn on transport layer security (TLS) for the request. Enabling TLS encrypts the data between the client and the server. Some servers require TLS.
 -
Message actions — Click
 Beautify to make the composed JSON message more readable with advanced formatting. Click
  Use Example Message to create an example message using the schema once you have selected the method to invoke.
The response section
After invoking a method, the response data sent from the server appears in the response area.
The response section has the following items:
-
Response — The information returned by the server after a successful request run.
- Wrap lines — Click
 Wrap lines to adjust the width of the response body according to the width of the response area. This makes it easier to read longer responses without scrolling.
- Wrap lines — Click
-
Metadata — The response’s metadata containing information about the run.
-
Trailers — Trailers are metadata sent by the server at the end of a response stream.
-
Test results — The results for assertions you write in the Scripts section appear here. Based on the post-response script, the results can be Passed, Failed, and Skipped. Learn more about scripting in gRPC requests.
-
Status code and Time — Contains information about performance and if the request succeeded. You can assess the performance of the API using the time, which displays how long the request took to process. The status code provides information about the request’s success or errors. The 0 OK status code means the request succeeded. In the event of an error, a gRPC-based implementation returns different status codes for different error scenarios which help you understand the cause.
-
Save Response — You can save your gRPC request responses as examples. For streaming methods, you must end streaming before you can save an example. See Save, edit, and share gRPC request-response examples to learn more.
-
Search — Click
 Search to find specific text in the response.
 -
Multiple responses — While invoking a streaming method type (client streaming, server streaming, or bidirectional streaming), the client-server communication within a single session is recorded in the response area as a series of sent and received messages in a timeline instead of a single response.
-
Connection status — The connection status displays whether connection with the server is active and if messages are streaming.
-
Message stream — The message stream contains the list of sent, received, and informative messages arranged in reverse chronological order (latest appears on the top).
-
Expand or collapse message — Click
to view a message’s contents in the message stream. -
Search — Use the text box to search for specific messages.
-
Message filter — Click
to adjust the view based on the type of message. Instead of all messages, you can choose to view only sent or received messages. -
Clear Messages — Hides all messages from the view, cleaning up the response area so that you can focus on the new messages. Click Restore to restore of all messages.
-
End Streaming — Appears when you invoke a method that sends multiple messages from the client. Click End Streaming to conclude the streaming operation between the client and the server.
-
Send - Appears when invoking a method that sends multiple messages from the client. Click Send to send the request message to the server.
-
The right sidebar
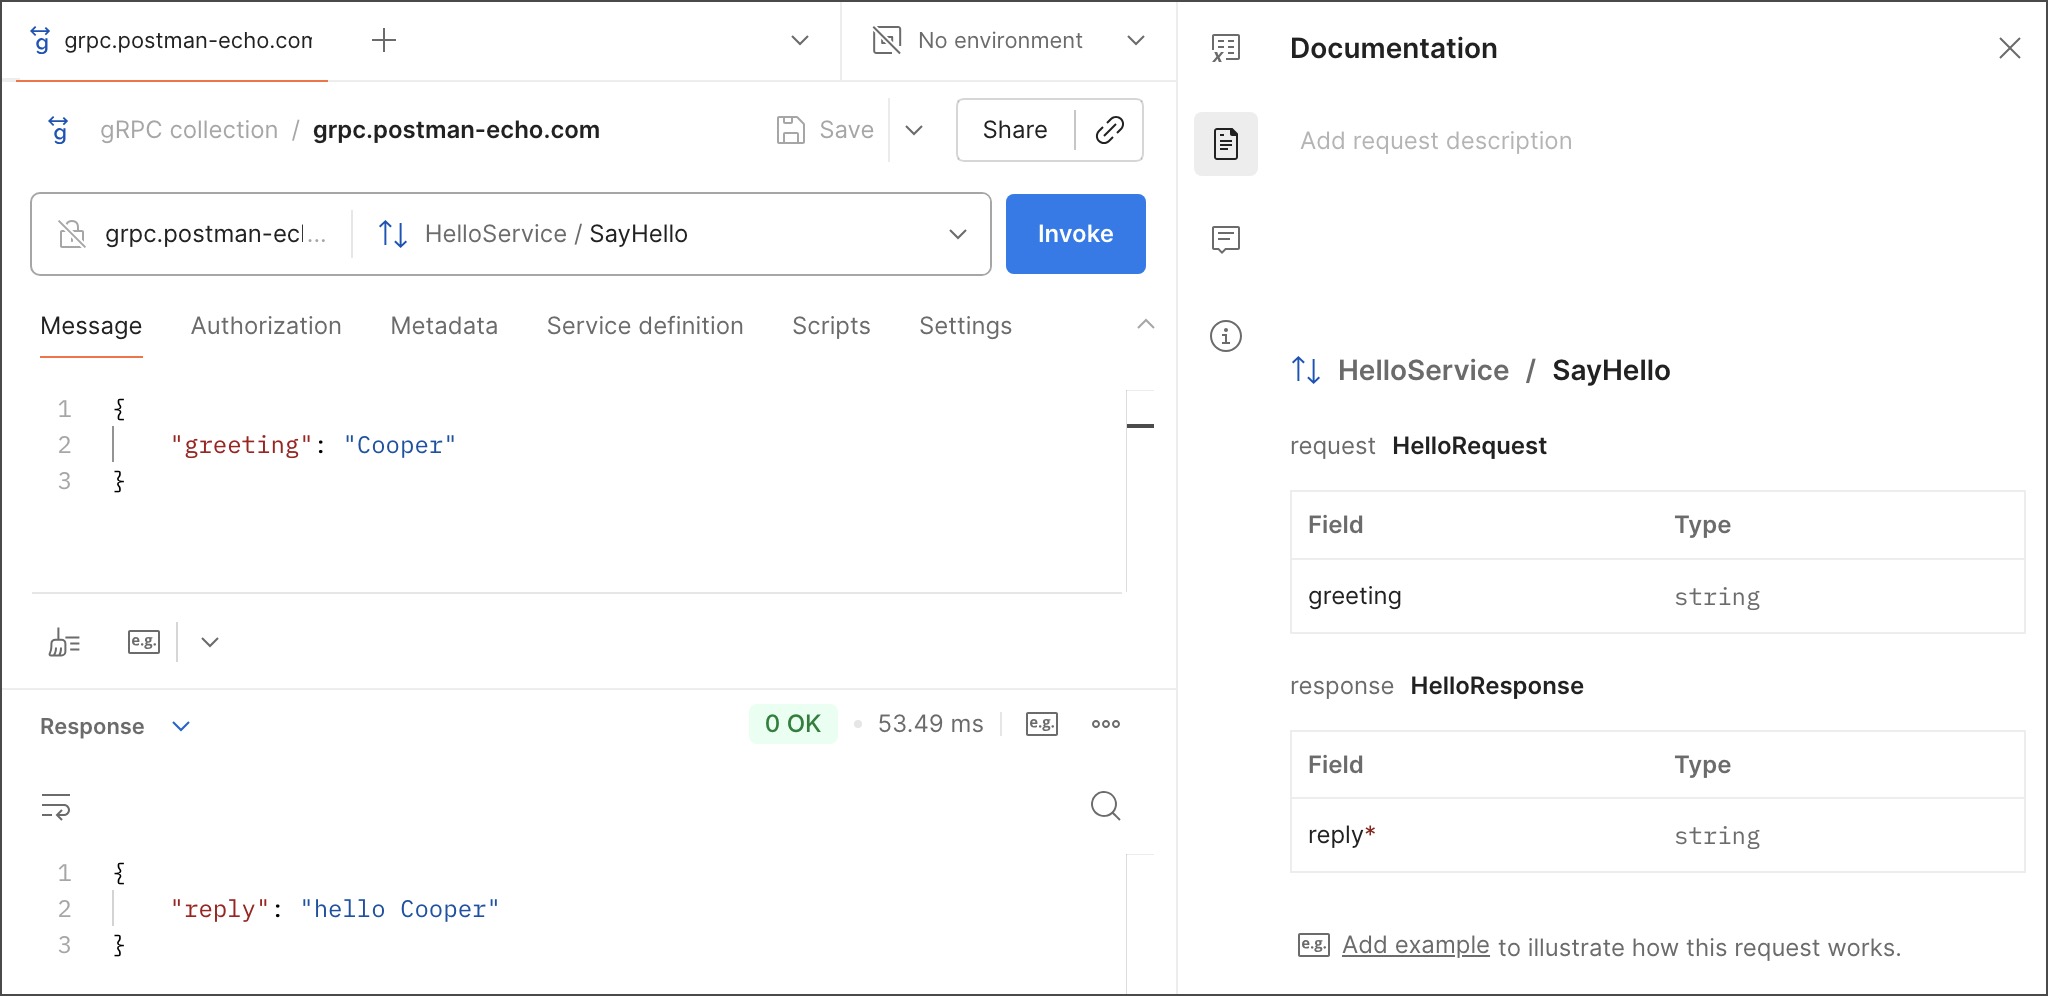
In the right sidebar, you can access your gRPC request’s documentation, comments, and request details.
-
Documentation — Click
 Documentation to view the request’s documentation. When you select a method, Postman automatically generates documentation for the payload fields and data types using the protobuf definition. You can also add a description to help users understand and use the request. Click Add request description, then write your content using Postman’s built-in editing tools. Or click
  Open Agent to write content with the Postman Agent.
You can also add a description to your collection’s overview or a folder in your collection. Select the collection or folder in the sidebar, then click Add collection description or Add folder description.
-
Code snippet — Click
 Code snippet to copy the request’s gRPCurl command.
 -
Comments — Click
 Comments to collaborate with your teammates as you work on a gRPC request. You can use ”@” to tag others to ask a question, give feedback, and discuss your request.
 -
Info — Click
 Info to view details about a request, including its ID, creation date, and the date when it was last updated.
Next steps
After learning about the basic interface elements, try invoking your first gRPC request.