Configure SSO
This feature is available on Postman Enterprise plans and Team plans with the Simple Security add-on. For more information, see the pricing page.
Single sign-on (SSO) for Postman is configured by an Organization Manager or Admin. To configure SSO, add an authentication method, and then configure the identity provider (IdP) details.
To learn more about the user experience, see Signing in to SSO.
Configure single sign-on
To begin adding an authentication method, do the following:
-
Go to Organization or team settings, then click Authentication.
-
Click Add Authentication Method.
-
Select the authentication type.
-
Enter an authentication name that’s identifiable to your organization or team.
-
Click Continue to configure the IdP details.

Important
Always check with your authentication provider dashboard or your IT support staff for the correct information to configure SSO.
Configure the IdP details
After adding the authentication method, you can configure the IdP details.
Note
To configure the IdP details later, click Configure Later. When you’re ready to continue configuring the IdP details, see Editing SSO settings.
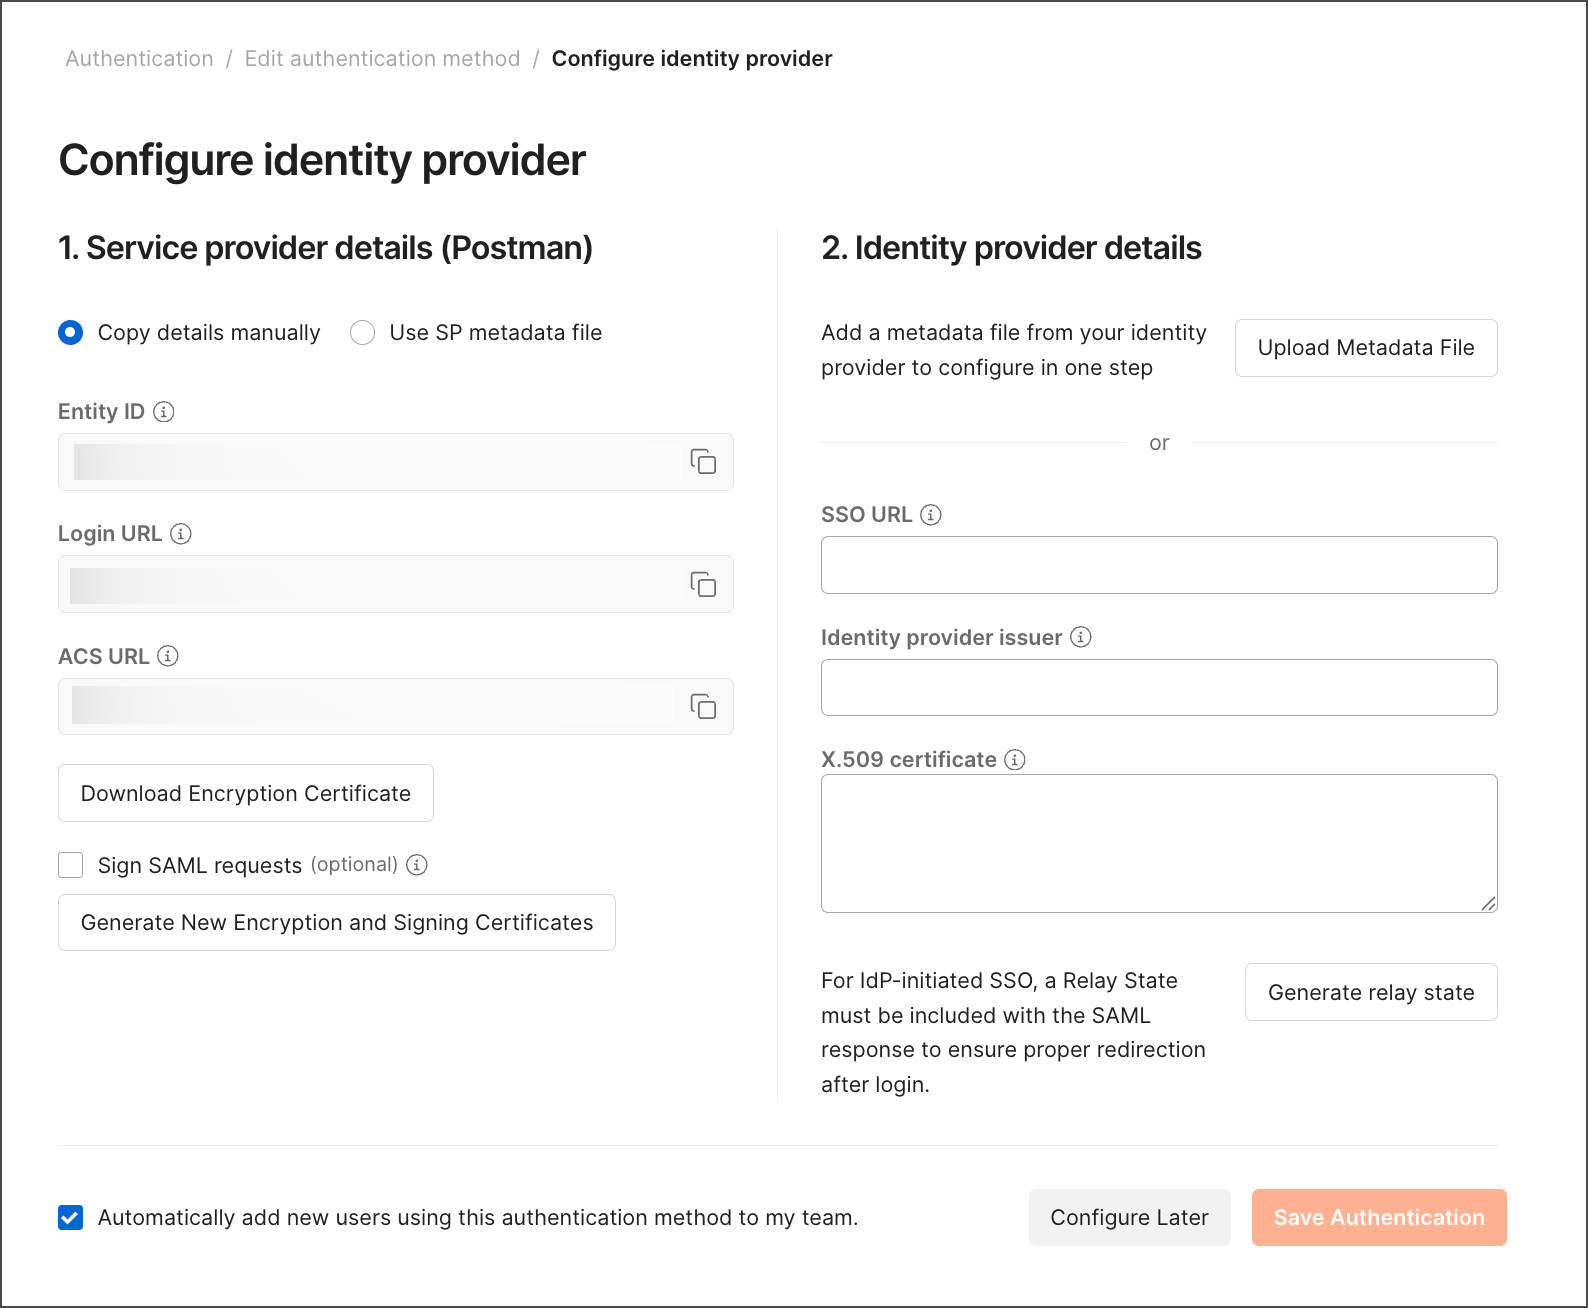
In the Service provider details (Postman) section, the Entity ID, Login URL, and ACS URL are already populated.
Fill in the Identity provider details section. From your IdP account, enter your SSO URL, Identity provider issuer, and X.509 Certificate. Instead, you can upload a metadata file to configure the IdP details in one step.
To enter details in the Identity provider details section, you must sign in to your IdP account and get the details. Refer to the corresponding section of the documentation and follow the outlined procedure there:
Optionally, you can select the Automatically add new users checkbox if you want users to automatically join your organization or team. The first time users sign in to Postman using this authentication method they will automatically join the organization or team.
Edit SSO settings
After configuring the authentication method for Postman, you can select the Status toggle to turn it on or off. This is a team-level option, so this setting applies to the whole organization or team.

To update the settings for an authentication method, click Edit, then click Continue.
To delete an authentication method, click Edit, then click Delete.

Create user accounts
The first time a new Postman user signs in to Postman using the authentication method, a Postman account is created, and the user is automatically added to the team if the following is true: the team has seats available and the Automatically add new users checkbox was selected during authentication method configuration.
The user is automatically associated to the organization or team with a Developer role and has access to team resources.
If the required conditions aren’t met to automatically join the organization or team, all Admins will receive your request to join.
Add existing user accounts
The first time an existing Postman user signs in to Postman using the authentication method, the user is automatically added to the organization or team if one of the following is true:
- The organization or team has available seats and the Automatically add new users checkbox was selected during authentication method configuration.
- An Admin has invited the user to join.
The user will be automatically associated to the organization or team with a Developer role and have access to organization or team resources.
Note
If the required conditions aren’t met to automatically join the organization or team, all Admins will receive your request to join.
Automatically add new users
The Automatically add new users checkbox in your authentication method determines whether users with accounts in your IdP can automatically join your organization or team. Sign in to Postman using the authentication method to automatically join.
Note
Automatically add new users will only work if your organization or team has user seats available. Your organization or team size won’t automatically increase if more users sign in with SSO.
Manage team sign-ins
By default, Postman only supports Service Provider (Postman)-initiated sign-ins for Postman Enterprise. Your users must sign in to Postman using the authentication method. If you require users to sign in using an IdP-initiated sign-in from your SSO portal, you can generate and copy the Relay state from your authentication method, and then save it in your IdP configuration. This ensures an extra level of security when the sign-in process is initiated through a source unknown to Postman.
Remove access
You must remove users from your Postman to prevent access to shared resources. When you remove a user from Postman, you’ll still retain access to any data they have shared. You’ll also be able to reassign their workspaces and the data within them to remaining members in some situations. To learn more, see Removing members.
Signing and encryption certificates
As an extra level of security, Postman provides optional SAML signing and encryption certificates. These certificates aren’t supported by all IdPs nor are they required in a typical Postman SAML SSO configuration. However, for organizations or teams with stricter security requirements, these certificates may be valuable options to implement.
Signing certificate
The signing certificate is an X.509 certificate used by Postman, the Service Provider (SP), to digitally sign SAML assertions sent to the Identity Provider (IdP). Signing ensures the authenticity and integrity of the SAML data by allowing the recipient (IdP) to verify that the message hasn’t been tampered with and comes from the expected sender.
To enable the signing certificate, do the following:
- In Postman’s SAML SSO settings, select the Sign SAML Requests box.
- Download the public certificate from Postman.
- Upload the public certificate to your IdP, and select to require signature verification. For verification steps, refer to your IdP documentation.
Warning
If you configure your IdP to require signature validation, and then turn off SAML signing in Postman, you may break your SSO integration. The IdP will expect a signature but Postman won’t send it.
Encryption certificate
The encryption certificate is an X.509 certificate used by the IdP to encrypt the SAML assertions (such as user attributes). The recipient of the SAML response, Postman (the SP), uses a stored private key to decrypt the encrypted SAML response assertions. Encryption ensures that only the intended recipient can read the protected information, providing confidentiality during transmission.
To enable the encryption certificate, do the following:
- In Postman’s SAML SSO settings, download the encryption certificate.
- Upload the public certificate to your IdP for encrypting. For encryption steps, refer to your IdP documentation.
Tip
You can rotate the encryption and signing certificates at your own convenience. Click Generate New Encryption and Signing Certificates, then download them for encryption and signature verification. Upload the new certificate to your IdP immediately, to avoid authentication failures.
Troubleshoot SSO issues
Learn more about common SSO issues and how to troubleshoot them.
If you experience an error after signing in to Postman using SSO, check the type of error and these possible solutions:
- Your IdP returns a 404 error. Make sure the SSO URL is correctly copied from your IdP to your authentication method in Postman.
- Postman returns a 500 error. Make sure the X.509 Certificate is correctly copied from your IdP to your authentication method in Postman.
- Postman returns a 404 error. Make sure the values in the Service provider details (Postman) section are correctly copied from your authentication method in Postman to your IdP.
- Postman returns a page explaining that the sign-in request expired. Make sure the Relay state is correctly copied from your authentication method in Postman to your IdP.
For more common SSO issues, see the following:
- An email address isn’t associated with your team members. In your IdP configuration settings, make sure the username format is set to Email.
Next steps
Now that you’ve set up SSO, you might be interested in learning about how your organization or team will interact with SSO and continuing on with SCIM (System for Cross-domain Identity Management) provisioning.