Manage and organize Postman Collections
You can save, organize, and find all of your API requests in Postman Collections. Use folders in collections to group requests by type or use case, and reorder requests to replicate workflows. You can also reorder requests alphabetically. If you don’t want to keep a change, you can revert your collection to an earlier state.
Collection basics
To view all collections in the current workspace, click ![]() Items, then expand Collections in the sidebar. From here you can take the following actions:
Items, then expand Collections in the sidebar. From here you can take the following actions:
- Click a collection to open its overview in the workbench and expand its contents.
- Hover over a collection and click
 Add to favorites to move that collection to the top of the list.
 - Use the search box in the sidebar to filter collections and their contents.
- Reorder the requests, folders, and examples inside a collection by dragging and dropping them.
- Alphabetize the collection’s folders and requests by hovering over a collection and selecting
 View more actions > Sort and select a sort option.
 - Press and hold ⌘ or Ctrl and click the HTTP collection elements you’d like to bulk select.
Add folders to a collection
Use folders to organize the requests and examples in a collection. You can also add subfolders to create more levels of nesting.
-
To add a folder, click
View more actions next to the collection, then click Add folder. -
To add a subfolder, click
View more actions next to a folder, then click Add folder.
You can add collection items to folders or subfolders by dragging and dropping them.
Delete a collection
Delete an HTTP or multi-protocol collection if you no longer need it. You can delete collections where you have Editor permissions.
Delete an HTTP collection
To delete an HTTP collection, do the following:
-
Click
View more actions next to a collection, then click Delete. You can also click the collection and then press Delete on your keyboard. -
Review the collection in the delete dialog. You can take the following actions before you delete:
- Click forks to view details about the collection’s forks and the users who have created them.
- Click monitors to view the monitors created from the collection.
- Click mock servers to view the mock servers associated with the collection.
- If the collection is larger than 30 MB, you can click Export to back up the collection before deleting it. You can’t restore a deleted collection if it’s larger than 30 MB.
If a collection is larger than 30 MB, you can split the collection’s contents into multiple, smaller collections before deleting it. This gives you the option to restore the collections later.
-
Click Delete
-
If the collection has requests, enter “delete” then click Delete Collection.
You can also bulk select multiple HTTP collections to delete them at the same time. Press and hold ⌘ or Ctrl, click the collections you’d like to bulk select, then press Delete on your keyboard.
Delete a multi-protocol collection
To delete a multi-protocol collection, do the following:
-
Click
View more actions next to a collection, then click Delete. You can also click the collection and then press Delete on your keyboard. -
Review the collection in the delete dialog. You can take the following actions before you delete:
- Click forks to view details about the collection’s forks and the users who have created them.
-
Click Delete
-
If the collection has requests, enter “delete” then click Delete Collection.
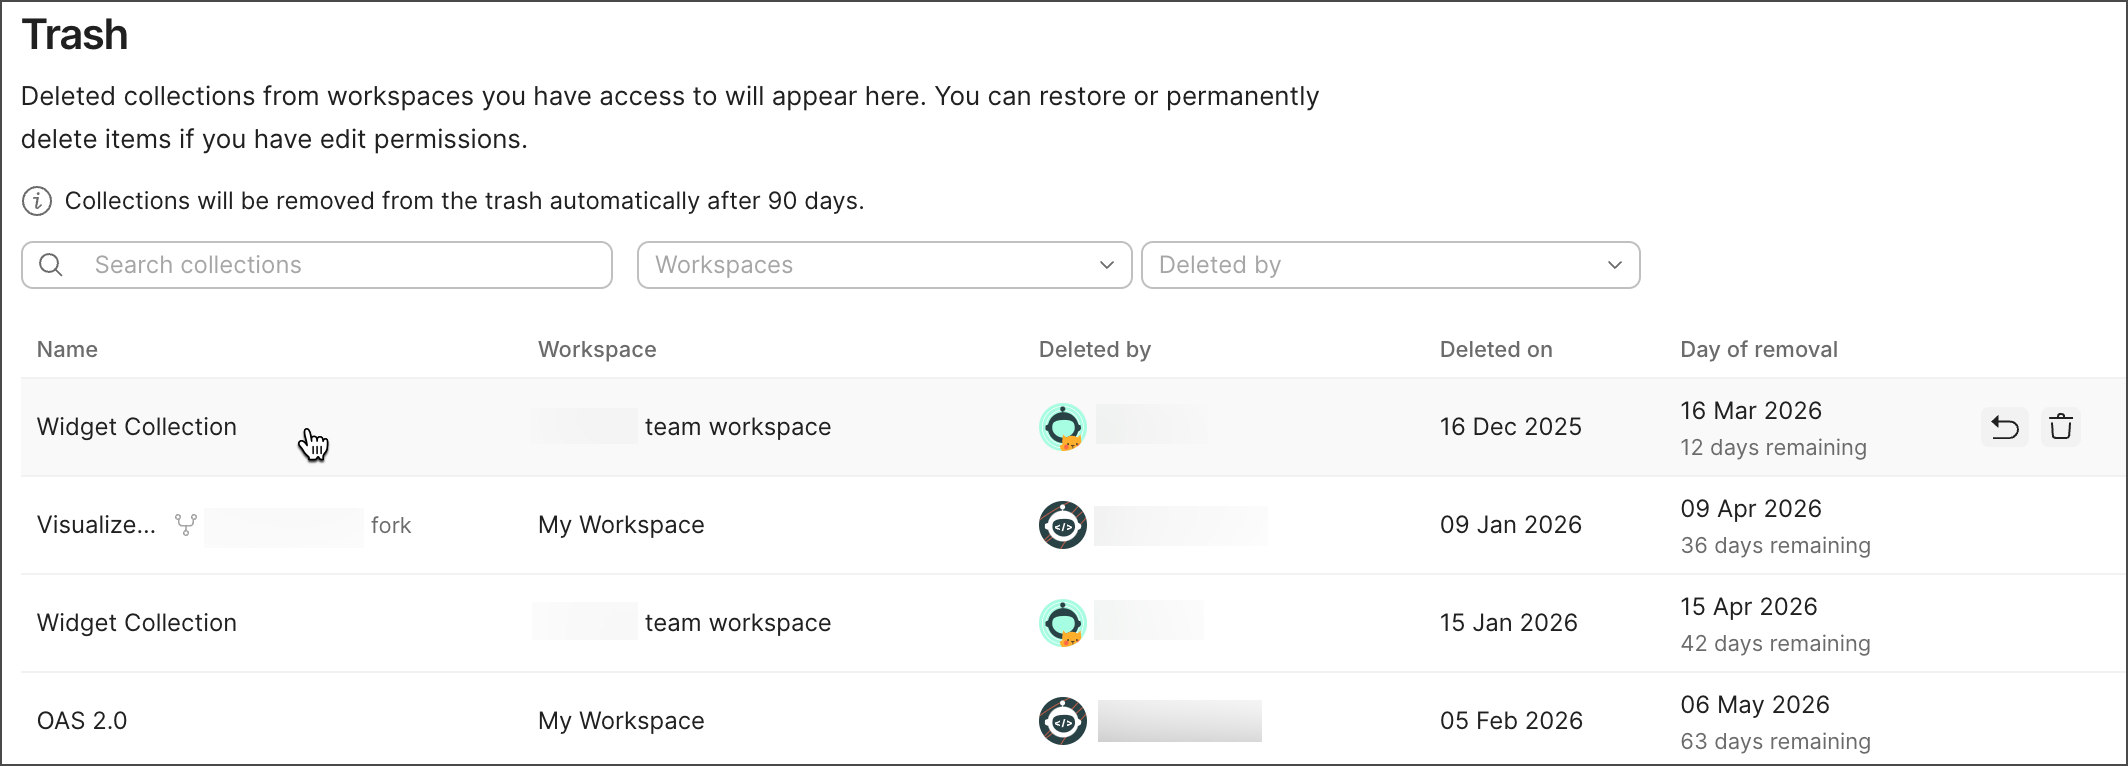
View a deleted collection
You can view HTTP collections that you and other team members deleted. Deleted collections are retained for a limited period of time depending on your Postman plan.
To view collections you and your team members deleted, click Tools > ![]() Trash in the Postman footer.
Trash in the Postman footer.
You can view collections that you and other team members deleted, including collections from workspaces you deleted. For each collection, you can view the collection’s name, workspace it was deleted from, user who deleted it, and the date it was deleted. You can also view the date the collection will be permanently deleted.
Take the following actions to manage your team’s deleted collections:
- Click the Search collections box and search for a collection by name.
- Click the Workspaces dropdown list, then select the workspace a collection was deleted from.
- Click the Deleted by dropdown list, then select a user who deleted the collection.
- Click a collection to view more information, such as the number of times it was forked.
- To restore a collection, hover over it and click
 Restore.
 - To permanently delete a collection, hover over it and click
 Delete permanently.
If a collection you expected to be in the trash isn’t there, it may have been moved to another workspace rather than deleted. Learn more about moving elements.
Use the changelog
To review the changelog for a collection in Postman, open the collection and click ![]() Last updated in the collection overview. Or, click
Last updated in the collection overview. Or, click ![]() Changelog in the right sidebar.
Changelog in the right sidebar.
The changelog provides a chronological list of the collection’s activities. You can view the time and date at which changes occurred, the users who made changes, and the affected parts of the collection.
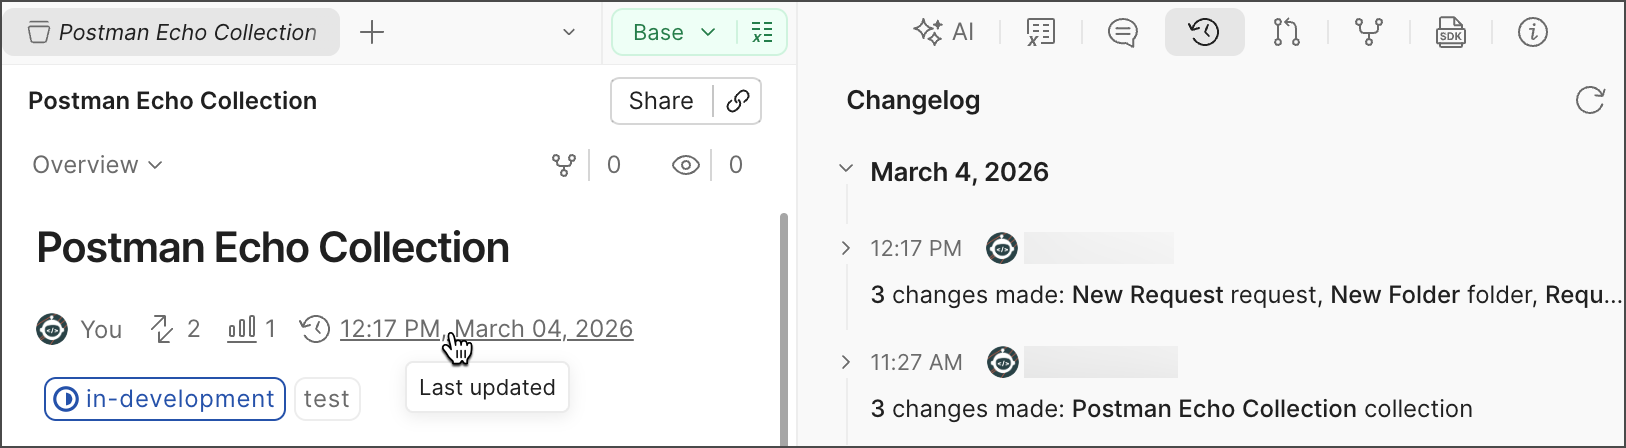
Changes made within several minutes of each other are grouped into sessions for readability. You can select a session in the changelog to review its changes.
Click View diff to view the collection’s diff. If a diff is too large to view in the changelog, you can hover over the diff and click View more to open it in a new tab.
Hide diffs in the changelog
If you have an Editor role for a collection, you can hide specific actions in its changelog. When you hide a changelog entry’s diff, users who don’t have Editor permissions on the collection can’t view that diff in the changelog. This enables you to protect sensitive data in a public collection.
-
To hide a diff, click
for the changelog entry, then click Hide diff for this change. -
To restore the visibility of a diff, click
for the changelog entry, then click Show diff to all users. Once you restore the visibility of a diff, all users can view it in the changelog.
Recover or permanently delete a collection
You can recover and permanently delete HTTP collections you and other team members deleted where you had Admin or Editor permissions. The actions you can take on the deleted collection depend on the roles you were assigned when the collection was deleted. Deleted collections are retained for a limited period of time depending on your Postman plan.
You can also recover and permanently delete collections that were in workspaces you deleted. If a team member deletes a workspace, you won’t be able to view or take any actions on the deleted collections, even if you had Admin or Editor permissions.
Users on paid plans receive emails that notify you when collections will permanently delete from your team. Once a collection is permanently deleted, it can’t be recovered. The email will include collections you created or deleted.
You can’t recover deleted collections that are larger than 30 MB.
Recover a deleted collection
To recover a deleted collection, do the following:
- In the Postman footer, click Tools > Trash.
- Hover over a collection and click Restore. Or, click the collection and select Restore.
- Choose the workspace where you’d like to restore the collection.
- Click Restore Collection.
Permanently delete a collection
To permanently delete a collection, do the following:
- In the Postman footer, click Tools > Trash.
- Hover over a collection, and click Delete permanently. Or, click the collection and select Delete.
- Click Delete to confirm.
Revert collection changes
Postman retains a changelog of the changes made to a collection. If needed, you can revert the collection to an earlier state.
- Click
 Last updated in the collection overview. Or, click Changelog in the right sidebar.
 - Click a changelog entry to expand it.
- Click next to a change and click Restore to this change.
The collection is reverted to the state it was in after the selected change.
To restore a deleted collection, see Recover or permanently delete a collection.